New in Confluent Cloud: Making Data & Pipelines Accessible for AI-Ready Streaming | Learn More
Introducing the Kafka Consumer: Getting Started with the New Apache Kafka 0.9 Consumer Client
When Apache Kafka® was originally created, it shipped with a Scala producer and consumer client. Over time we came to realize many of the limitations of these APIs. For example, we had a “high-level” consumer API which supported consumer groups and handled failover, but didn’t support many of the more complex usage scenarios. We also had a “simple” consumer client which provided full control, but required users to manage failover and error handling themselves. So we set about redesigning these clients in order to open up many use cases that were hard or impossible with the old clients and establish a set of APIs we could support over the long haul.
The first phase of this was rewriting the Producer API in 0.8.1. The recent 0.9 release completed the second phase with the introduction of the new Consumer API. Building on top of a new group coordination protocol provided by Kafka itself, the new consumer brings the following advantages:
- Clean Consolidated API: the new consumer combines the capabilities of both the older “simple” and “high-level” consumer clients, providing both group coordination and lower level access to build your own consumption strategy with.
- Reduced Dependencies: the new consumer is written in pure Java. It has no dependence on the Scala runtime or on Zookeeper, which makes it a much lighter library to include in your project.
- Better Security: the security extensions implemented in Kafka 0.9 are only supported by the new consumer.
- This new consumer also adds a set of protocols for managing fault-tolerant groups of consumer processes. Previously this functionality was implemented with a thick Java client (that interacted heavily with Zookeeper). The complexity of this logic made it hard to build fully featured consumers in other languages. With the introduction of this new protocol, this has now become far far easier. In fact we’ve moved the C client over to this protocol already.
Although the new consumer uses a redesigned API and a new coordination protocol, the concepts are not fundamentally different, so users familiar with the old consumer shouldn’t have much trouble understanding it. However, there are some subtle details in particular with respect to group management and the threading model which requires some extra care. The purpose of this tutorial is to cover the basic usage of the new consumer and explain all of these details.
One word of caution: at the time of this writing, the new consumer is still considered “beta” in terms of stability. We have fixed several important bugs in the 0.9.0 branch, so if you run into any problems using the 0.9.0.0 release of Kafka, we encourage you to test against that branch. If you still see issues, please report it on the Kafka mailing list or on the Kafka JIRA.
Getting Started
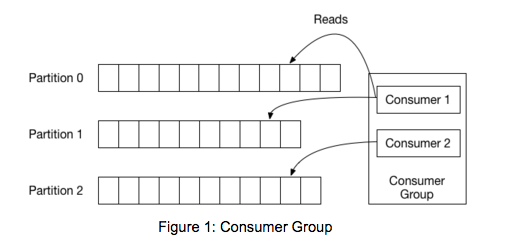
Before getting into the code, we should review some basic concepts. In Kafka, each topic is divided into a set of logs known as partitions. Producers write to the tail of these logs and consumers read the logs at their own pace. Kafka scales topic consumption by distributing partitions among a consumer group, which is a set of consumers sharing a common group identifier. The diagram below shows a single topic with three partitions and a consumer group with two members. Each partition in the topic is assigned to exactly one member in the group.
While the old consumer depended on Zookeeper for group management, the new consumer uses a group coordination protocol built into Kafka itself. For each group, one of the brokers is selected as the group coordinator. The coordinator is responsible for managing the state of the group. Its main job is to mediate partition assignment when new members arrive, old members depart, and when topic metadata changes. The act of reassigning partitions is known as rebalancing the group.
When a group is first initialized, the consumers typically begin reading from either the earliest or latest offset in each partition. The messages in each partition log are then read sequentially. As the consumer makes progress, it commits the offsets of messages it has successfully processed. For example, in the figure below, the consumer’s position is at offset 6 and its last committed offset is at offset 1.
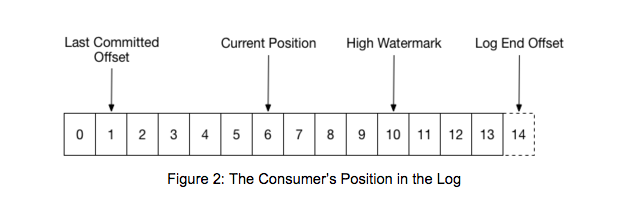
When a partition gets reassigned to another consumer in the group, the initial position is set to the last committed offset. If the consumer in the example above suddenly crashed, then the group member taking over the partition would begin consumption from offset 1. In that case, it would have to reprocess the messages up to the crashed consumer’s position of 6.
The diagram also shows two other significant positions in the log. The log end offset is the offset of the last message written to the log. The high watermark is the offset of the last message that was successfully copied to all of the log’s replicas. From the perspective of the consumer, the main thing to know is that you can only read up to the high watermark. This prevents the consumer from reading unreplicated data which could later be lost.
Configuration and Initialization
To get started with the consumer, add the kafka-clients dependency to your project. The maven snippet is provided below:
<dependency>
  <groupId>org.apache.kafka</groupId>
  <artifactId>kafka-clients</artifactId>
  <version>0.9.0.0-cp1</version>
</dependency>
The consumer is constructed using a Properties file just like the other Kafka clients. In the example below, we provide the minimal configuration needed to use consumer groups.
Properties props = new Properties();
props.put("bootstrap.servers", "localhost:9092");
props.put("group.id", "consumer-tutorial");
props.put("key.deserializer", StringDeserializer.class.getName());
props.put("value.deserializer", StringDeserializer.class.getName());
KafkaConsumer<String, String> consumer = new KafkaConsumer<>(props);
Just as in the old consumer and the producer, we need to configure an initial list of brokers for the consumer to be able discover the rest of the cluster. This doesn’t need to be all the servers in the cluster—the client will determine the full set of alive brokers from the brokers in this list. We have assumed here that the broker is running on localhost. The consumer also needs to be told how to deserialize message keys and values. Finally, to join a consumer group, we need to configure the group id. As we proceed through this tutorial, we’ll introduce more of the configuration.
Topic Subscription
To begin consumption, you must first subscribe to the topics your application needs to read from. In the example below, we subscribe to the topics “foo” and “bar.”
consumer.subscribe(Arrays.asList("foo", "bar"));
After you have subscribed, the consumer can coordinate with the rest of the group to get its partition assignment. This is all handled automatically when you begin consuming data. Later we will show how you can assign partitions manually using the assign API, but keep in mind that it is not possible to mix automatic and manual assignment.
The subscribe method is not incremental: you must include the full list of topics that you want to consume from. You can change the set of topics you’re subscribed to at any time–any topics previously subscribed to will be replaced by the new list when you call subscribe.
Basic Poll Loop
The consumer needs to be able to fetch data in parallel, potentially from many partitions for many topics likely spread across many brokers. To do this it uses an API style similar to the poll or select call in unix: once topics are registered, all future coordination, rebalancing, and data fetching is driven through a single poll call meant to be invoked in an event loop. This allows for a simple and efficient implementation which can handle all IO from a single thread.
After subscribing to a topic, you need to start the event loop to get a partition assignment and begin fetching data. It sounds complex, but all you need to do is call poll in a loop and the consumer handles the rest. Each call to poll returns a (possibly empty) set of messages from the partitions that were assigned. The example below shows a basic poll loop which prints the offset and value of fetched records as they arrive:
try {
  while (running) {
    ConsumerRecords<String, String> records = consumer.poll(1000);
    for (ConsumerRecord<String, String> record : records)
      System.out.println(record.offset() + ": " + record.value());
  }
} finally {
  consumer.close();
}
The poll API returns fetched records based on the current position. When the group is first created, the position will be set according to the reset policy (which is typically either set to the earliest or latest offset for each partition). Once the consumer begins committing offsets, then each later rebalance will reset the position to the last committed offset. The parameter passed to poll controls the maximum amount of time that the consumer will block while it awaits records at the current position. The consumer returns immediately as soon as any records are available, but it will wait for the full timeout specified before returning if nothing is available.
The consumer is designed to be run in its own thread. It is not safe for multithreaded use without external synchronization and it is probably not a good idea to try. In this example, we’ve used a flag which can be used to break from the poll loop when the application is shutdown. When this flag is set to false from another thread (e.g. to shutdown the process), the loop will break as soon as poll returns and the application finishes processing whatever records were returned.
You should always close the consumer when you are finished with it. Not only does this clean up any sockets in use, it ensures that the consumer can alert the coordinator about its departure from the group.
This example uses a relatively small timeout to ensure that there is not too much delay when shutting down the consumer. Alternatively, you can use a long timeout and break from the loop using the wakeup API.
try {
  while (true) {
    ConsumerRecords<String, String> records = consumer.poll(Long.MAX_VALUE);
    for (ConsumerRecord<String, String> record : records)
      System.out.println(record.offset() + “: ” + record.value());
  }
} catch (WakeupException e) {
  // ignore for shutdown
} finally {
  consumer.close();
}
We’ve changed the timeout to use Long.MAX_VALUE, which basically means the consumer will block indefinitely until the next records can be returned. Instead of setting the flag in the previous example, the thread triggering the shutdown can then call consumer.wakeup() to interrupt an active poll, causing it to throw a WakeupException. This API is safe to use from another thread. Note that if there is no active poll in progress, the exception will be raised from the next call. In this example, we catch the exception to prevent it from being propagated.
Putting it all Together
In the next example, we’ll put all of this together to build a simple Runnable task which initializes the consumer, subscribes to a list of topics, and executes the poll loop indefinitely until shutdown externally.
public class ConsumerLoop implements Runnable {
  private final KafkaConsumer<String, String> consumer;
  private final List<String> topics;
  private final int id;

  public ConsumerLoop(int id,
                      String groupId,
                      List<String> topics) {
    this.id = id;
    this.topics = topics;
    Properties props = new Properties();
    props.put(“group.id”, groupId);
    props.put(“key.deserializer”, StringDeserializer.class.getName());
    props.put(“value.deserializer”, StringDeserializer.class.getName());
    this.consumer = new KafkaConsumer<>(props);
  }

  @Override
  public void run() {
    try {
      consumer.subscribe(topics);

      while (true) {
        ConsumerRecords<String, String> records = consumer.poll(Long.MAX_VALUE);
        for (ConsumerRecord<String, String> record : records) {
          Map<String, Object> data = new HashMap<>();
          data.put("partition", record.partition());
          data.put("offset", record.offset());
          data.put("value", record.value());
          System.out.println(this.id + ": " + data);
        }
      }
    } catch (WakeupException e) {
      // ignore for shutdown
    } finally {
      consumer.close();
    }
  }

  public void shutdown() {
    consumer.wakeup();
  }
}
To test this example, you will need a Kafka broker running release 0.9.0.0 and a topic with some string data to consume. The easiest way to write a bunch of string data to a topic is to using the kafka-verifiable-producer.sh script. To make it interesting, we should also make sure the topic has more than one partition so that one member isn’t left doing all the work. For example, with a single Kafka broker and Zookeeper both running on localhost, you might do the following from the root of the Kafka distribution:
# bin/kafka-topics.sh --create --topic consumer-tutorial --replication-factor 1 --partitions 3 --zookeeper localhost:2181

# bin/kafka-verifiable-producer.sh --topic consumer-tutorial --max-messages 200000 --broker-list localhost:9092
Then we can create a small driver to setup a consumer group with three members, all subscribed to the same topic we have just created.
public static void main(String[] args) {
  int numConsumers = 3;
  String groupId = "consumer-tutorial-group"
  List<String> topics = Arrays.asList("consumer-tutorial");
  ExecutorService executor = Executors.newFixedThreadPool(numConsumers);

  final List<ConsumerLoop> consumers = new ArrayList<>();
  for (int i = 0; i < numConsumers; i++) {
    ConsumerLoop consumer = new ConsumerLoop(i, topics);
    consumers.add(consumer);
    executor.submit(consumer);
  }

  Runtime.getRuntime().addShutdownHook(new Thread() {
    @Override
    public void run() {
      for (ConsumerLoop consumer : consumers) {
        consumer.shutdown();
      }
    }
  });
}
This example submits the three runnable consumers to an executor. Each thread is given a separate id so that you can see which thread is receiving data. The shutdown hook will be invoked when you stop the process, which will halt the three threads using wakeup and wait for them to shutdown. If you run this, you should see lots of data from all of the threads. Here is a sample from one run:
2: {partition=0, offset=928, value=2786}
2: {partition=0, offset=929, value=2789}
1: {partition=2, offset=297, value=891}
2: {partition=0, offset=930, value=2792}
1: {partition=2, offset=298, value=894}
2: {partition=0, offset=931, value=2795}
0: {partition=1, offset=278, value=835}
2: {partition=0, offset=932, value=2798}
0: {partition=1, offset=279, value=838}
1: {partition=2, offset=299, value=897}
1: {partition=2, offset=300, value=900}
1: {partition=2, offset=301, value=903}
1: {partition=2, offset=302, value=906}
1: {partition=2, offset=303, value=909}
1: {partition=2, offset=304, value=912}
0: {partition=1, offset=280, value=841}
2: {partition=0, offset=933, value=2801}
The output shows consumption across all three partitions. Each partition has been assigned to one of the threads. Within each partition, you can see the offsets increasing as expected. You can shutdown the process using Ctrl-C from the command line or through your IDE.
Consumer Liveness
When part of a consumer group, each consumer is assigned a subset of the partitions from topics it has subscribed to. This is basically a group lock on those partitions. As long as the lock is held, no other members in the group will be able to read from them. When your consumer is healthy, this is exactly what you want. It’s the only way that you can avoid duplicate consumption. But if the consumer dies due to a machine or application failure, you need that lock to be released so that the partitions can be assigned to a healthy member.
Kafka’s group coordination protocol addresses this problem using a heartbeat mechanism. After every rebalance, all members of the current generation begin sending periodic heartbeats to the group coordinator. As long as the coordinator continues receiving heartbeats, it assumes that members are healthy. On every received heartbeat, the coordinator starts (or resets) a timer. If no heartbeat is received when the timer expires, the coordinator marks the member dead and signals the rest of the group that they should rejoin so that partitions can be reassigned. The duration of the timer is known as the session timeout and is configured on the client with the setting session.timeout.ms.
props.put("session.timeout.ms", "60000");
The session timeout ensures that the lock will be released if the machine or application crashes or if a network partition isolates the consumer from the coordinator. However, application failures are a little trickier to handle generally. Just because the consumer is still sending heartbeats to the coordinator does not necessarily mean that the application is healthy.
The consumer’s poll loop is designed to handle this problem. All network IO is done in the foreground when you call poll or one of the other blocking APIs. The consumer does not use any background threads. This means that heartbeats are only sent to the coordinator when you call poll. If your application stops polling (whether because the processing code has thrown an exception or a downstream system has crashed), then no heartbeats will be sent, the session timeout will expire, and the group will be rebalanced. The only problem with this is that a spurious rebalance might be triggered if the consumer takes longer than the session timeout to process messages. You should therefore set the session timeout large enough to make this unlikely. The default is 30 seconds, but it’s not unreasonable to set it as high as several minutes. The only downside of a larger session timeout is that it will take longer for the coordinator to detect genuine consumer crashes.
Delivery Semantics
When a consumer group is first created, the initial offset is set according to the policy defined by the auto.offset.reset configuration setting. Once the consumer begins processing, it commits offsets regularly according to the needs of the application. After every subsequent rebalance, the position will be set to the last committed offset for that partition in the group. If the consumer crashes before committing offsets for messages that have been successfully processed, then another consumer will end up repeating the work. The more frequently you commit offsets, the less duplicates you will see in a crash. In the examples thus far, we have assumed that the automatic commit policy is enabled. When the setting enable.auto.commit is set to true (which is the default), the consumer automatically triggers offset commits periodically according to the interval configured with “auto.commit.interval.ms.” By reducing the commit interval, you can limit the amount of re-processing the consumer must do in the event of a crash. To use the consumer’s commit API, you should first disable automatic commit by setting enable.auto.commit to false in the consumer’s configuration.
props.put("enable.auto.commit", "false");
The commit API itself is trivial to use, but the most important point is how it is integrated into the poll loop. The following examples therefore include the full poll loop with the commit details in bold. The easiest way to handle commits manually is with the synchronous commit API:
try {
  while (running) {
    ConsumerRecords<String, String> records = consumer.poll(1000);
    for (ConsumerRecord<String, String> record : records)
      System.out.println(record.offset() + ": " + record.value());

    try {
      consumer.commitSync();
    } catch (CommitFailedException e) {
      // application specific failure handling
    }
  }
} finally {
  consumer.close();
}
Using the commitSync API with no arguments commits the offsets returned in the last call to poll. This call will block indefinitely until either the commit succeeds or it fails with an unrecoverable error. The main error you need to worry about occurs when message processing takes longer than the session timeout. When this happens, the coordinator kicks the consumer out of the group, which results in a thrown CommitFailedException. Your application should handle this error by trying to rollback any changes caused by the consumed messages since the last successfully committed offset.
Typically you should ensure that offset are committed only after the messages have been successfully processed. If the consumer crashes before a commit can be sent, then messages will have to be processed again. If the commit policy guarantees that the last committed offset never gets ahead of the current position, then you have “at least once” delivery semantics.
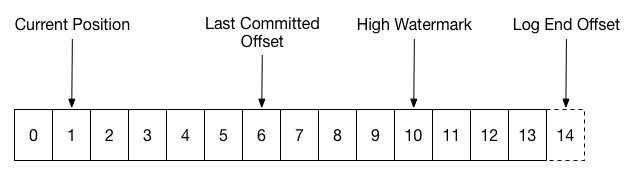
By changing the commit policy to guarantee instead that the current position never exceeds the last committed offset, as in the diagram above, you will get “at most once” delivery. If the consumer crashes before its position catches up to the last committed offset, then all messages in that gap will be “lost,” but you can be sure no message will be handled more than once. To implement this policy, we only have to change the order of the commit and the message handling.
try {
  while (running) {
    ConsumerRecords<String, String> records = consumer.poll(1000);

    try {
      consumer.commitSync();
      for (ConsumerRecord<String, String> record : records)
        System.out.println(record.offset() + ": " + record.value());
    } catch (CommitFailedException e) {
      // application specific failure handling
    }
  }
} finally {
  consumer.close();
}
Note that using the automatic commits gives you “at least once” processing since the consumer guarantees that offsets are only committed for messages which have been returned to the application. The number of messages you may have to reprocess in the worst case is bounded by the number of messages your application can process during the commit interval (as configured by auto.commit.interval.ms).
By using the commit API, however, you have much finer control over how much duplicate processing you are willing to accept. In the most extreme case, you could commit offsets after every message is processed, as in the following example:
try {
  while (running) {
    ConsumerRecords<String, String> records = consumer.poll(1000);

    try {
      for (ConsumerRecord<String, String> record : records) {
        System.out.println(record.offset() + ": " + record.value());
        consumer.commitSync(Collections.singletonMap(record.partition(), new OffsetAndMetadata(record.offset())));
      }
    } catch (CommitFailedException e) {
      // application specific failure handling
    }
  }
} finally {
  consumer.close();
}
In this example, we’ve passed the explicit offset we want to commit in the call to commitSync. The committed offset should always be the offset of the next message that your application will read. When commitSync is called with no arguments, the consumer commits the last offsets (plus one) that were returned to the application, but we can’t use that here since that since it would allow the committed position to get ahead of our actual progress.
Obviously committing after every message is probably not a great idea for most use cases since the processing thread has to block for each commit request to be returned from the server. This would kill throughput. A more reasonable approach might be to commit after every N messages where N can be tuned for better performance.
The argument to commitSync in this example is a map from the topic partition to an instance of OffsetAndMetadata. The commit API allows you to include some additional metadata with each commit. This could be used to record the time of the commit, the host which sent it, or any information needed by your application. In this example, we’ve left it empty.
Instead of committing on every message received, a more reasonably policy might be to commit offsets as you finish handling the messages from each partition. The ConsumerRecords collection provides access to the set of partitions contained in it and to the messages for each partition. The example below demonstrates this policy.
try {
  while (running) {
    ConsumerRecords<String, String> records = consumer.poll(Long.MAX_VALUE);
    for (TopicPartition partition : records.partitions()) {
      List<ConsumerRecord<String, String>> partitionRecords = records.records(partition);
      for (ConsumerRecord<String, String> record : partitionRecords)
        System.out.println(record.offset() + ": " + record.value());


      long lastoffset = partitionRecords.get(partitionRecords.size() - 1).offset();
      consumer.commitSync(Collections.singletonMap(partition, new OffsetAndMetadata(lastoffset)));
    }
  }
} finally {
  consumer.close();
}
The examples so far have focused on the synchronous commit API, but the consumer also exposes an asynchronous API, commitAsync. Using asynchronous commits will generally give you higher throughput since your application can begin processing the next batch of messages before the commit returns. The tradeoff is that you may only find out later that the commit failed. The example below shows the basic usage:
try {
  while (running) {
    ConsumerRecords<String, String> records = consumer.poll(1000);
    for (ConsumerRecord<String, String> record : records)
      System.out.println(record.offset() + ": " + record.value());

    consumer.commitAsync(new OffsetCommitCallback() {
      @Override
      public void onComplete(Map<TopicPartition, OffsetAndMetadata> offsets,
                             Exception exception) {
        if (exception != null) {
          // application specific failure handling
        }
      }
    });
  }
} finally {
  consumer.close();
}
Note that we’ve provided a callback to commitAsync, which is invoked by the consumer when the commit finishes (either successfully or not). If you don’t need this, you can also call commitAsync with no arguments.
Consumer Group Inspection
When a consumer group is active, you can inspect partition assignments and consumption progress from the command line using the consumer-groups.sh script, which is located in the bin directory of the Kafka distribution.
# bin/kafka-consumer-groups.sh --new-consumer --describe --group consumer-tutorial-group --bootstrap-server localhost:9092
Which results in output like this:
GROUP, TOPIC, PARTITION, CURRENT OFFSET, LOG END OFFSET, LAG, OWNER
consumer-tutorial-group, consumer-tutorial, 0, 6667, 6667, 0, consumer-1_/127.0.0.1
consumer-tutorial-group, consumer-tutorial, 1, 6667, 6667, 0, consumer-2_/127.0.0.1
consumer-tutorial-group, consumer-tutorial, 2, 6666, 6666, 0, consumer-3_/127.0.0.1
This shows all the partitions assigned within the consumer group, which consumer instance owns it, and the last committed offset (reported here as the “current offset”). The lag of a partition is the difference between the log end offset and the last committed offset. Administrators can monitor this to ensure that the consumer group is keeping up with the producers.
Using Manual Assignment
As mentioned at the start of this tutorial, the new consumer implements lower level access for use cases which don’t need consumer groups. The convenience of this is one of the strongest reasons to adopt this API. The older “simple” consumer also provided this, but it required you to do a lot of error handling yourself. With the new consumer, you just need to assign the partitions you want to read from and then start polling for data.
The example below shows how to assign all the partitions from a topic using the partitionsFor API.
List<TopicPartition> partitions = new ArrayList<>();
for (PartitionInfo partition : consumer.partitionsFor(topic))
  partitions.add(new TopicPartition(topic, partition.partition()));
consumer.assign(partitions);
Similar to subscribe, the call to assign must pass the full list of partitions you want to read from. Once partitions are assigned, the poll loop will work exactly like before.
One word of caution, however. All offset commits go through the group coordinator regardless of whether it is a simple consumer or a consumer group. Hence if you need to commit offsets, then you still must set group.id to a reasonable value to prevent conflicts with other consumers. If a simple consumer tries to commit offsets with a group id which matches an active consumer group, the coordinator will reject the commit (which will result in a CommitFailedException). However, there won’t be any errors if another simple consumer instance shares the same group id.
Conclusion
The new consumer brings a number of benefits to the Kafka community including a cleaner API, better security, and reduced dependencies. This tutorial introduced its basic usage with a focus on poll semantics and using the commit API to control delivery semantics. There are many more details to cover, but this should be enough to get you started. Although the consumer is still being actively worked on, we encourage you to give it a try. If you run into any problems, tell us about it on the Kafka mailing list.
If you have enjoyed this article, start learning how to build your first Kafka consumer application with Kafka Tutorials. If you need a Kafka cluster to work with, check out Confluent Cloud and use the promo code CL60BLOG to get $60 of additional free usage.* With a scales-to-zero, low-cost, only-pay-for-what-you-stream pricing model, Confluent Cloud is perfect for getting started with Kafka right through to running your largest deployments.
Did you like this blog post? Share it now
Subscribe to the Confluent blog


