New in Confluent Cloud: Making Data & Pipelines Accessible for AI-Ready Streaming | Learn More
Trigger AWS Lambda Functions Directly from an Apache Kafka Topic
The distributed architecture of Apache Kafka® can cause the operational burden of managing it to quickly become a limiting factor for adoption and developer agility. For this reason, it is important to have easy access to a cloud-native, fully managed Apache Kafka as a service that frees you from the operational complexities, allowing you to focus on application development rather than on becoming experts at managing infrastructure.
This is where Confluent comes in. Built as a cloud-native service, Confluent offers a serverless experience with self-serve provisioning, elastic scaling, and usage-based billing so that you only pay for what you stream and not for provisioned infrastructure. Confluent protects your data using industry-standard security features, and the service reliability is backed by an enterprise-grade uptime SLA. In addition to fully managing your Kafka clusters, Confluent also has fully managed components including Schema Registry, connectors to popular cloud services such as Amazon S3 and Amazon Redshift, and ksqlDB—enabling you to harness the full power of real-time events without the operational burden.
As part of the AWS Partner Network (APN), Confluent enables AWS customers with their real-time event streaming needs. In fact, we have already announced our Service Ready Redshift designation for real-time analytics, AWS PrivateLink, as well as AWS Outposts for hybrid cloud streaming.
In this blog post, we will walk you through how to directly integrate AWS Lambda with Confluent by leveraging Lambda’s newly supported SASL/PLAIN authentication. This solution focuses on streaming data from Kafka topics into Amazon DynamoDB tables by triggering an AWS Lambda function—providing a completely serverless architecture.
Solution overview
AWS Lambda is a compute service that allows you to run code without provisioning or managing servers. AWS Lambda runs your code only when needed and scales automatically, from a few requests per day to thousands per second. You pay only for the compute time consumed—there is no charge when your code is not running. With AWS Lambda, you can run code for virtually any type of application or backend service—all with zero administration. We decided to use Lambda for the task of integrating data-in-motion due to the popularity of this pattern in AWS serverless design.
Amazon DynamoDB is a key-value and document database that delivers single-digit millisecond performance at any scale. It’s a fully managed, multi-region, multi-active, durable database with built-in security, backup and restore, and in-memory caching for internet-scale applications. DynamoDB can handle more than 10 trillion requests per day and can support peaks of more than 20 million requests per second.
Confluent is the world’s premier data-in-motion system built on top of Apache Kafka. Kafka is an open source distributed event streaming platform used by many companies for high-performance data pipelines, streaming analytics, data integration, and mission-critical applications. Our fully managed SaaS offering is a scalable, resilient, and secure cloud-native system. On top of fully managed Kafka, Confluent provides other services that allow both operators and developers to focus on building applications instead of managing clusters.
Figure 1 illustrates a high-level, end-to-end overview of the solution where streaming events coming from a Kafka topic are ingested into Amazon DynamoDB in near real-time via Lambda. Instead of using Kafka Connect in this solution, we are leveraging the direct Kafka SASL/PLAIN authentication support recently launched in AWS Lambda. With this direct integration, the Kafka topic can now directly trigger a Lambda function and process data downstream.
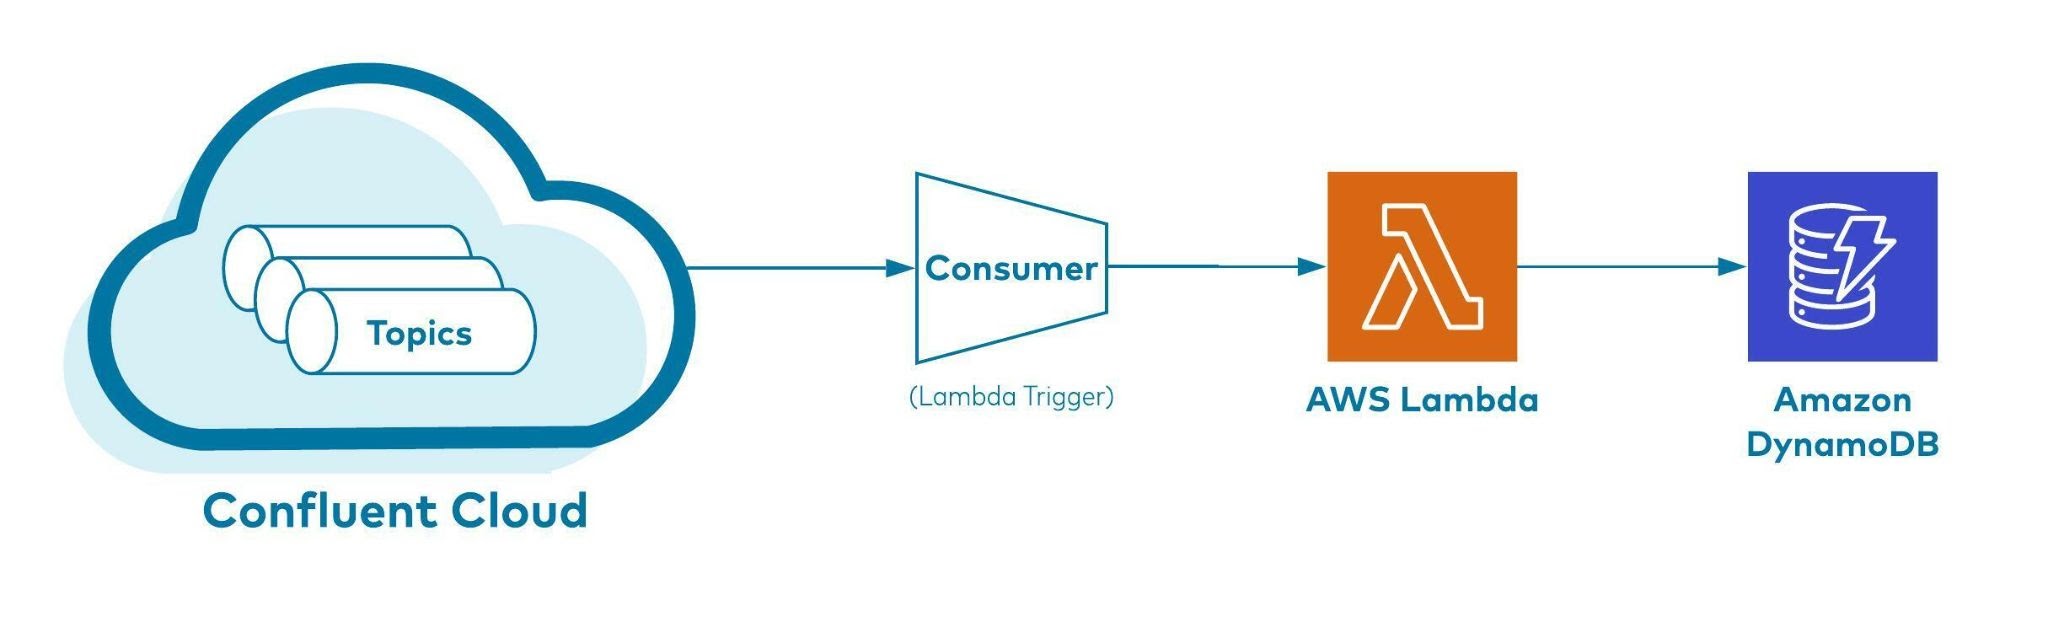
Figure 1: How event data flows from Confluent Cloud Kafka topics into DynamoDB
Figure 2 shows a holistic end-to-end flow of how event data flows from sources via producers and consumers to eventually being ingested into Amazon DynamoDB. Notice how the different services are spread across Confluent and the customer’s AWS accounts respectively.
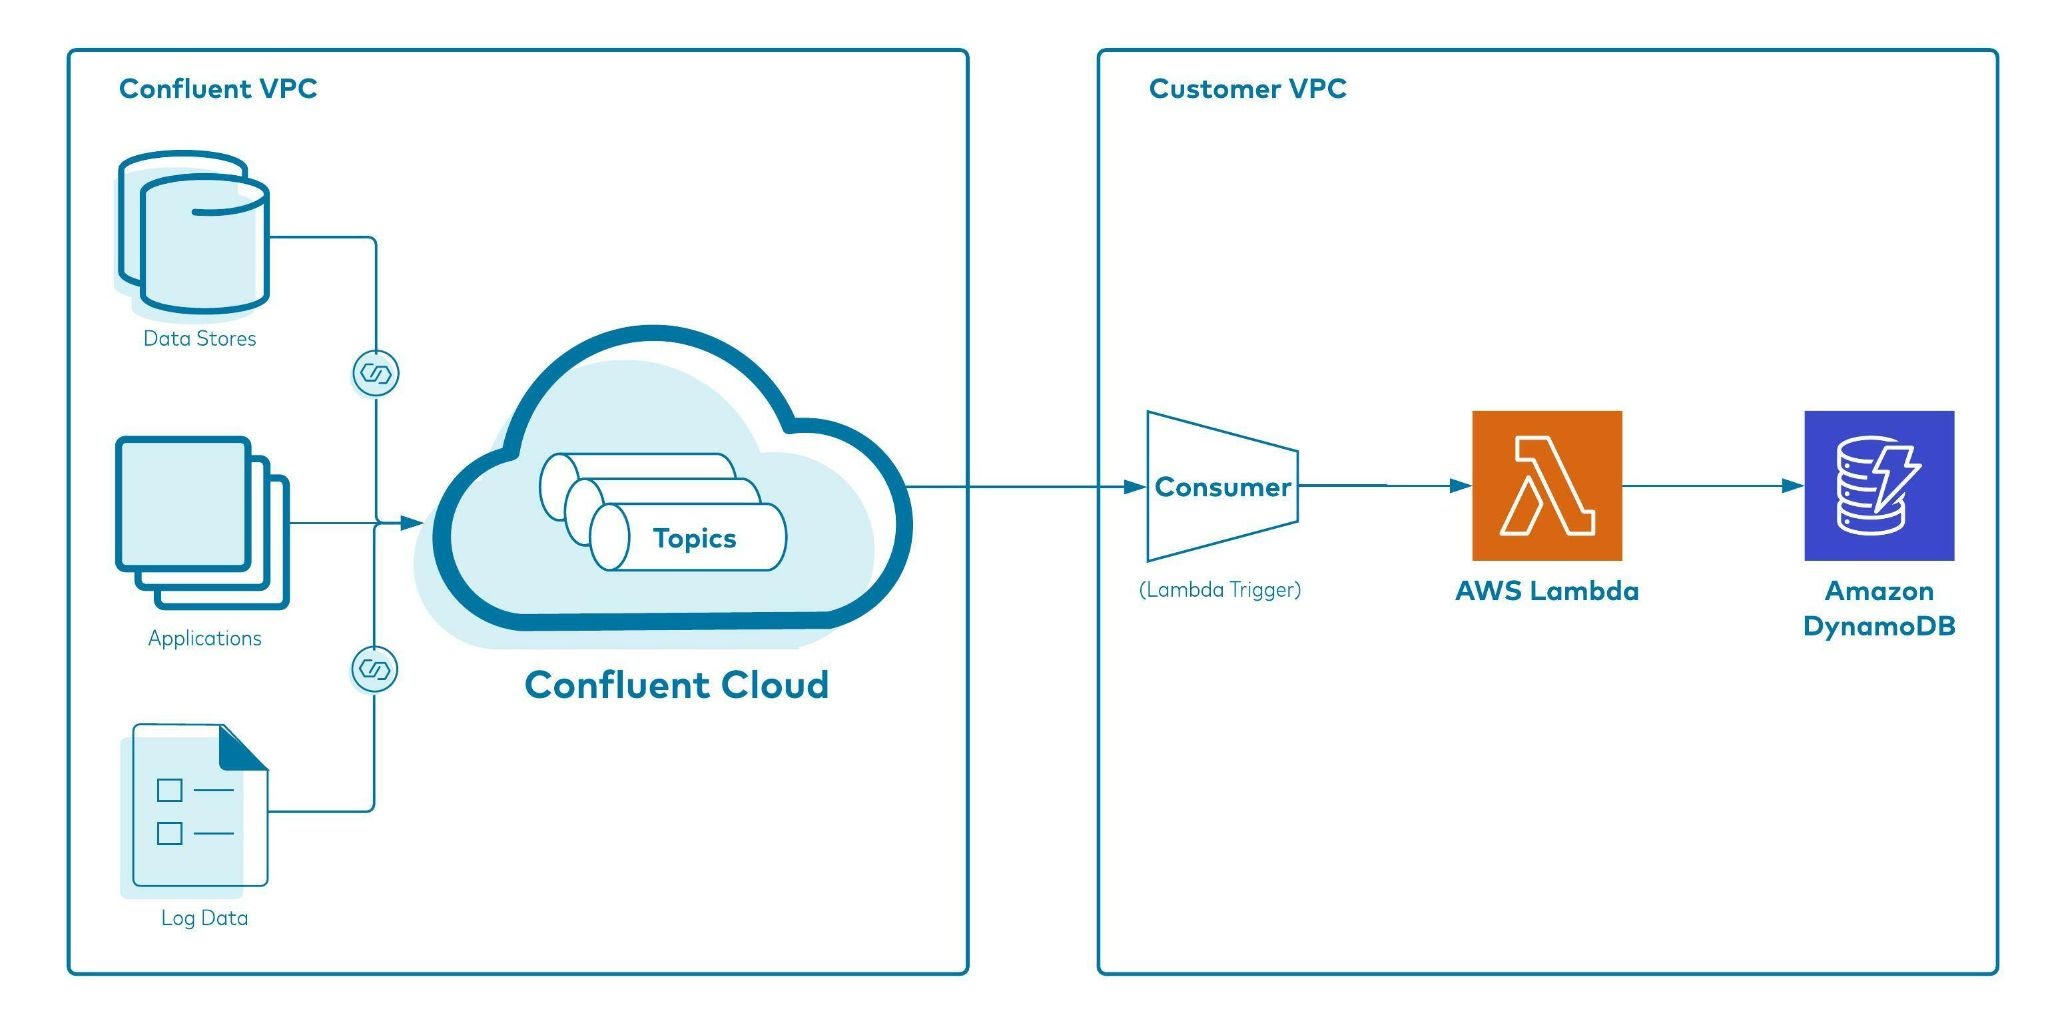
Figure 2: A holistic view of event data ingestion into DynamoDB with Confluent Cloud Kafka topic as a trigger for the AWS Lambda Function
Implementing the solution
You can try out the data flow solution by following the steps outlined below.
Prerequisites
- An active AWS account: If you don’t have one, create and activate a new AWS account.
- An active Confluent Cloud account: Sign up using Confluent Cloud on AWS Marketplace. Follow the steps below to get started.
Sign up for Confluent Cloud
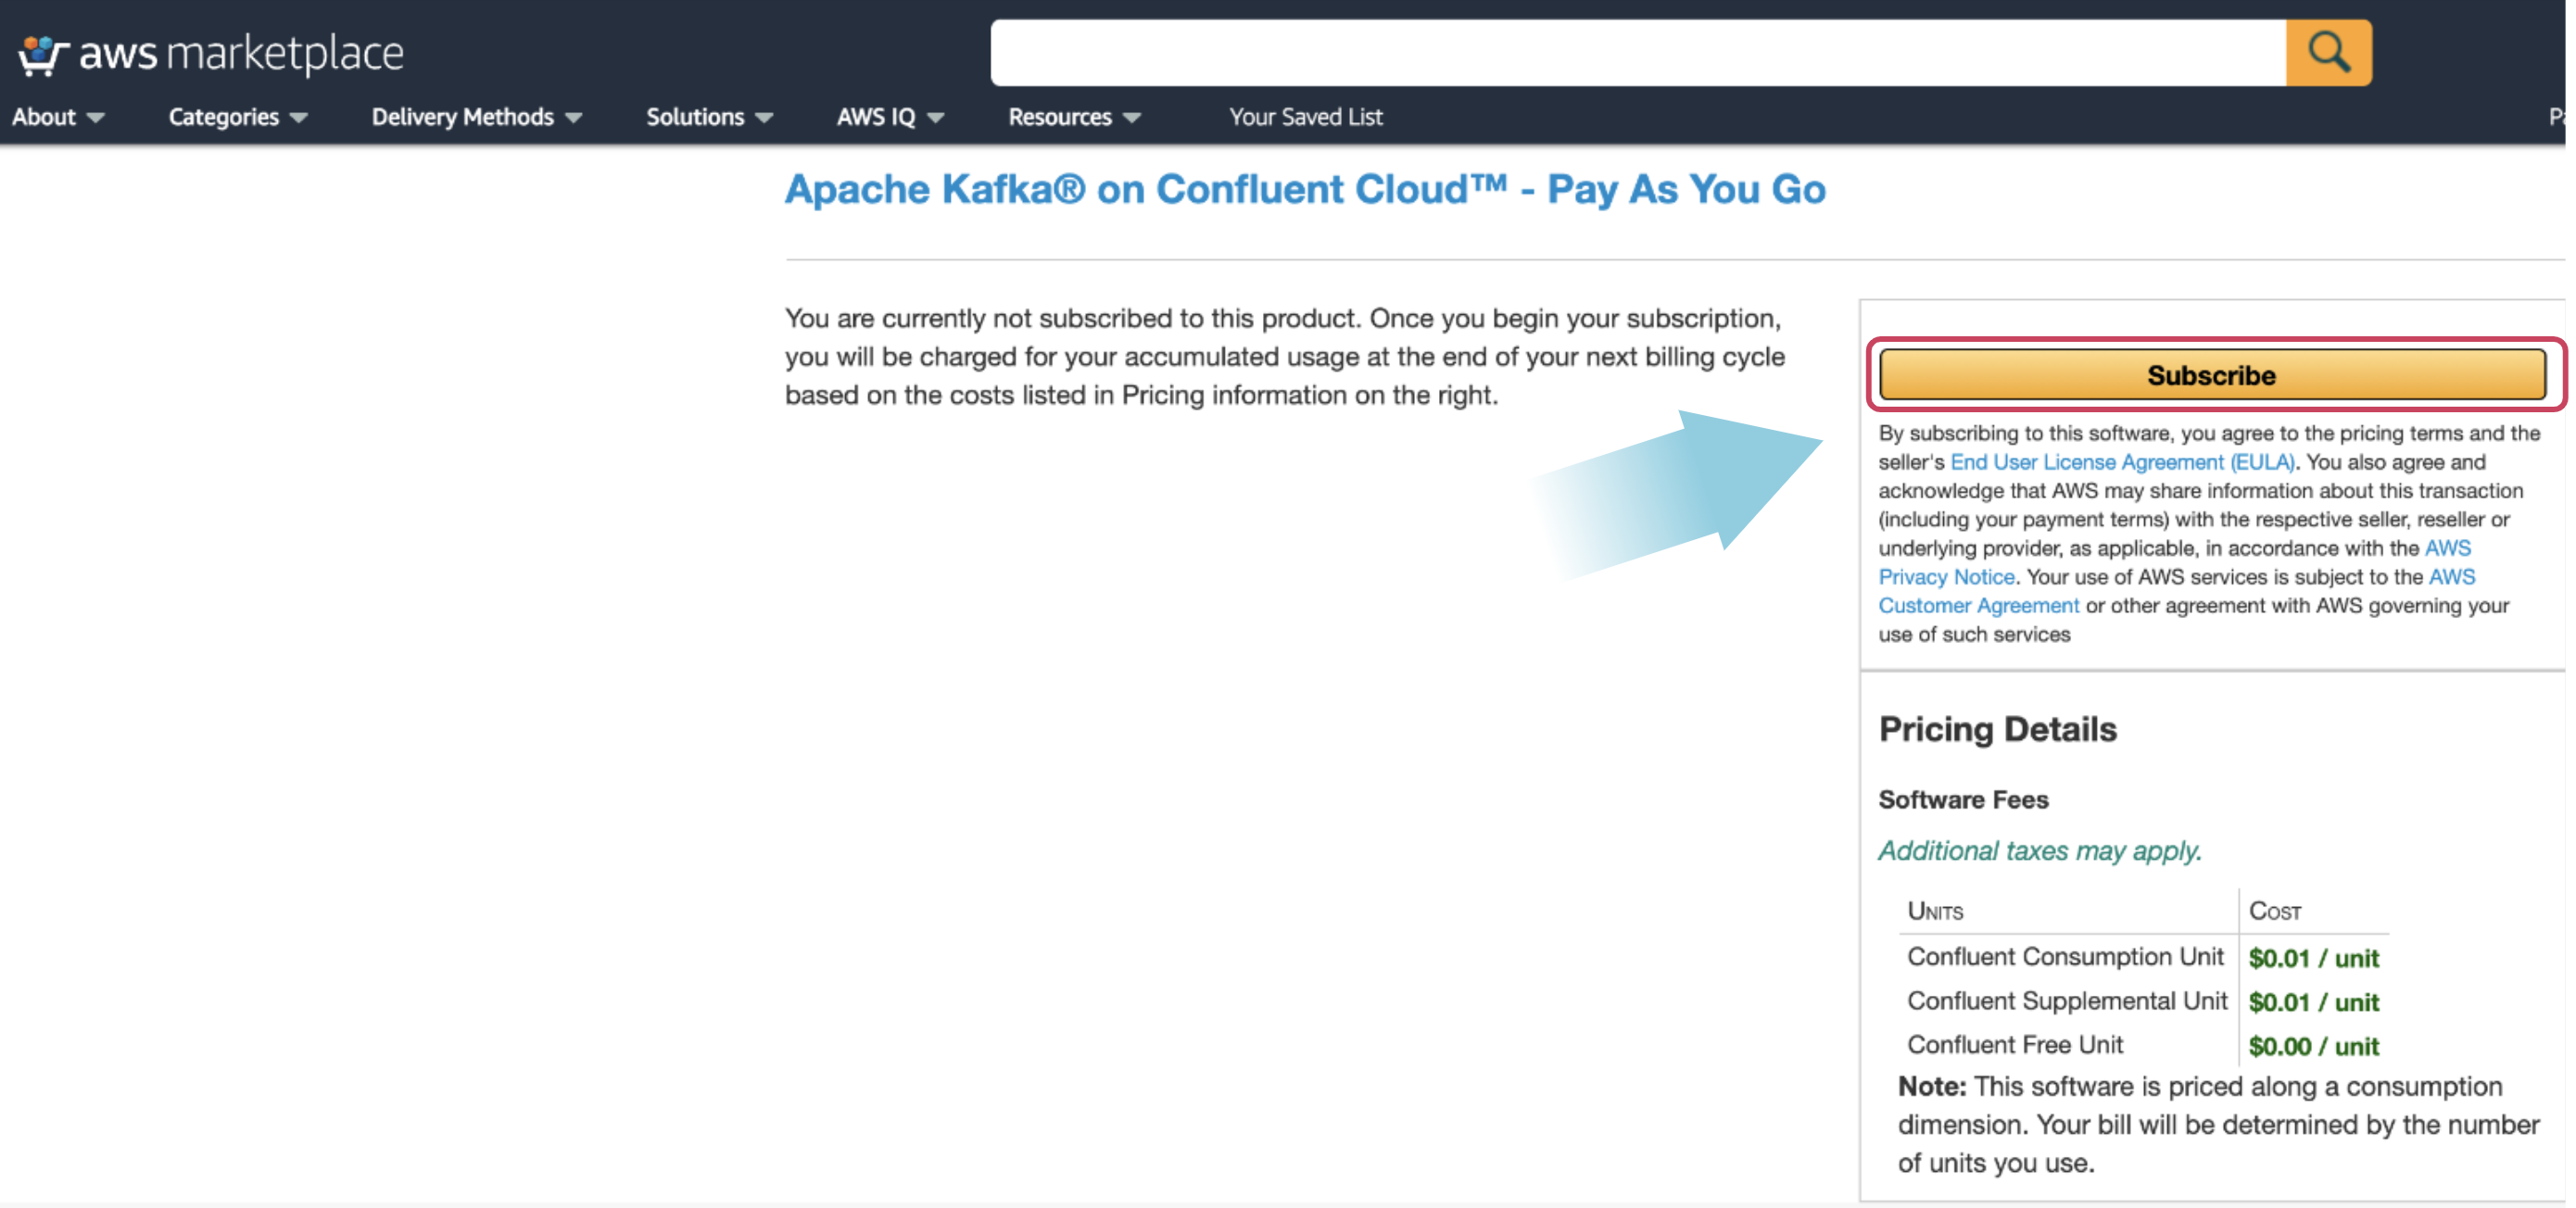
If you don’t already have an active Confluent Cloud account, navigate to AWS Marketplace and find Apache Kafka on Confluent Cloud – Pay As You Go. Select the Subscribe button. On the next page, review the pricing details and select the Subscribe button.
Next, to create an account, select the Set Up Your Account button on the pop-up window.
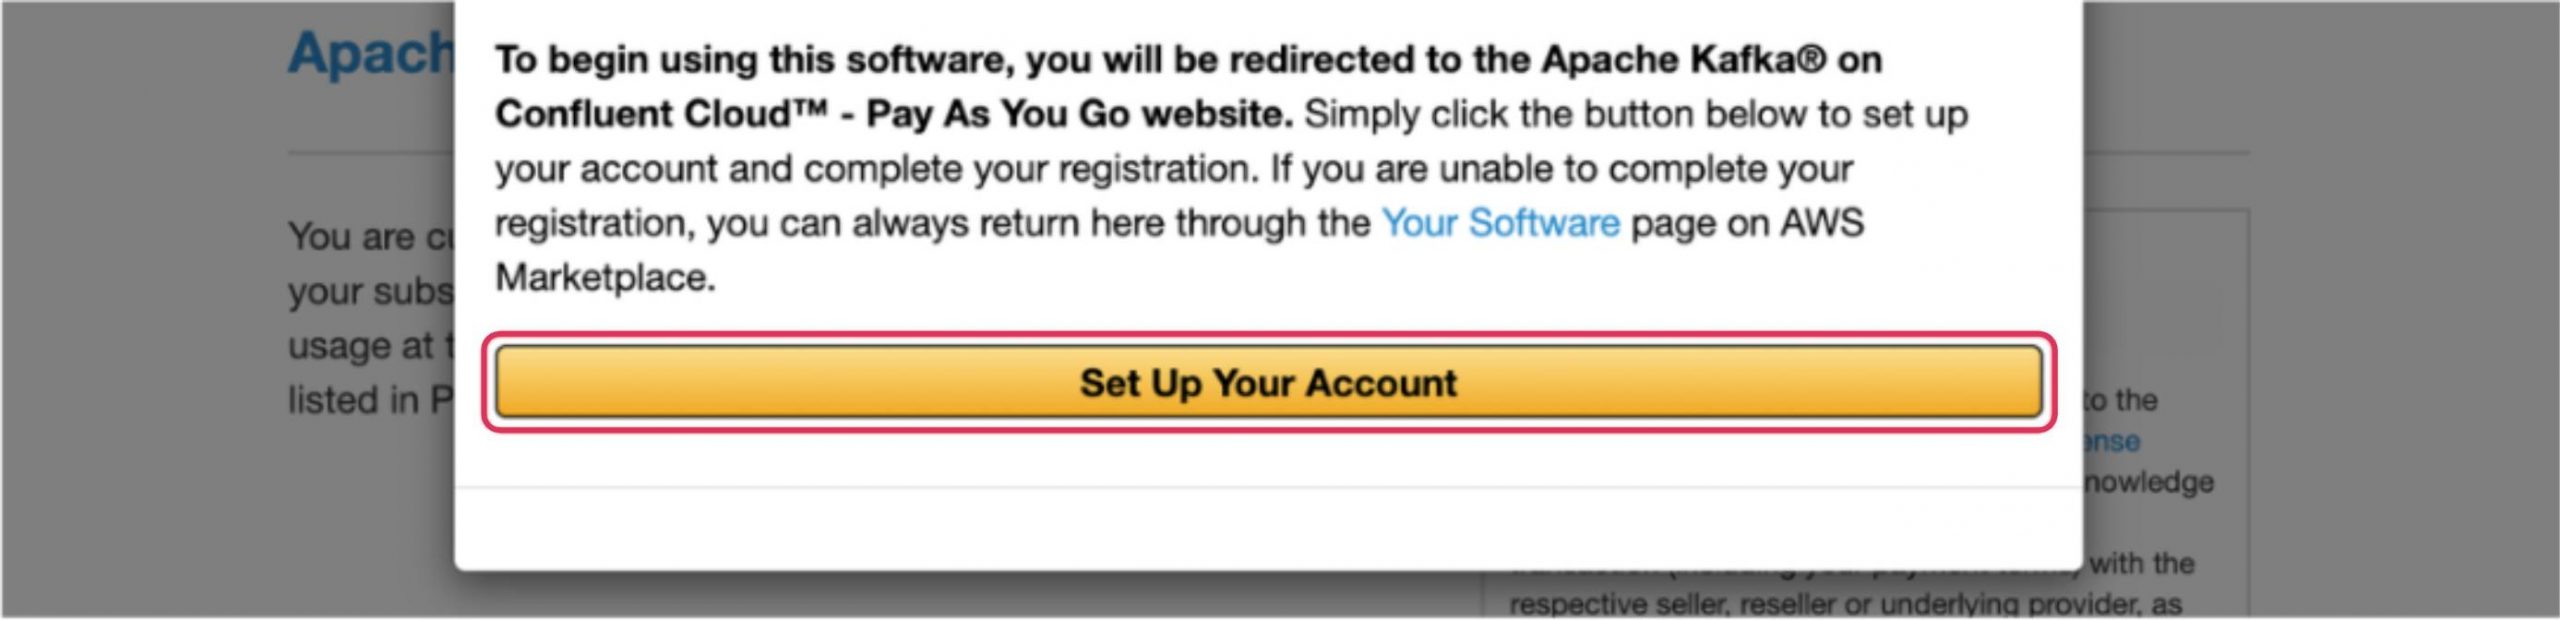
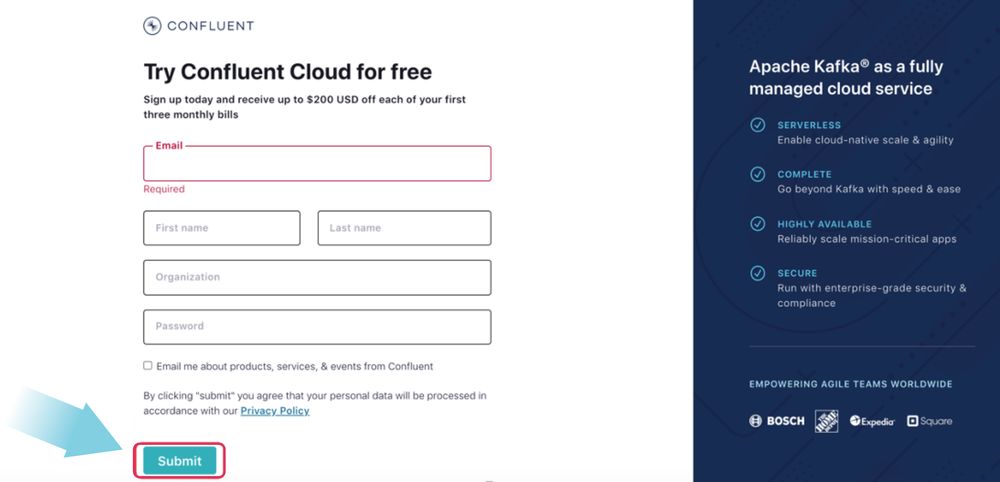
This redirects you to a Confluent Cloud page. Provide the required details and create your account. Once created, you can use this account to carry out the remainder of this procedure.
Create a Confluent Cloud cluster
After logging into Confluent Cloud, you will see a pop-up asking for a few details regarding your Kafka experience and roles. Click skip.
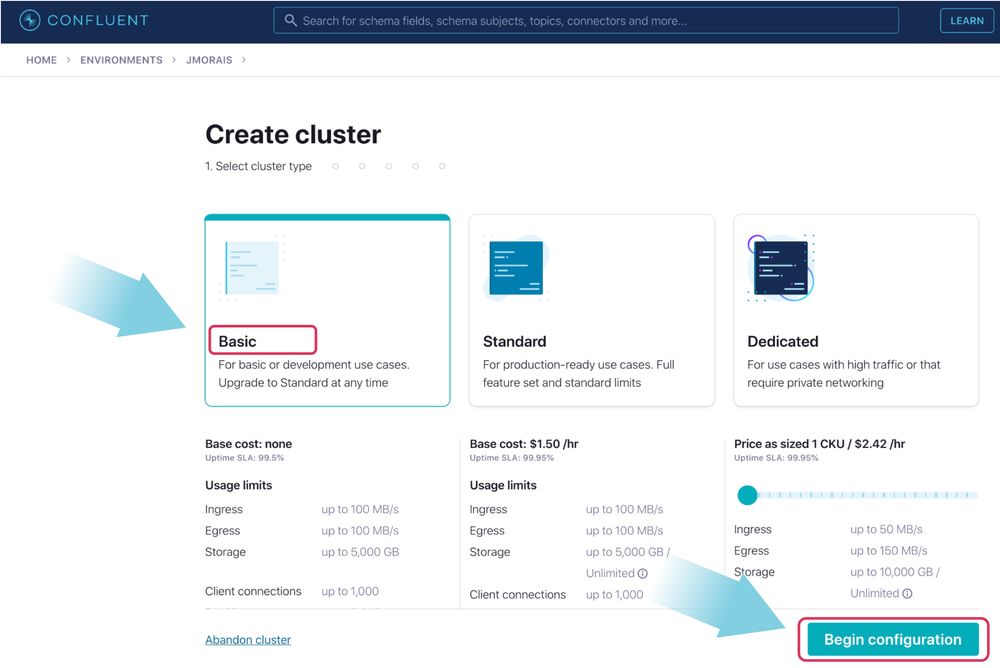
On the next page, you will see options to configure your Confluent cluster. Select the cluster type Basic and then click Begin configuration.
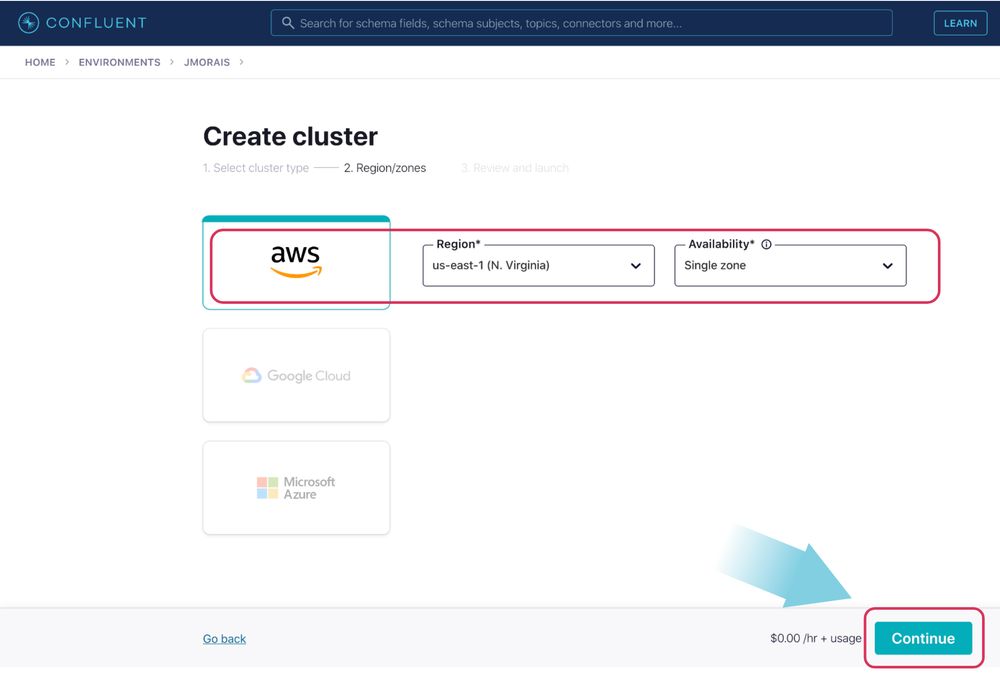
On the next page, select AWS and choose us-east-1 for the region. Set the availability as Single zone and click Continue.
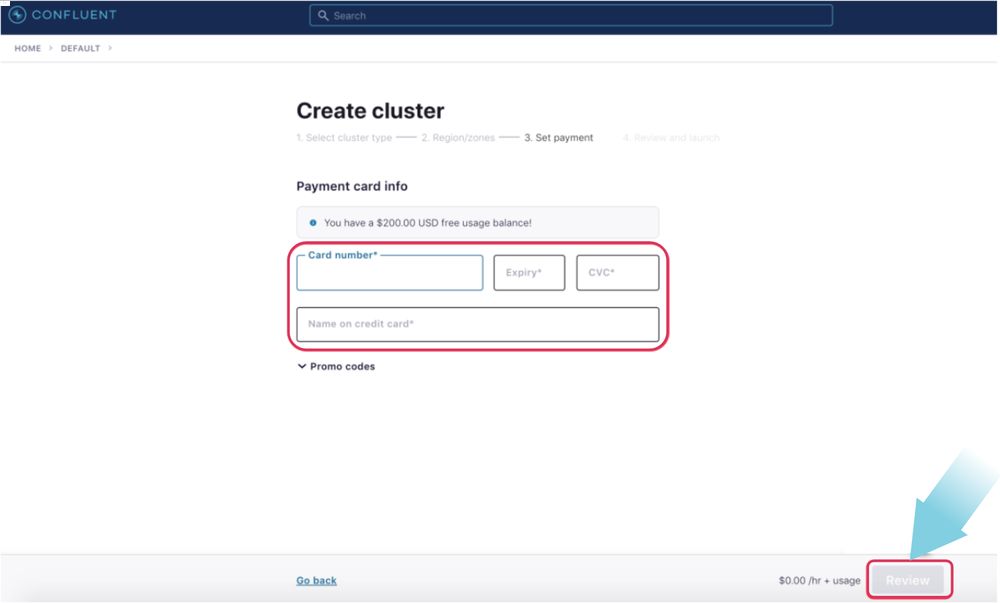
On the next page, you will be asked to provide a credit card number to keep on file. Provide that information and click Review.
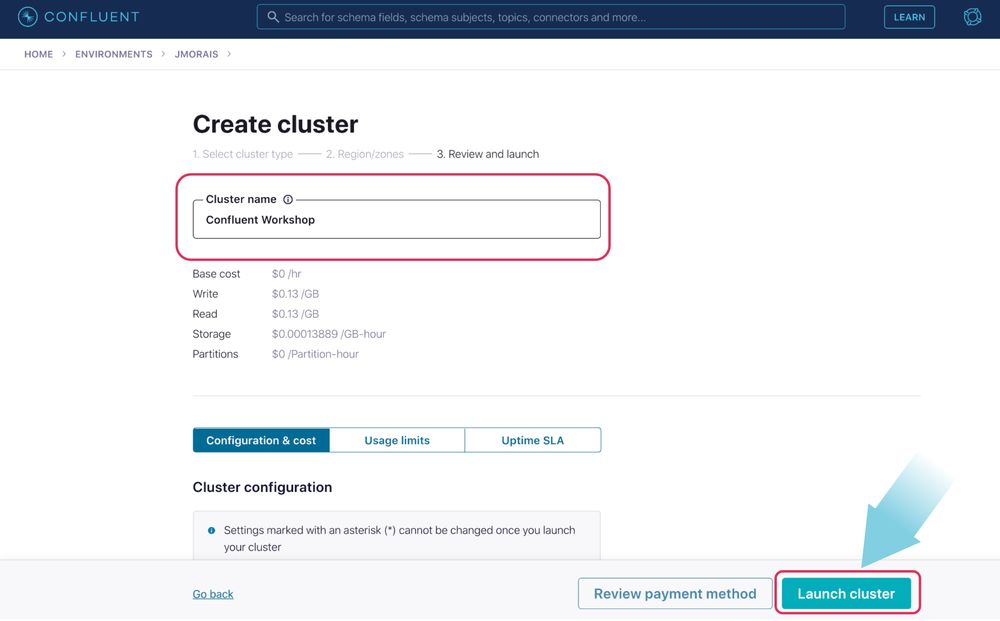
On the following page, provide a name for your cluster (“Confluent Workshop” for example) and click Launch cluster. The cluster will be created instantly.
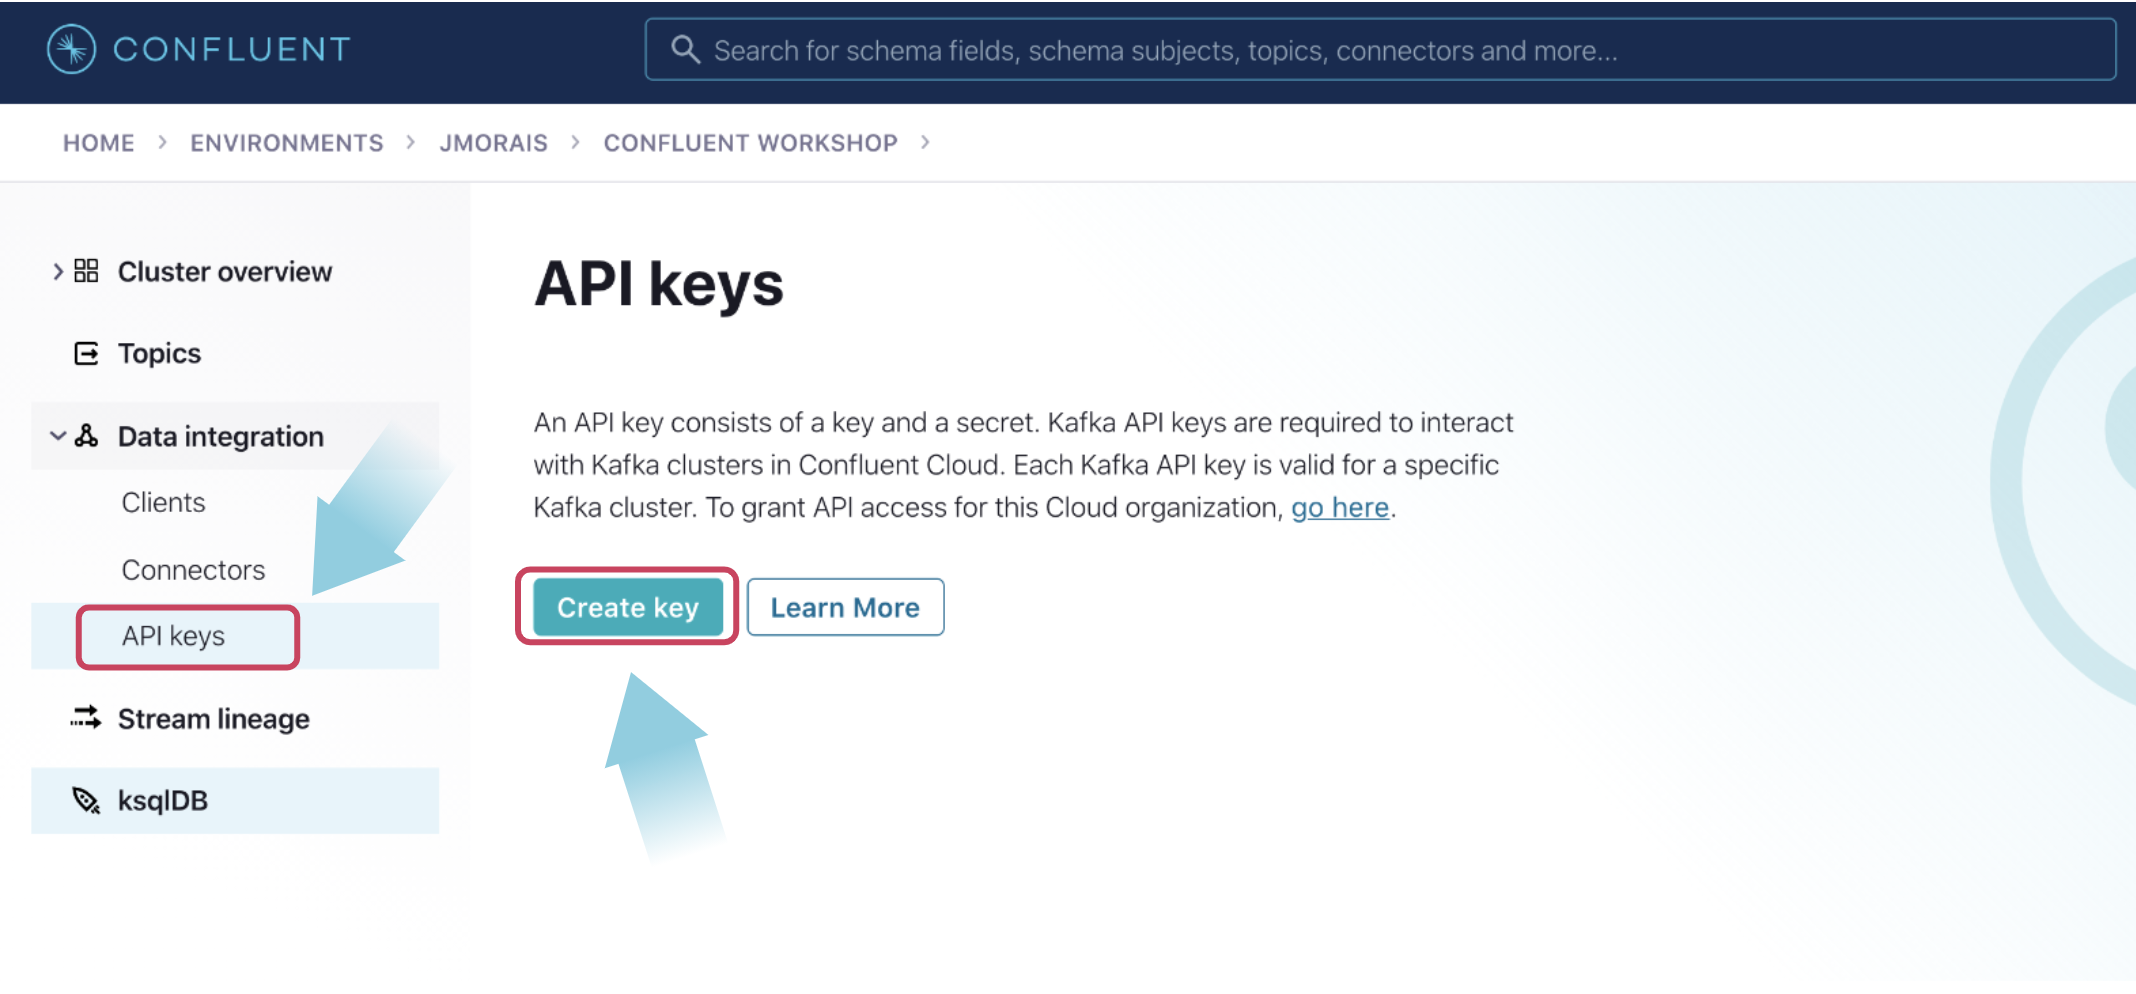
Create cluster API keys
Navigate to the API keys section and click Create key. Select the scope Global and click Next.
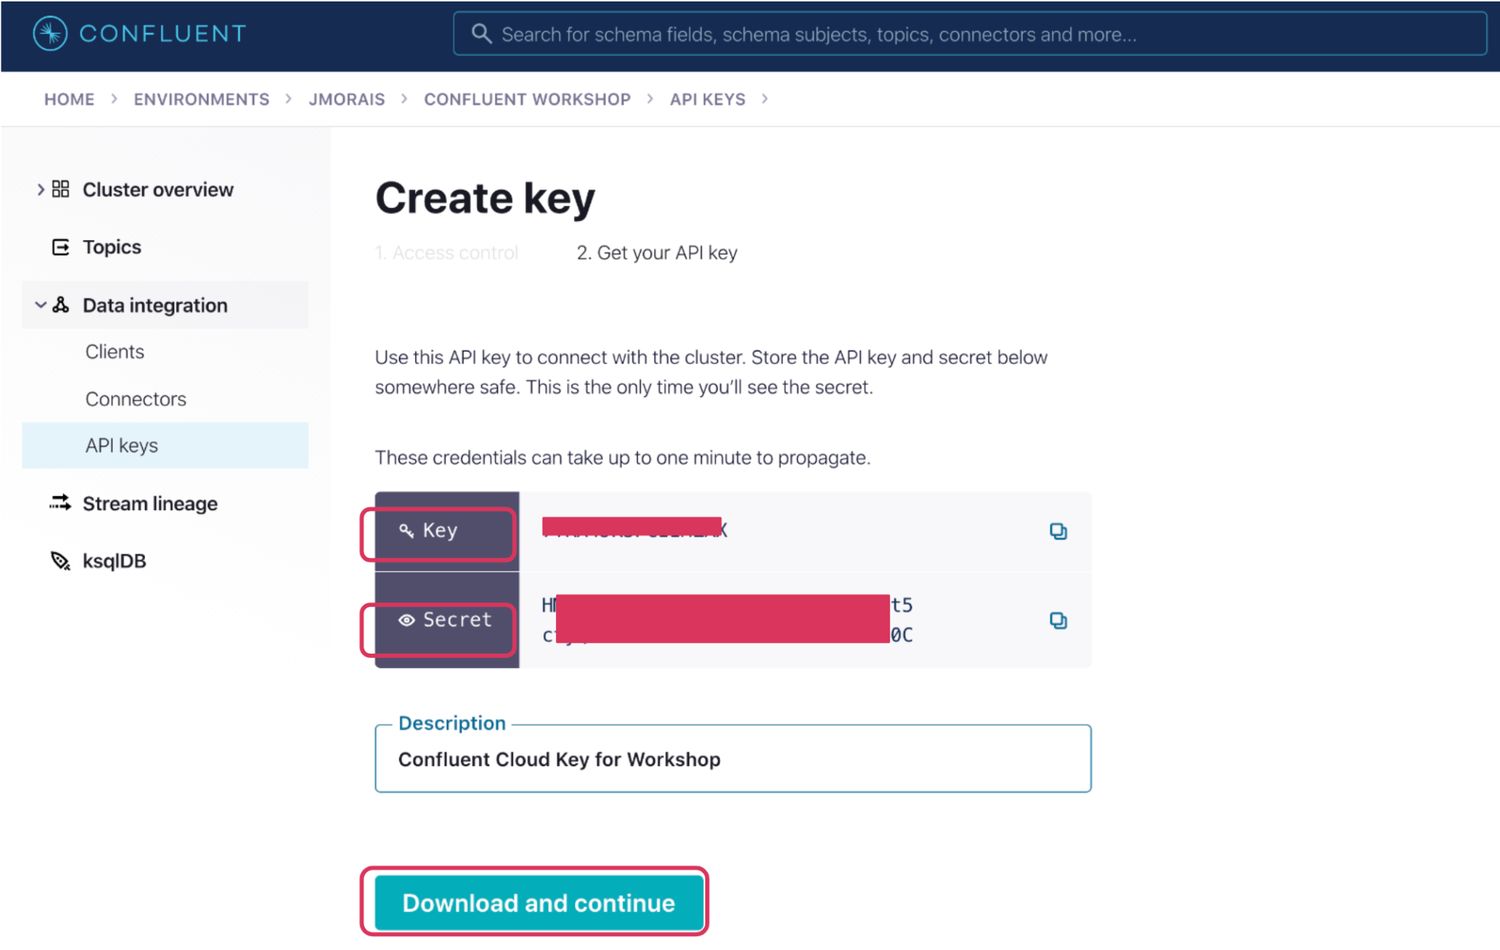
On the next screen, you will see the key has been generated for you. Ensure that you save the key and secret for use in later steps. Provide a description, then click Download and continue.
Now click on the Cluster overview section on the left, select Cluster settings, and note down the Bootstrap server URL, you will need it for the next section.
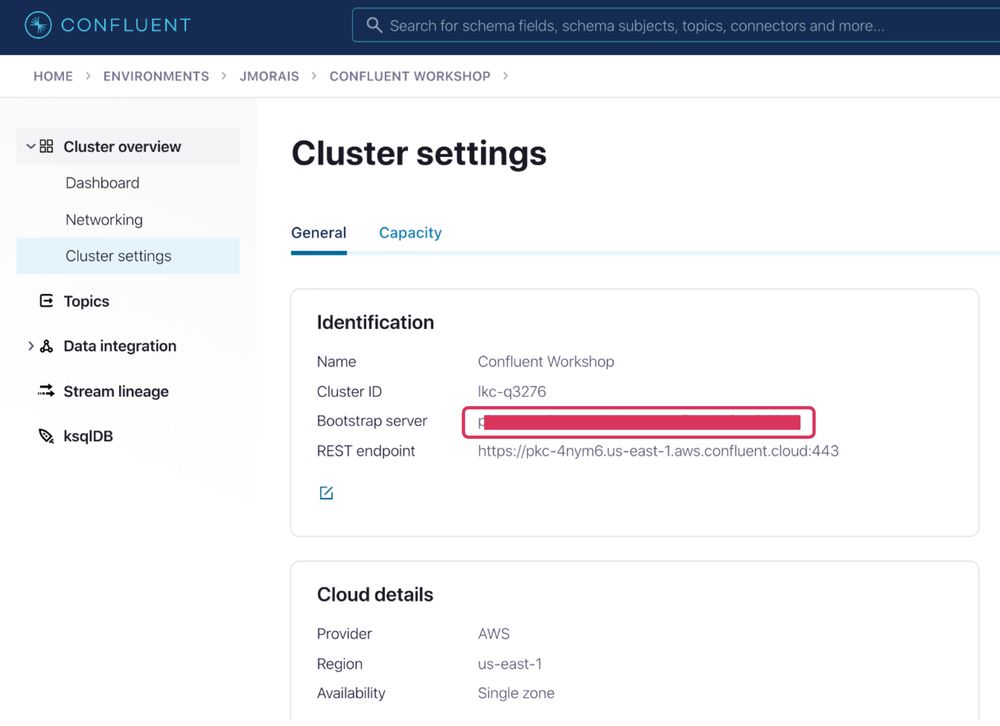
Now you have the Bootstrap server URL, API key, and API secret handy to proceed with the next section where you will pass those as inputs for CloudFormation Deployments.
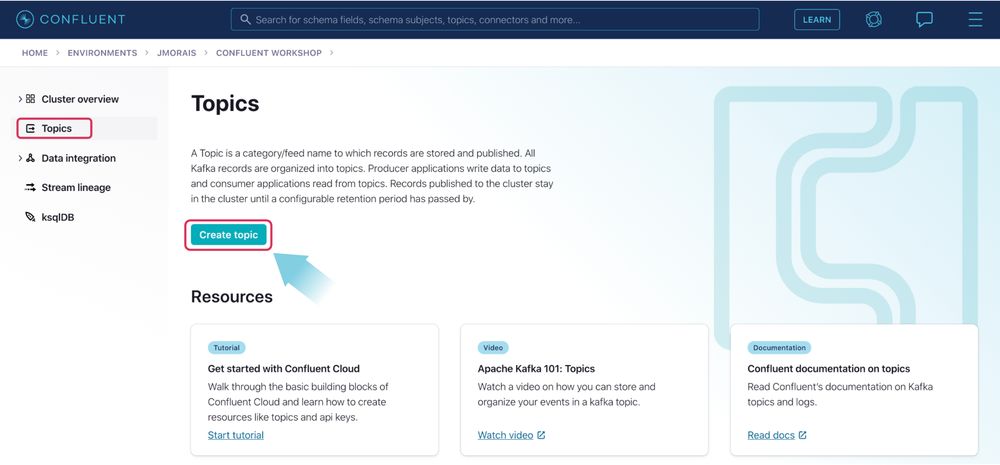
Create a topic
Navigate to the Confluent Cloud UI and click Topics on the left-side navigation bar. On the topics page, click on the Create topic button.
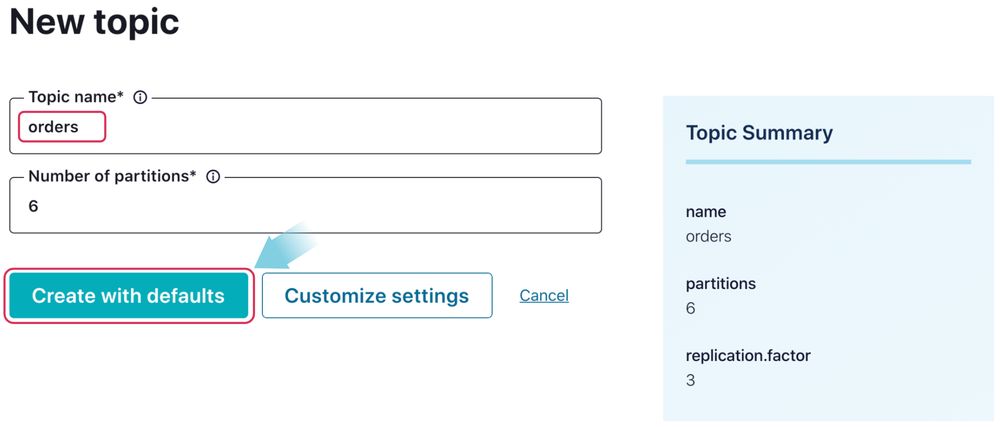
On the next screen, enter the topic name as “orders”, the number of partitions as “6”, and click the Create with defaults button. The topic will be created in a few seconds.
Launch CloudFormation to create the AWS resources
While logged into your AWS account, click the Launch Stack button shown below:
![]()
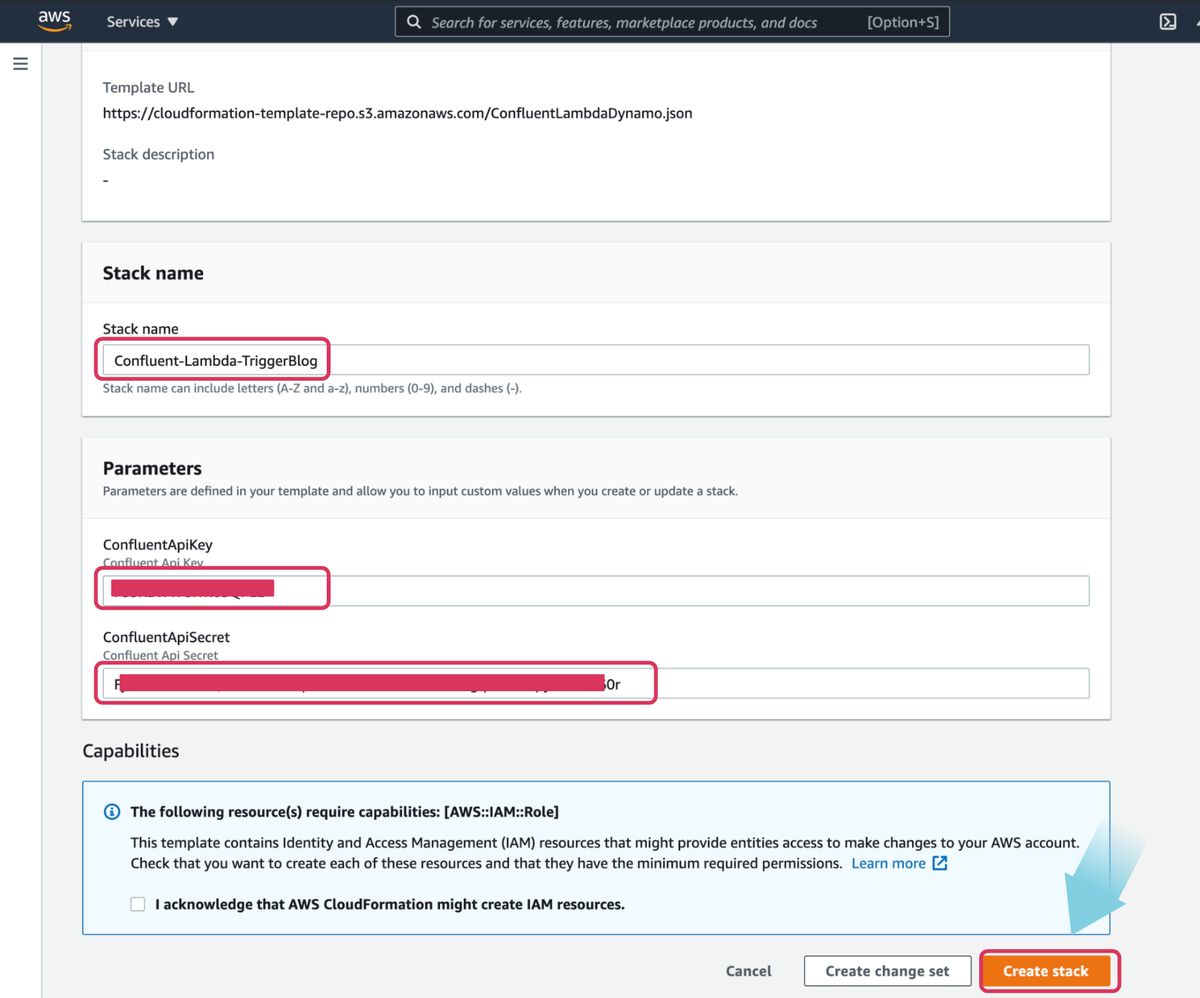
This will direct you to CloudFormation’s “create a stack” page. In the appropriate sections, provide the Confluent API key and API secret noted in the previous section, acknowledge the capabilities, and click the Create stack button.
This starts creating the required AWS resources and takes about five minutes to complete.
Once the CloudFormation completes, you have the AWS resources needed to run the end-to-end integration of the Lambda function triggered by Confluent Cloud with SASL/PLAIN authentication.
Configure the Datagen Source connector
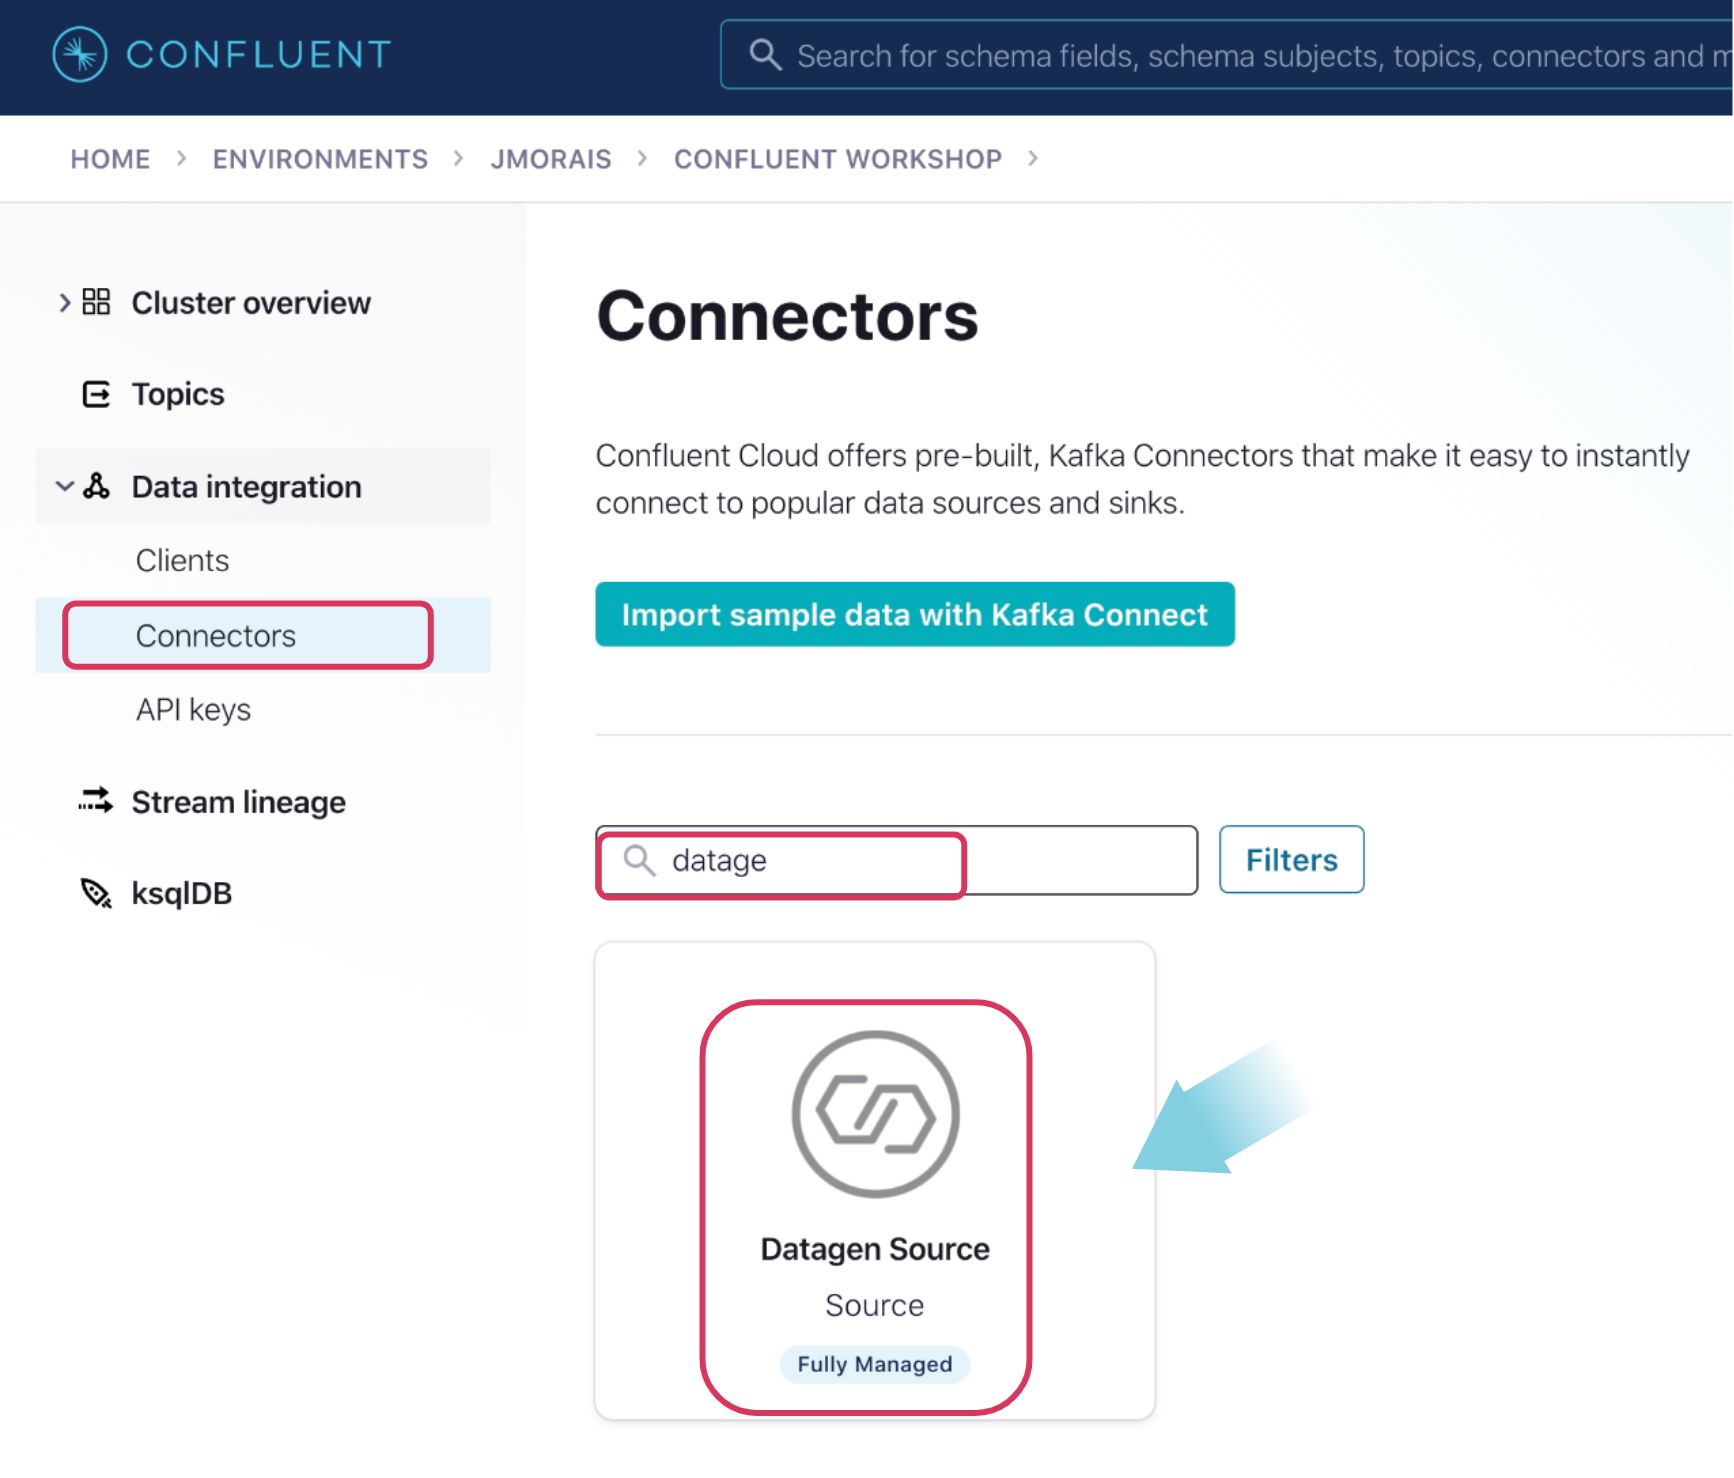
We will now set up the Confluent Datagen Source connector, which will generate sample data into our topic. The generated events from this connector will be read and actioned by our Lambda Function. Now navigate back to Confluent cloud UI and click on Data integration -> Connectors on the left panel, filter for “datagen”, and click on Datagen source connector.
On the next page, provide the following details:
| Parameters | Value |
| Name | DataGen |
| Kafka API Key | <Your Kafka API key> |
| Kafka API Secret | <Your Kafka API secret> |
| Topic name | orders |
| Output message format | JSON |
| Quickstart | ORDERS |
| Max interval between messages | 1000 |
| Tasks | 1 |
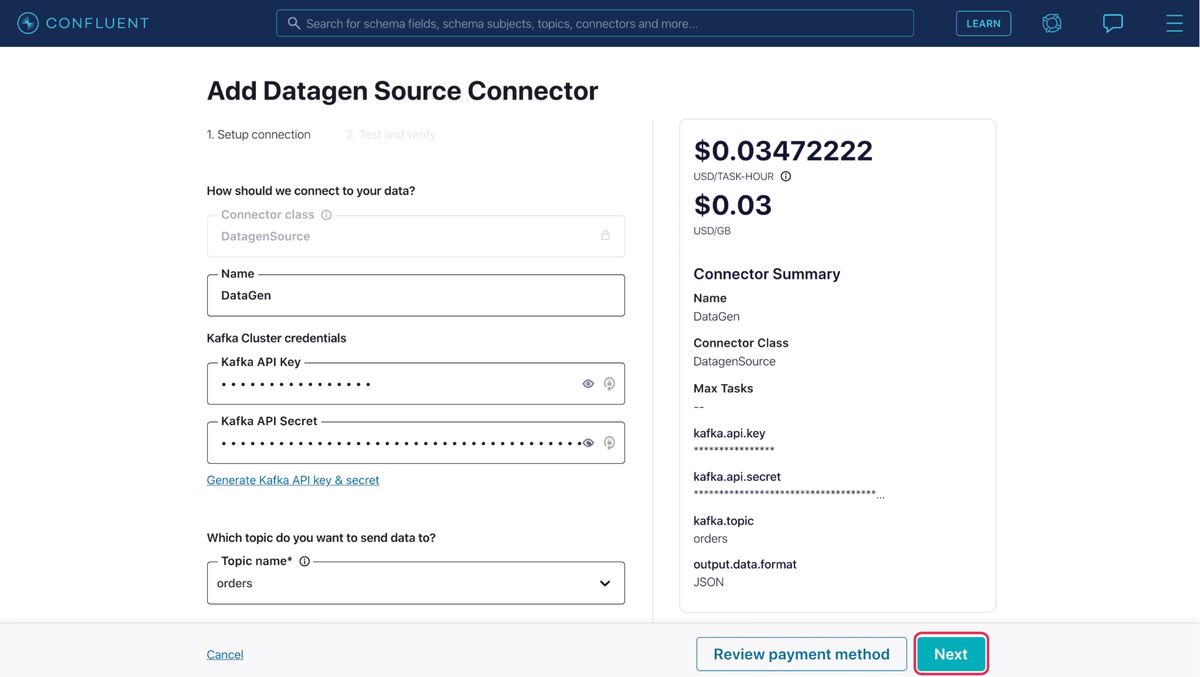
Then click Next. On the following page, review the details provided and click Launch.
It will take a few minutes for the connector to complete provisioning and start. Once the connector starts, messages will start flowing into the topic “orders” from the Datagen source. These messages will trigger the Lambda functions and be further processed and ingested into Amazon DynamoDB.
Configure Confluent Cloud as a Lambda trigger
The CloudFormation you deployed has already created a DynamoDB table named “ORDERS”, and created an AWS Secrets Manager named “secret” which stores the Confluent API key and secret as the Kafka SASL “username” and “password”. Additionally, it creates a predefined function that captures the events, decodes them, extracts the data, and ingests it into the DynamoDB table, as well as the IAM roles needed for it. The function is as follows:
def lambda_handler(event, context):
    TABLE = "ORDERS"
    current_time = int(time.time() * 1000)
    dynamodb = boto3.resource('dynamodb')
    table = dynamodb.Table(TABLE)
    records = []
    partition=list(event['records'].keys())[0]
    message=event['records'][partition]
    for data in message:
        rec=base64.b64decode(data['value'])
        value=json.loads(rec)
        table.put_item(Item={
        'ordertime': value['ordertime'],
        'orderid': value['orderid'],
        'itemid': str(value['itemid']),
        'orderunits': repr(value['orderunits']),
        'address_city': str(value['address']['city']),
        'address_state': str(value['address']['state']),
        'address_zipcode': str(value['address']['zipcode']),
        'createdtime': current_time})
The above function uses the AWS boto3 library to connect to AWS services. The data received from Confluent Cloud will be base64 encoded, hence we will have to decode it, parse the json file, and using the dynamoDB put_item() function the code inserts the ORDER records after stripping and parsing the array received. It also captures and adds current_time to the record.
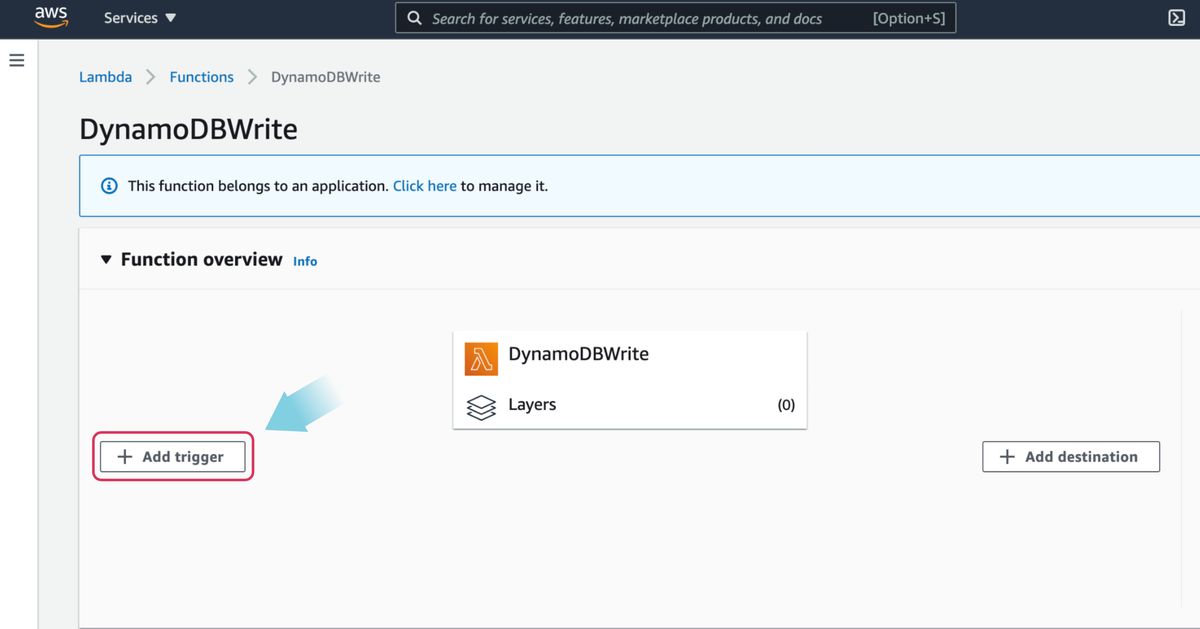
Complete the configuration by navigating to the Lambda function DynamoDBWrite created as part CloudFormation. And click the + Add trigger button as shown below:
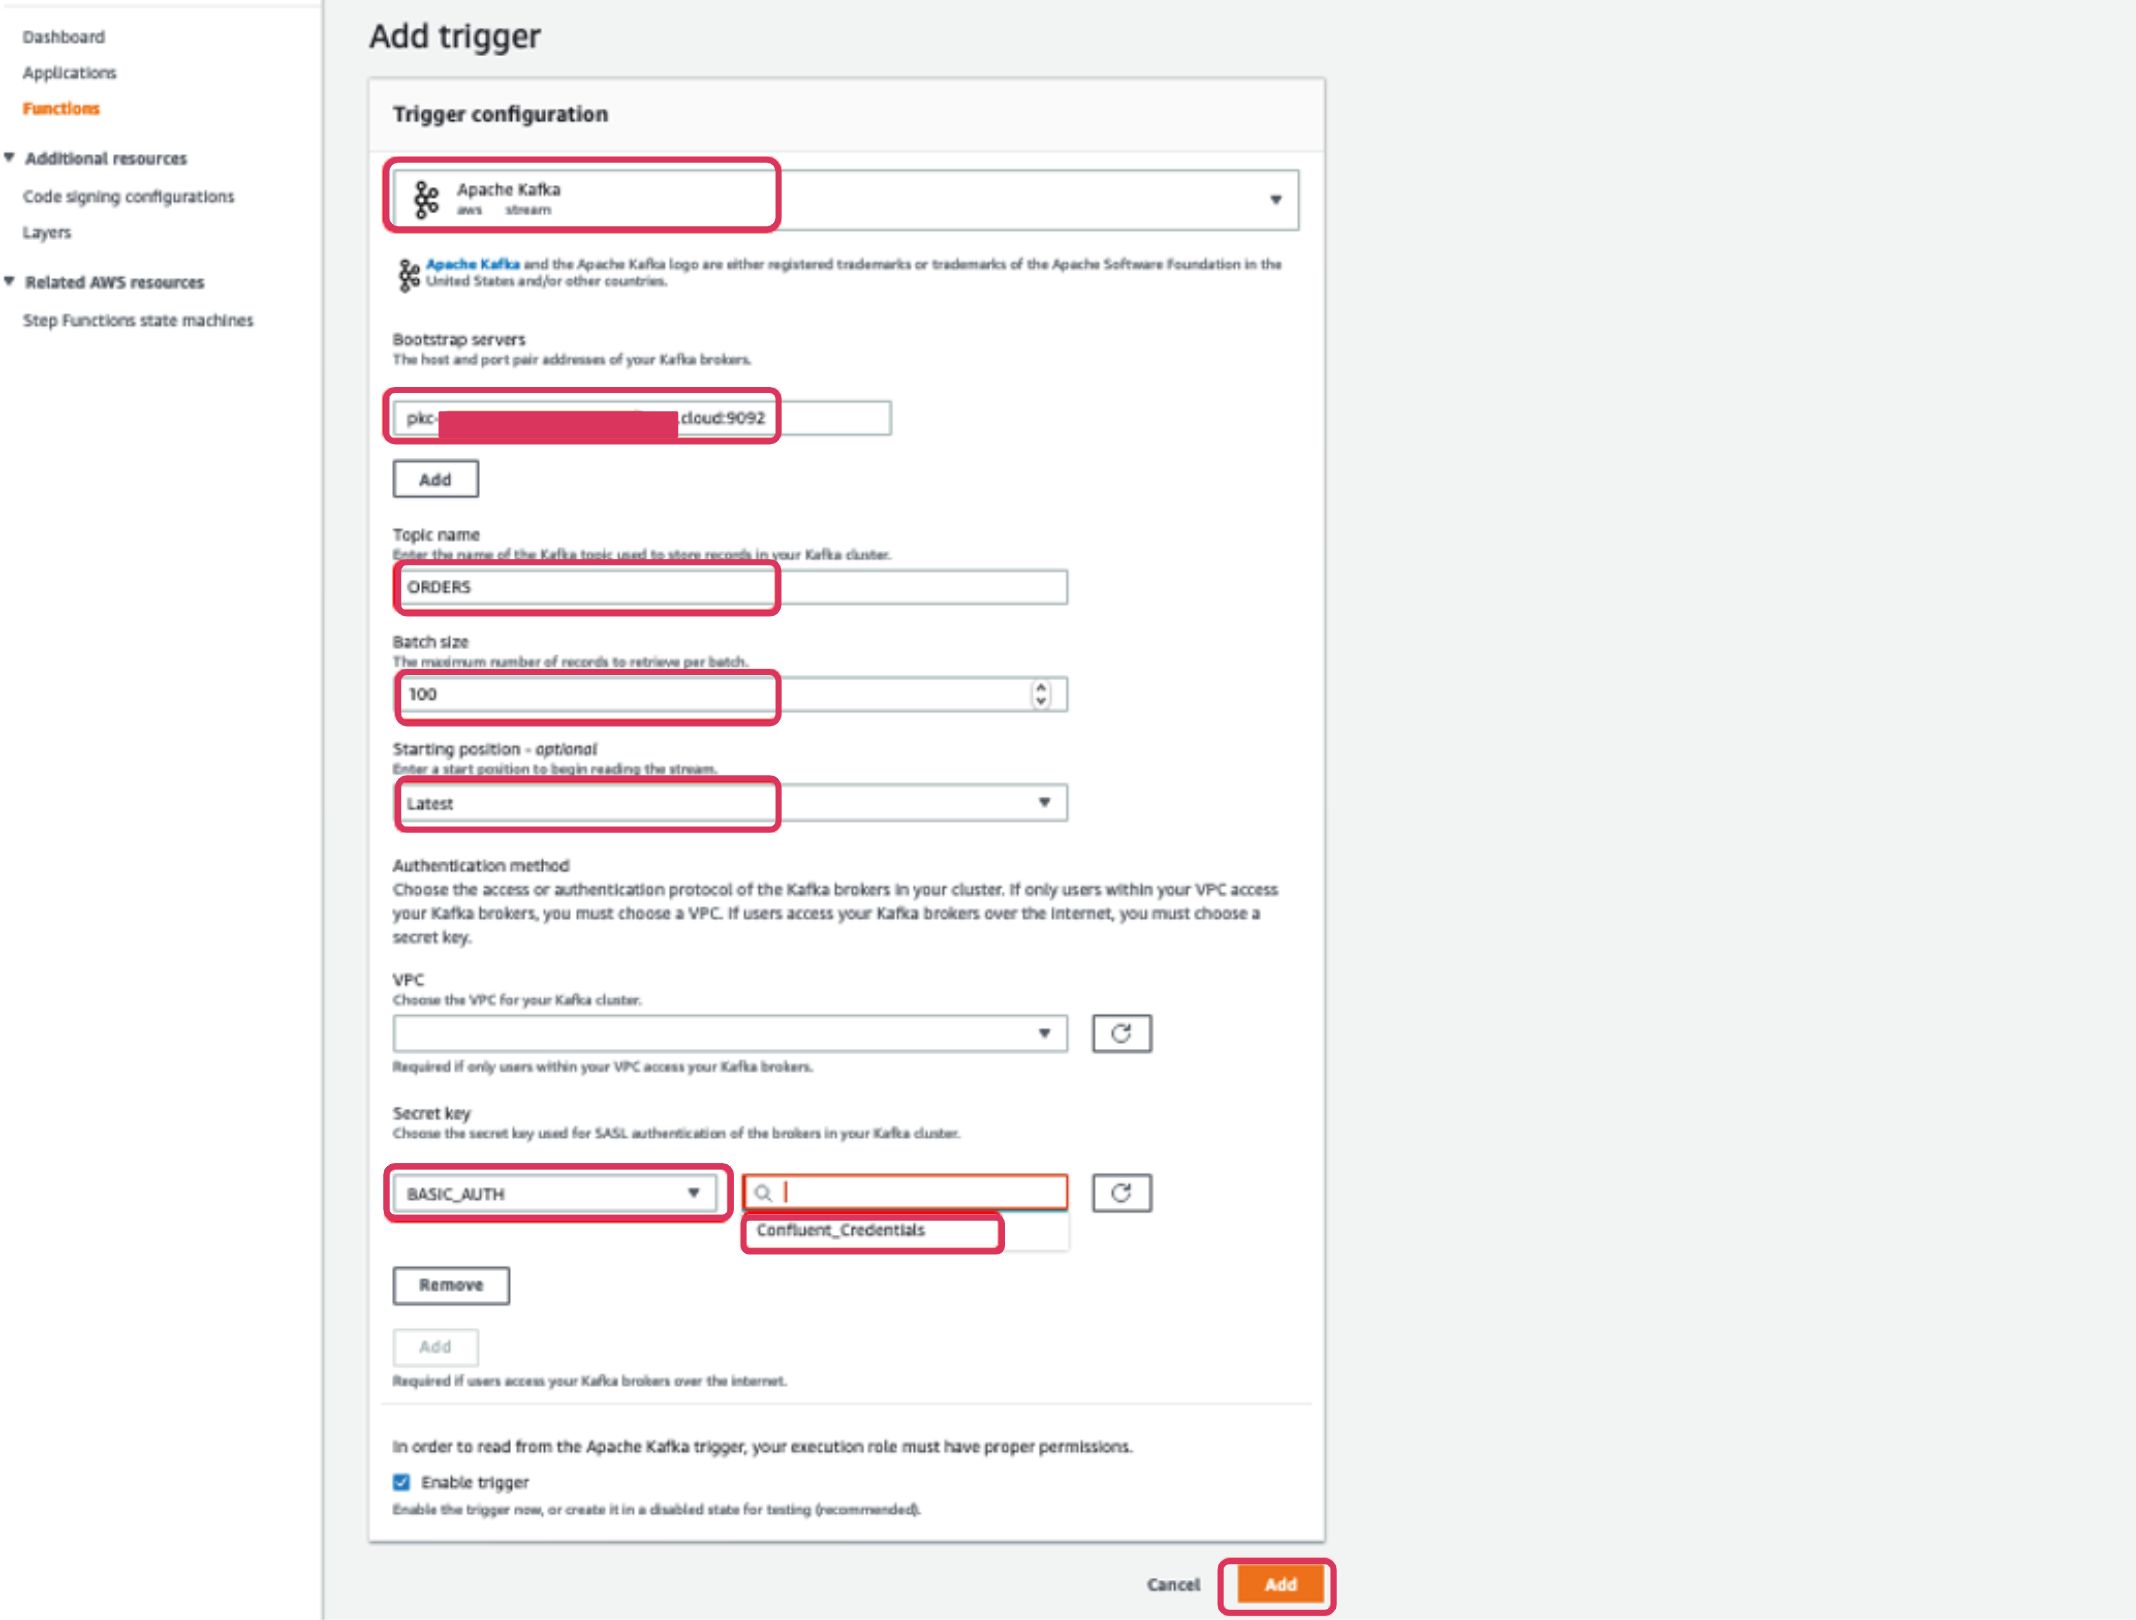
On the next page, select Apache Kafka as the trigger from the dropdown menu. Once selected, you will see a few fields that need to be populated in order to add it as a trigger. Populate the fields with the information below and click the Add button.
| Parameters | Values |
| Bootstrap servers | <Your Confluent Cloud bootstrap server address> |
| Topic name | orders |
| Batch size | 100 |
| Starting position | Latest |
| Secret key | BASIC_AUTH, <Select Confluent_Credentials from drop down> |
Once added, if the Datagen connector is up and running already, data will start flowing automatically into the DynamoDB table.
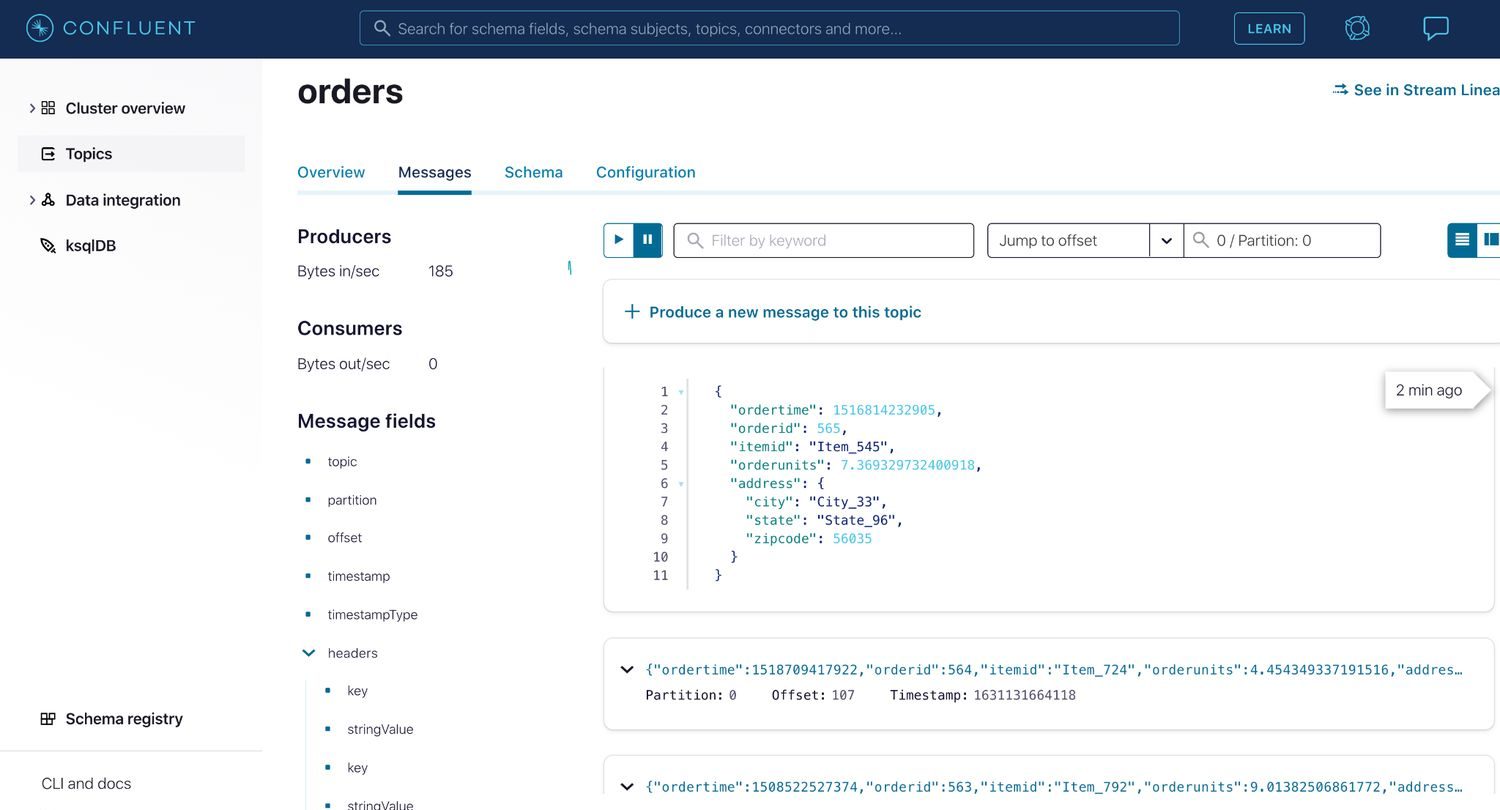
To view the data in the topic, in the Confluent Cloud UI click on Topics, select the orders topic, then click the Messages tab to watch the new events flow.
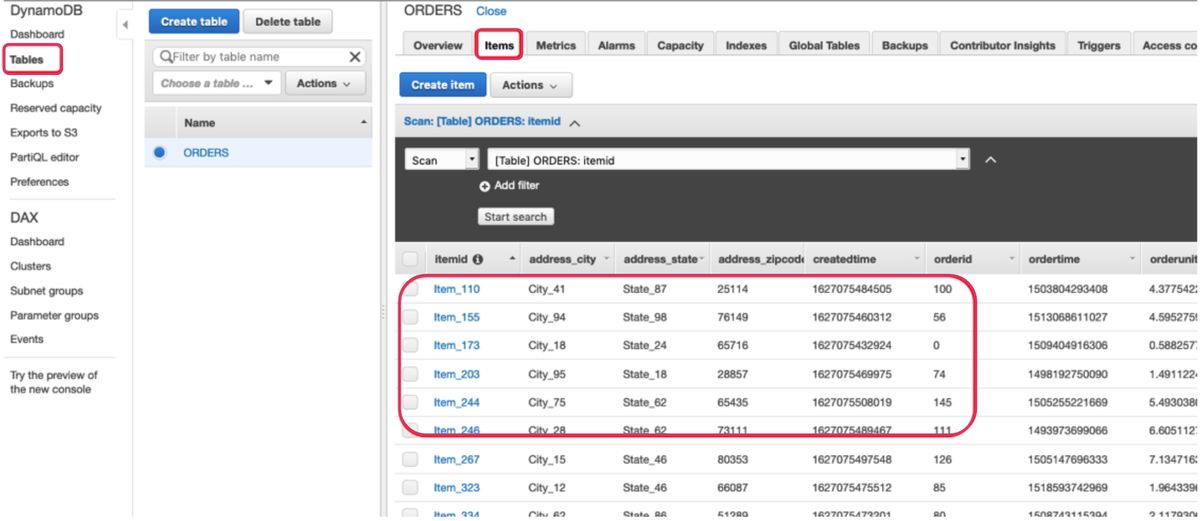
Now navigate to the ORDERS table in DynamoDB to verify seamless data ingestion from the Confluent Cloud Kafka topic via the Lambda function trigger. Under the Items tab, you should be able to see the orders received from Kafka events.
You have successfully integrated Confluent Cloud Kafka as a trigger to Amazon Lambda and ingested event data into a DynamoDB table.
Clean up
In order to avoid incurring additional charges caused by the resources created as a part of this walkthrough, make sure you delete the AWS CloudFormation stack. Navigate to the CloudFormation console and in stacks you can delete the stack that was created. On Confluent Cloud, delete the topics, connectors, and the Cluster itself.
Conclusion
In this blog post, we walked through integrating Confluent Cloud Kafka topics as a trigger to an AWS Lambda function which authenticates with Confluent Cloud using SASL/PLAIN mechanism and ingests data into Amazon DynamoDB—providing a complete and serverless solution for our customers.
To try this solution using AWS Lambda and Amazon DynamoDB, sign up for Confluent Cloud in AWS Marketplace today! Once you’ve signed up through AWS Marketplace and log into the Confluent Cloud UI, go to billing & payment > payment details & contracts > + promo code. Use CL60BLOG to get an additional $60 credit for Confluent Cloud usage.*
Did you like this blog post? Share it now
Subscribe to the Confluent blog


Announcing Confluent Platform 8.3: Powerful Apache Flink® SQL operations, Easier KRaft Migrations, Expanded Monitoring and more.
Confluent Platform (CP) 8.3.0, built on Apache Kafka® 4.3.0, helps platform teams simplify Apache Flink® SQL operations, migrate their streaming infrastructure with ease, maintain unified visibility while reinforcing security and governance.