New in Confluent Cloud: Making Data & Pipelines Accessible for AI-Ready Streaming | Learn More
Extracting Value from IoT Using Azure Cosmos DB, Azure Synapse Analytics, and Confluent Cloud
Today, an organization’s strategic objective is to deliver innovations for a connected life and to improve the quality of life worldwide. With connected devices comes data, and with data comes opportunity. Tapping into the enormous flow of IoT data can transform enterprises into digital businesses and facilitate new business models, increase efficiency, and improve customer engagement. This transforms the way businesses operate. The explosion of data generated from devices and machines at the edge requires capturing and processing data securely. Hence the need for a solution that enables continuous, real-time ingest, end-to-end security, and stream processing for deriving valuable insights.
How do Confluent Cloud and Microsoft Azure help? Cloud and edge computing are coming together as never before, leading to huge opportunities for developers and businesses around the world. Microsoft Azure offers a rich set of services, features, and integrations to quickly build secure and scalable solutions. Confluent offers capabilities to deliver continuous, real-time data integration across all applications, systems, and IoT devices, unifying data that is normally too large or complex for traditional data integration tools. With the integrations between Azure and Confluent Cloud a seamless device-to-cloud experience can be built.
The example provided in this blog post showcases how the following capabilities of Azure and Confluent Cloud are leveraged:
- A fully managed platform for data in motion and self-managed connectors from Confluent
- A secure connection from Confluent to Azure
- A highly distributed and scalable data management solution from Azure
- A limitless analytics service offered by Azure that brings together data integration, enterprise data warehousing, and big data analytics
- A fully managed microservice development platform on Azure
Customers want to operate securely, at scale, and reduce development time, maintenance, cost, and complexity. These platform capabilities help customers achieve this goal.
Architecture and end-to-end flow
The following is a look at the high-level architecture of the end-to-end solution.
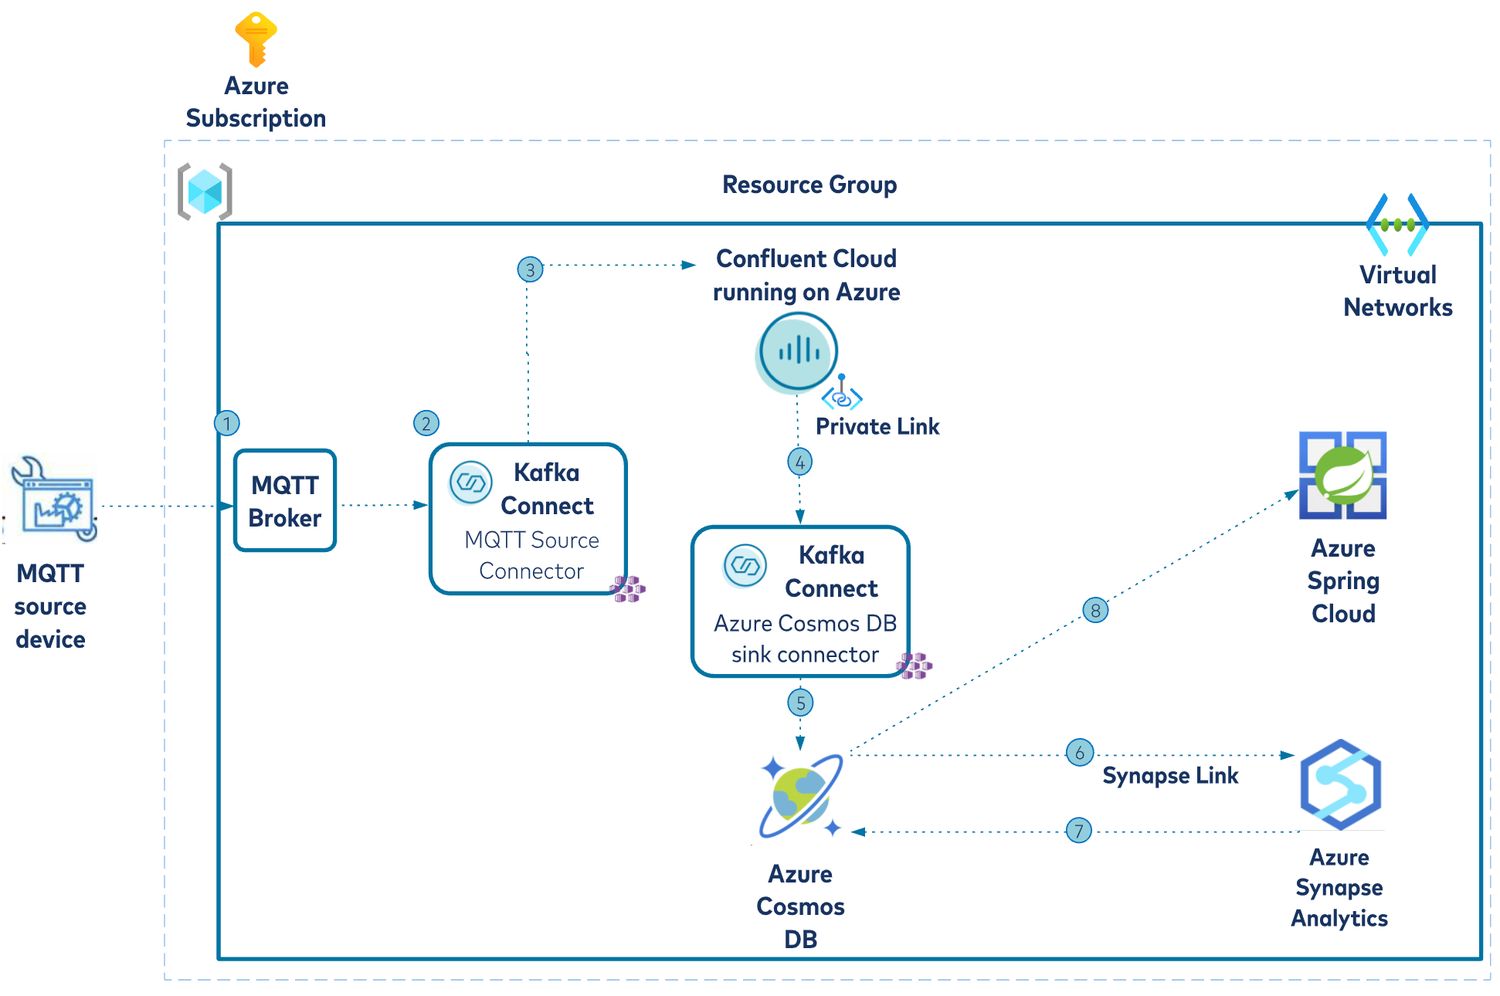
The requirements for this hypothetical use case are to ingest, store, and analyze device data such as temperature and pressure in different locations.
- Mock device data is produced using a data generator utility.
- This data flows into an MQTT broker.
- Apache Kafka® MQTT source connector is used to connect to a Confluent Cloud Kafka cluster on Azure.
- A private link is configured between Azure and Confluent cloud.
- From there, the Sink connector for Azure Cosmos DB takes care of sending the device data from Confluent Cloud to Azure Cosmos DB. It is important to note that the Azure Kubernetes Service (hosting Kafka connectors) and Azure Cosmos DB are deployed in a single VNet to enable a secure connection between Confluent Cloud and Azure Cosmos DB.
- IoT data in Azure Cosmos DB is processed using Azure Synapse Analytics.
- The aggregated IoT data is stored in Azure Cosmos DB.
- Aggregated device data is made accessible via REST APIs exposed by a Spring Boot application deployed to Azure Spring Cloud.
Below are the key elements and capabilities of the above-mentioned architecture.
Infrastructure components:
- MQTT broker – The MQTT broker receives mock device data (temperature and pressure).
- Azure Kubernetes Service – Both MQTT (source) and the Azure Cosmos DB (sink) connectors are run in a self-managed mode in Azure Kubernetes Service.
- Confluent Cloud on Azure – This is an Azure Marketplace offering which provides fully managed Kafka clusters (SaaS). Configure Azure Private Link for dedicated clusters in Azure for secure connectivity.
- Azure Cosmos DB is used to host the device data coming from MQTT source and processed data in Azure Synapse Analytics is pulled back to an analytical store in Cosmos DB.
- Azure Synapse Analytics – IoT data in Azure Cosmos DB is processed using Apache Spark pool. The no-ETL pipeline from Azure Cosmos DB and Azure Synapse Analytics is powered by Azure Synapse Link.
Application components:
Aggregated device data is made accessible via REST APIs exposed by a Spring Boot application deployed to Azure Spring Cloud—it makes use of the Azure Cosmos DB Spring support.
Before you proceed, make sure you have the following prerequisites and services available.
Prerequisites
- An Azure account (available for free here)
- Create Confluent Cloud on Azure using Azure Marketplace
- Install Azure CLI
- JDK 11 (e.g., OpenJDK)
- A recent version of Maven and Git
- Install Docker
The next section provides a summary of how to set up the Azure services and infrastructure to build the entire solution. References to the documentation and other resources are provided where applicable.
Infrastructure setup
Confluent Cloud on Azure
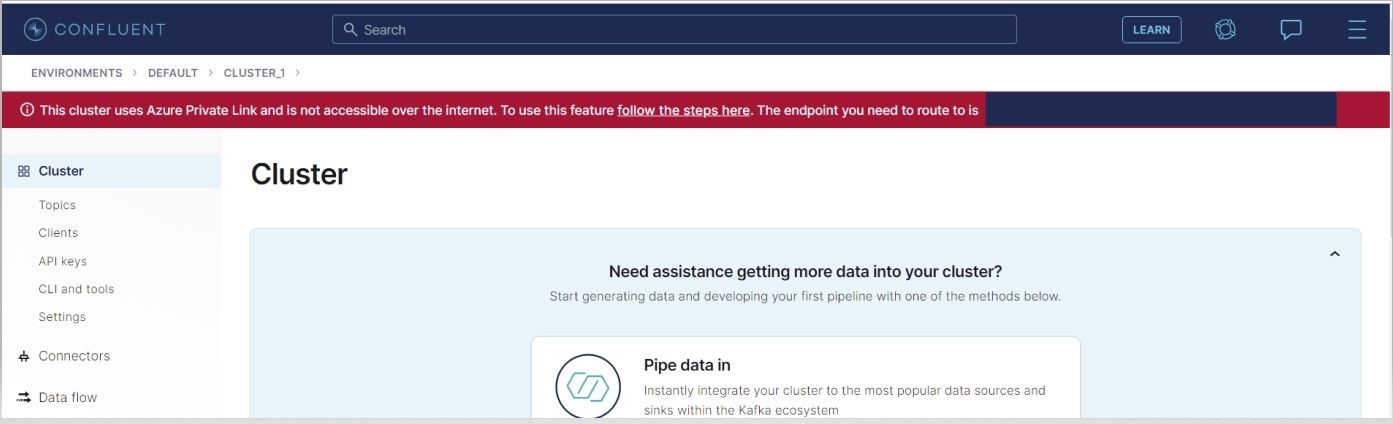
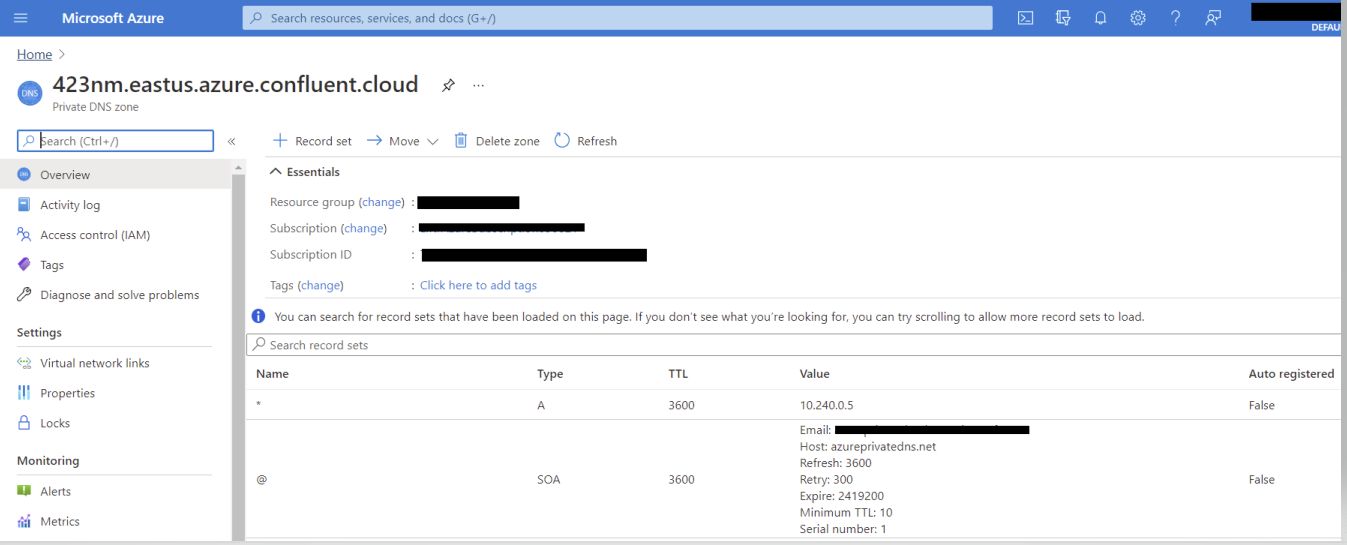
Provision a Confluent Cloud cluster on Azure Marketplace. Create a new dedicated cluster in Confluent Cloud with Private Link enabled, set up a private endpoint in your Azure VNet, and securely connect to a Confluent Cloud Kafka cluster for your data in motion from your Azure VNet. Configure Azure Private Link for dedicated clusters in Azure using these instructions.
Once complete, create the following:
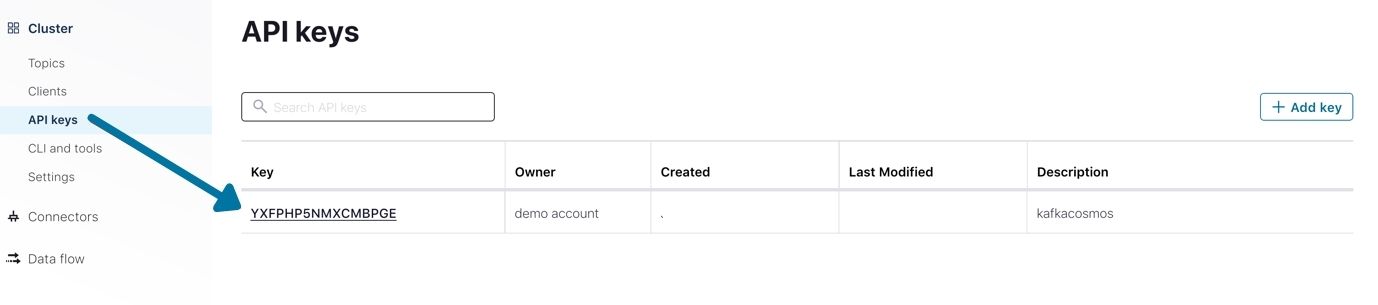
- Confluent Cloud API key and secret: The MQTT and Azure Cosmos DB connectors need credentials to access the Kafka cluster.
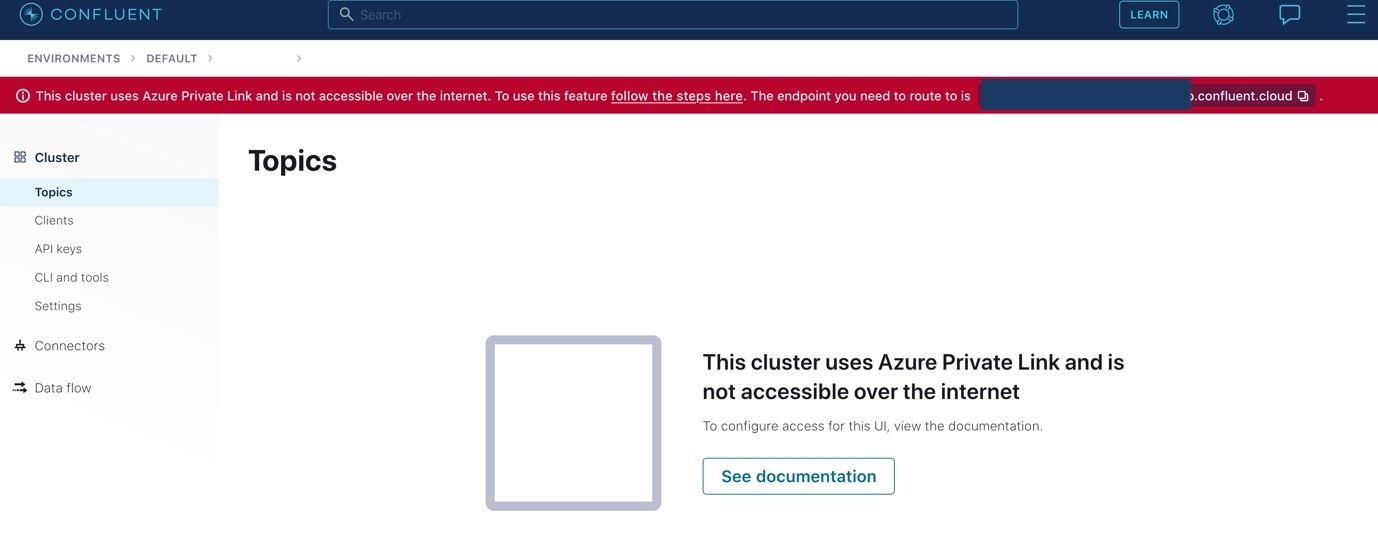
- A Kafka topic named mqtt.device-stats: When using Private Link, the Confluent Cloud UI components like topic management are not publicly reachable. You must configure internal access to these components.
Azure Cosmos DB
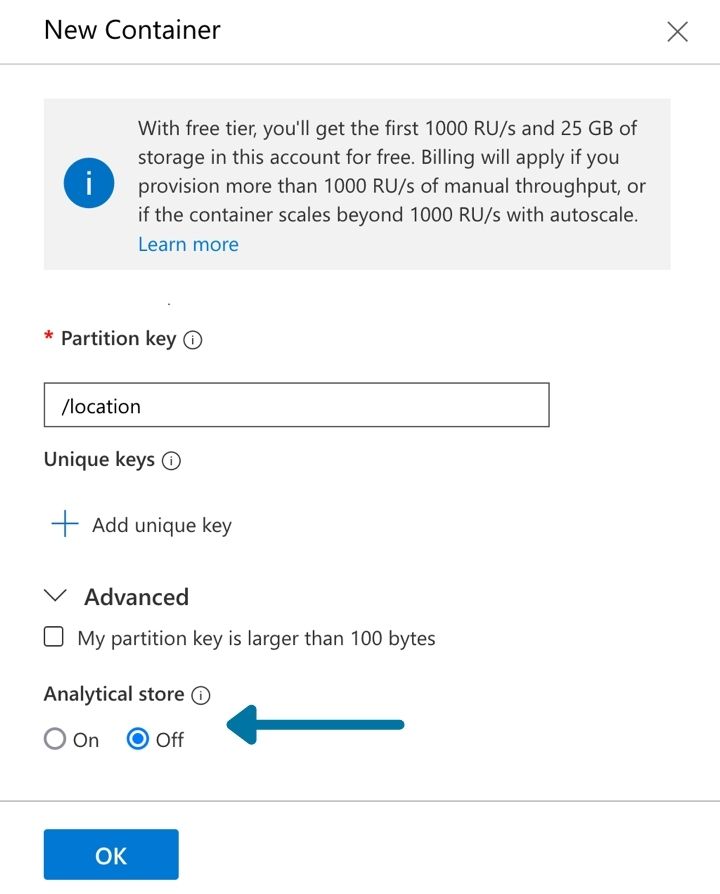
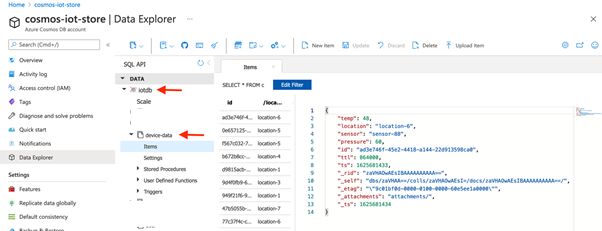
To set up Azure Cosmos DB, start by creating an account using the Azure portal. Enable Azure Synapse Link for Azure Cosmos DB accounts. Create a database (named iotdb) and containers with the following specifications:
- device-data: Partition key – /location, Analytical store On
- avg_temp: Partition key – /id, Analytical store Off
- locations: Partition key – /id, Analytical store On
- avg_temp_enriched: Partition key – /id, Analytical store Off
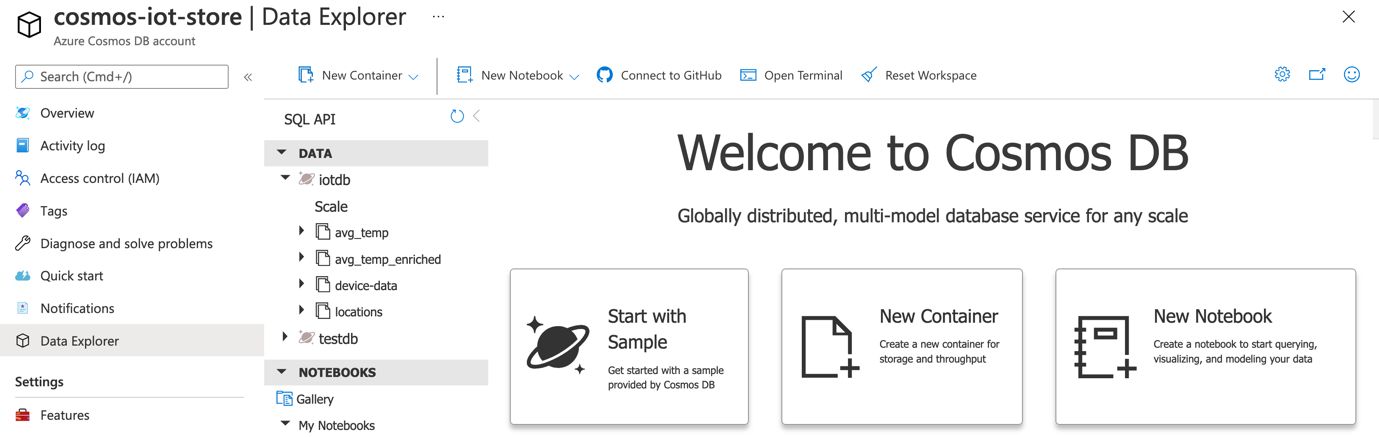
All the containers should show up under the iotdb database:
Azure Synapse workspace
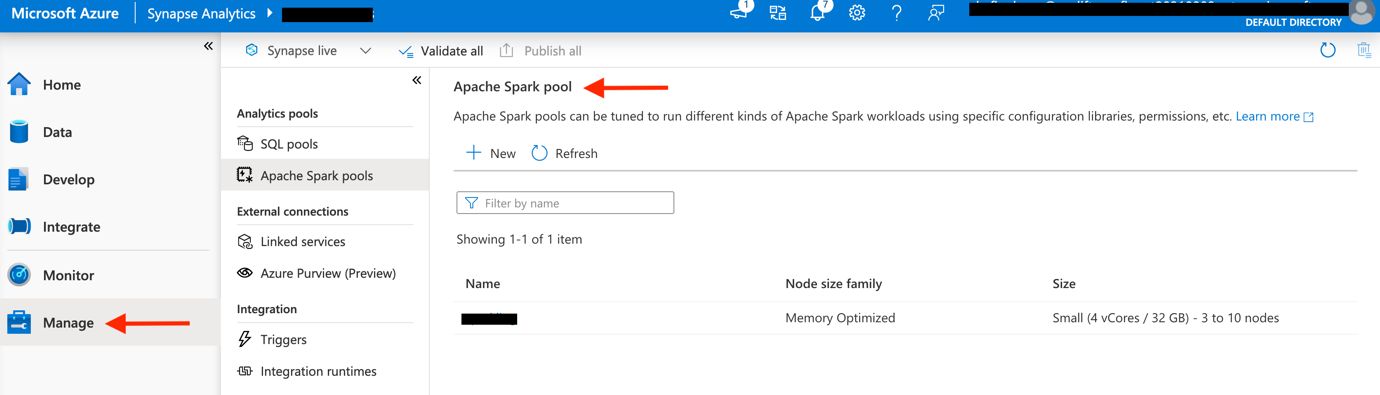
Provision an Azure Synapse workspace using the portal. Once complete, follow these instructions to create a serverless Apache Spark pool.
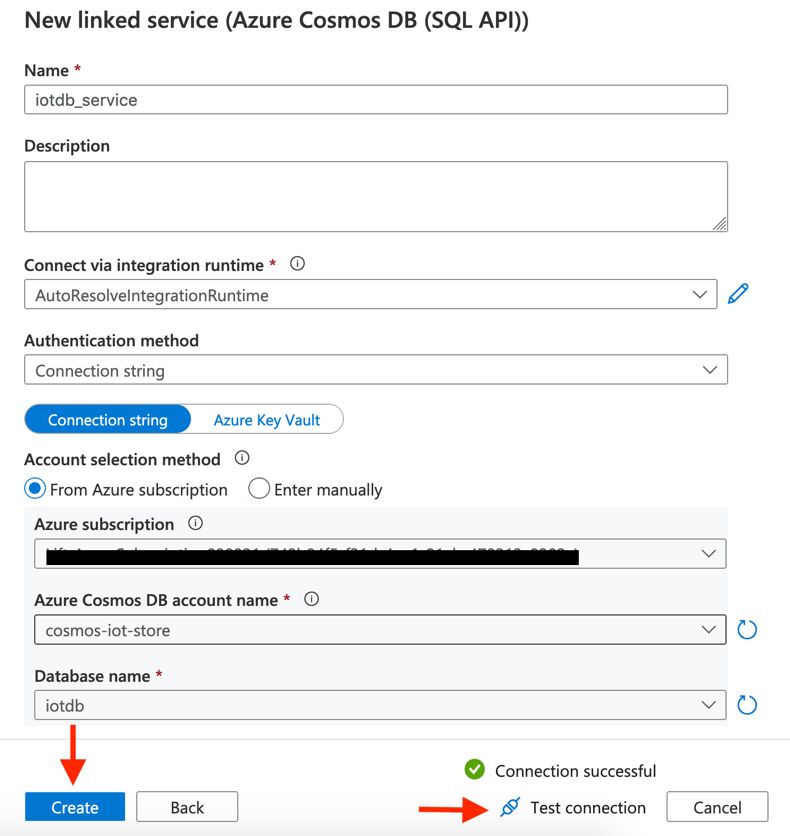
Finally, create a linked service for Azure Cosmos DB.
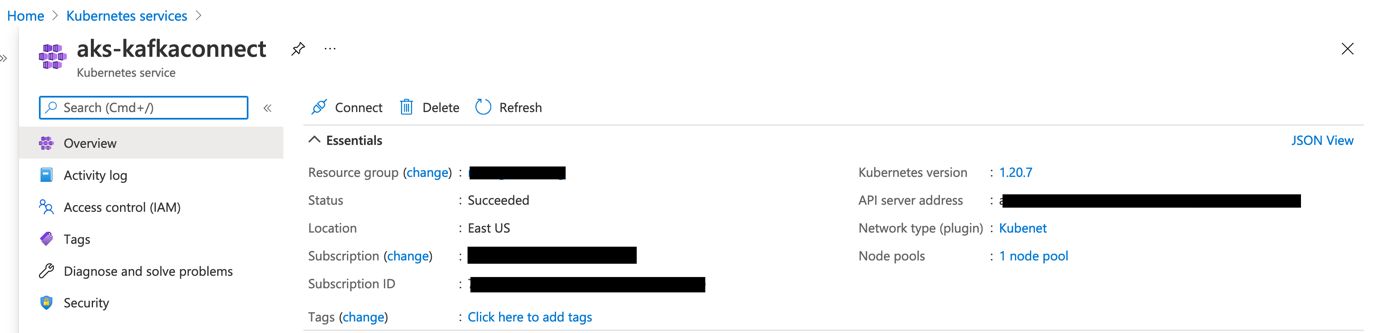
Azure Kubernetes Service
You can install a Kubernetes cluster on Azure using the portal or Azure CLI.
In order to connect to the cluster from your local machine using kubectl, use this command:
az aks get-credentials --resource-group <AZURE_RESOURCE_GROUP> --name <AKS_CLUSTER_NAME>
To confirm:
kubectl get nodes

#output will be similar to
NAME                                STATUS   ROLES   AGE   VERSION
aks-agentpool-12345678-vmss000000   Ready    agent   1d    v1.20.7
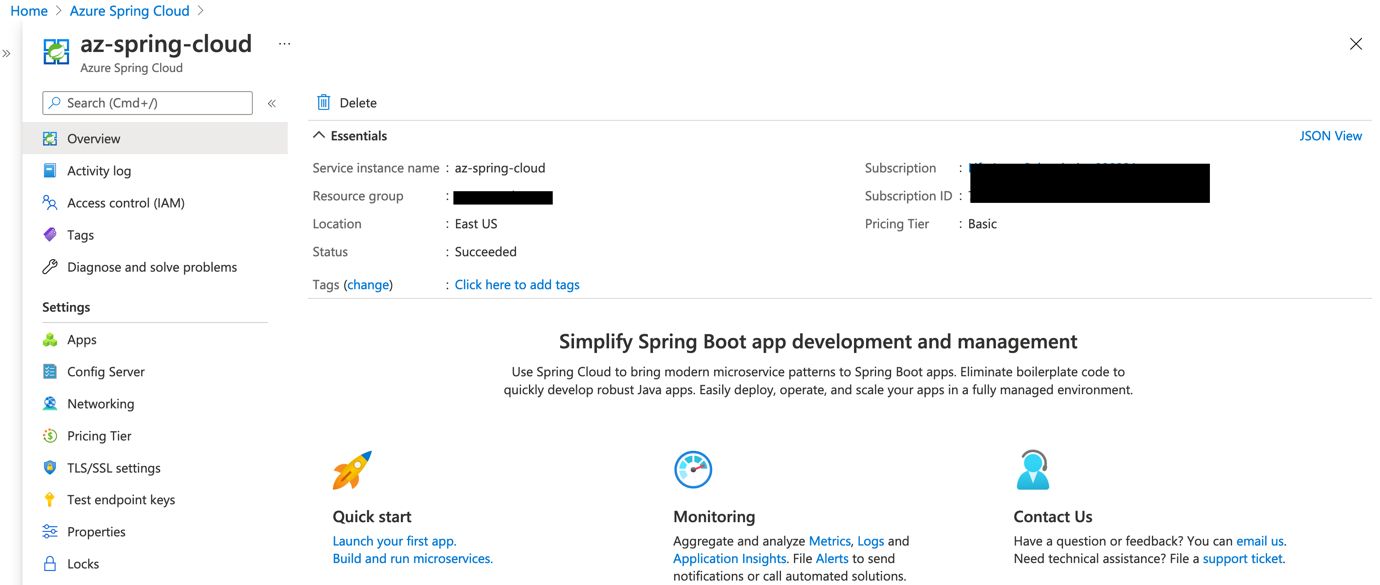
Azure Spring Cloud
You can quickly create an instance of Azure Spring Cloud using the Azure portal and following this guide.
Finally, clone this GitHub repo:
git clone https://github.com/abhirockzz/azure-kafka-iot
Once you’ve completed provisioning and configuring the Azure services, move to the next section that covers how to deploy the MQTT and Azure Cosmos DB Kafka Connectors for the data pipeline. These will be deployed in self-managed mode. The following covers the Kubernetes resources for running these connectors to better understand how things work.
Kubernetes components for MQTT source connector
ConfigMap: Typically, a properties file is used to configure a Kafka Connect worker. Since it needs to run in Kubernetes, it’s convenient to encapsulate this information in the form of a ConfigMap resource. Here is a snippet:
apiVersion: v1
kind: ConfigMap
metadata:
  name: connector-config
data:
  CONNECT_REST_ADVERTISED_HOST_NAME: connect
  CONNECT_REST_PORT: "8083"
  CONNECT_GROUP_ID: cosmosdb-connector-group
  CONNECT_CONFIG_STORAGE_TOPIC: cosmosdb-connector-configs
  CONNECT_CONFIG_STORAGE_REPLICATION_FACTOR: "3"
....
Secret: We could have included all the attributes in the ConfigMap resource, but that’s not advisable for sensitive information such as cluster API keys, etc. Hence, we use a Kubernetes secret:
apiVersion: v1
kind: Secret
metadata:
  name: kafka-cluster-credentials
stringData:
  CONNECT_BOOTSTRAP_SERVERS: "<broker host:port>"
  CONNECT_SASL_JAAS_CONFIG: org.apache.kafka.common.security.plain.PlainLoginModule required username='<confluent cloud API key>' password='<confluent cloud API secret>';
  CONNECT_PRODUCER_SASL_JAAS_CONFIG: org.apache.kafka.common.security.plain.PlainLoginModule required username='<confluent cloud API key>' password='<confluent cloud API secret>';

  CONNECT_PRODUCER_CONFLUENT_MONITORING_INTERCEPTOR_SASL_JAAS_CONFIG: org.apache.kafka.common.security.plain.PlainLoginModule required username='<confluent cloud API key>' password='<confluent cloud API secret>';
  CONNECT_CONSUMER_SASL_JAAS_CONFIG: org.apache.kafka.common.security.plain.PlainLoginModule required username='<confluent cloud API key>' password='<confluent cloud API secret>';
  CONNECT_CONSUMER_CONFLUENT_MONITORING_INTERCEPTOR_SASL_JAAS_CONFIG: org.apache.kafka.common.security.plain.PlainLoginModule required username='<confluent cloud API key>' password='<confluent cloud API secret>';
The attributes (CONNECT_GROUP_ID, CONNECT_SASL_JAAS_CONFIG, etc.) from the ConfigMap and secret are automatically available in the Kafka Connect worker Pod as environment variables.
Deployment: It points to a preexisting Docker image for the connector and references the Config and secret resources for the worker configuration (broker details, etc.).
If you want to create your own image, you can use the Dockerfile.
Let’s start implementing the first part of the data pipeline that involves ingesting device data into Confluent Cloud.
Ingest device data into Confluent Cloud using MQTT source connector
This blog makes use of a publicly hosted HiveMQ MQTT broker. This keeps things simple since you don’t have to worry about setting up a broker yourself.
The public HivemQ broker is available at broker.hivemq.com:1883 and it is open for anyone. This blog makes use of it for experimental/instructional purposes only.
The connector (deployment) depends on the cluster information. Update the secret manifest file kafka-cluster-secret.yaml (under mqtt-source-connector/deploy) with the API key and secret for Confluent Cloud.
Use kubectl to deploy the connector:
kubectl apply -f mqtt-source-connector/deploy/
#expected output secret/kafka-cluster-credentials created configmap/mqtt-connector-config created deployment.apps/mqtt-kafka-connector created
Create MQTT source connector instance
Make sure to update the connector configuration file mqtt-source-config.json (under mqtt-source-connector) and enter the correct values for confluent.topic.bootstrap.servers and confluent.topic.sasl.jaas.config attributes.
Here is the connector configuration snippet:
{
    "name": "mqtt-source",
    "config": {
        "connector.class": "io.confluent.connect.mqtt.MqttSourceConnector",
        "tasks.max": "1",
        "mqtt.server.uri": "tcp://broker.hivemq.com:1883",
        "mqtt.topics": "device-stats",
        "kafka.topic": "mqtt.device-stats",
        ...
        "confluent.topic.replication.factor": 3,
        "confluent.topic.bootstrap.servers": "<confluent cloud bootstrap server>",
        "confluent.topic.security.protocol": "SASL_SSL",
        "confluent.topic.sasl.jaas.config": "org.apache.kafka.common.security.plain.PlainLoginModule required username='<confluent cloud API key>' password='confluent cloud API secret';",
The MQTT topic named device-stats is mapped to the mqtt.device-stats topic in Kafka. Leave these values unchanged.
For now, you can use port forwarding to access the REST endpoint for the Kafka Connect instance in Kubernetes:
kubectl port-forward $(kubectl get pods -l=app=mqtt-kafka-connector --output=jsonpath={.items..metadata.name}) 8083:8083
Use the Kafka Connect REST endpoint to create the connector instance:
curl -X POST -H 'Content-Type: application/json' http://localhost:8083/connectors -d @mqtt-source-connector/mqtt-source-config.json

# wait for a minute before checking the connector status
curl http://localhost:8083/connectors/mqtt-source/status
Publish mock data
An application to generate device data has been packaged as a pre-built Docker image for your convenience. It will start publishing mock JSON data to an MQTT broker endpoint:
The Dockerfile for the app is available here.
To start the producer application:
docker run -e MQTT_BROKER=tcp://broker.hivemq.com:1883 abhirockzz/mqtt-go-producer
If everything works well, you should see data flowing into Confluent Cloud. Check the mqtt.device-stats topic:
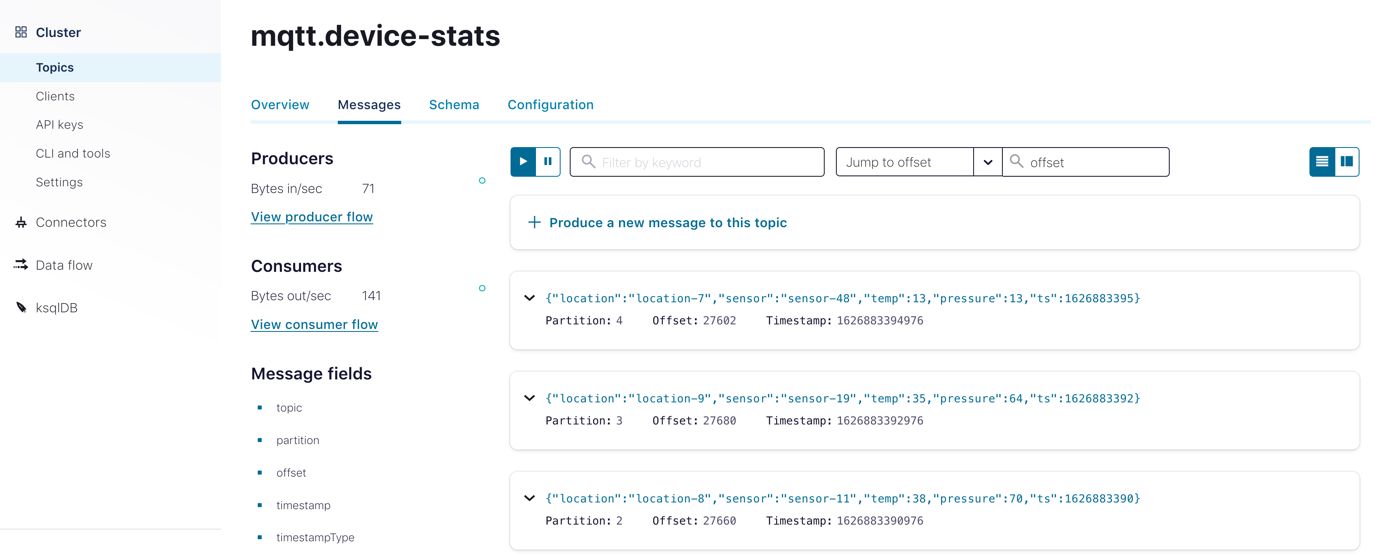
Now that your source setup is operational, it’s time to focus on the part that will persist the device data in the Kafka topic to a container in Azure Cosmos DB using the Kafka Connect Sink connector for Azure Cosmos DB.
Write device data from Confluent Cloud to Azure Cosmos DB
To deploy the Azure Cosmos DB connector, please execute the commands below:
 kubectl apply -f cosmosdb-sink-connector/deploy/
#expected output
configmap/connector-config created
deployment.apps/cosmosdb-kafka-connector created
Wait for the Kafka Connect instance to start—it might take a minute or so. In the meantime, you can keep track of the logs:
kubectl logs -f $(kubectl get pods -l=app=cosmosdb-kafka-connector --output=jsonpath={.items..metadata.name})
It’s time to start the connector. But, before you do that, take a look at the connector configuration:
{
	"name": "iot-sink",
	"config": {
    	"connector.class": "com.azure.cosmos.kafka.connect.sink.CosmosDBSinkConnector",
    	"tasks.max": "1",
    	"topics": "mqtt.device-stats",
    	"value.converter": "org.apache.kafka.connect.json.JsonConverter",
    	"value.converter.schemas.enable": "false",
    	"key.converter": "org.apache.kafka.connect.storage.StringConverter",
    	"key.converter.schemas.enable": "false",
    	"connect.cosmos.connection.endpoint": "https://<account name>.documents.azure.com:443/",
    	"connect.cosmos.master.key": "<access key>",
    	"connect.cosmos.databasename": "iotdb",
    	"connect.cosmos.containers.topicmap": "mqtt.device-stats#device-data",
    	"transforms": "insertID,insertTTL,castTTLInt",
    	"transforms.insertID.type": "com.github.cjmatta.kafka.connect.smt.InsertUuid$Value",
    	"transforms.insertID.uuid.field.name": "id",
    	"transforms.insertTTL.type": "org.apache.kafka.connect.transforms.InsertField$Value",
    	"transforms.insertTTL.static.field": "ttl",
    	"transforms.insertTTL.static.value": "864000",
    	"transforms.castTTLInt.type": "org.apache.kafka.connect.transforms.Cast$Value",
    	"transforms.castTTLInt.spec": "ttl:int32"
	}
}
- Device data from Kafka topic mqtt.device-stats will be synced to device-data container in Azure Cosmos DB (in the iotdb database).
- The id attribute (required by Azure Cosmos DB) is generated using the InsertUUID SMT transformer.
- A static value (86400 seconds) for time-to-live property (ttl) is also added (InsertField transformer) and its converted (Cast) into an int.
Make sure to update the connector configuration with the Azure Cosmos DB account name (in connect.cosmos.connection.endpoint) and the Access Key (for connect.cosmos.master.key attribute). Leave the others unchanged.
Just like before, you can use port forwarding to access the REST endpoint for the Kafka Connect instance:
kubectl port-forward $(kubectl get pods -l=app=cosmosdb-kafka-connector --output=jsonpath={.items..metadata.name}) 9090:8083
In another terminal, enter the following command to start the Azure Cosmos DB connector instance:
curl -X POST -H "Content-Type: application/json" -d @cosmosdb-sink-connector/connector-config.json http://localhost:9090/connectors
 # wait for few seconds before checking the status and making sure its RUNNING
curl http://localhost:9090/connectors/iot-sink/status
Since the device records are already flowing into Kafka via the MQTT source connector (in the mqtt.device-stats topic), it should get persisted to Azure Cosmos DB. Navigate to the Azure portal and check the device-data container:
The pipeline is set up, now it’s time to process the data.
Run near-real-time analytics on IoT data using Azure Synapse
The code snippets covered in this section are a part of this notebook.
Start by reading data from the device-data container in Azure Cosmos DB. Note that this is executed against the analytical store (notice the cosmos.olap format), which is a fully isolated column store to run analytics without affecting your transactional workloads.
iotdata = spark.read.format("cosmos.olap")\ .option("spark.synapse.linkedService", "iotcosmos")\

.option("spark.cosmos.container", "device-data")\ .load() print(iotdata.count()) display(iotdata.limit(3))
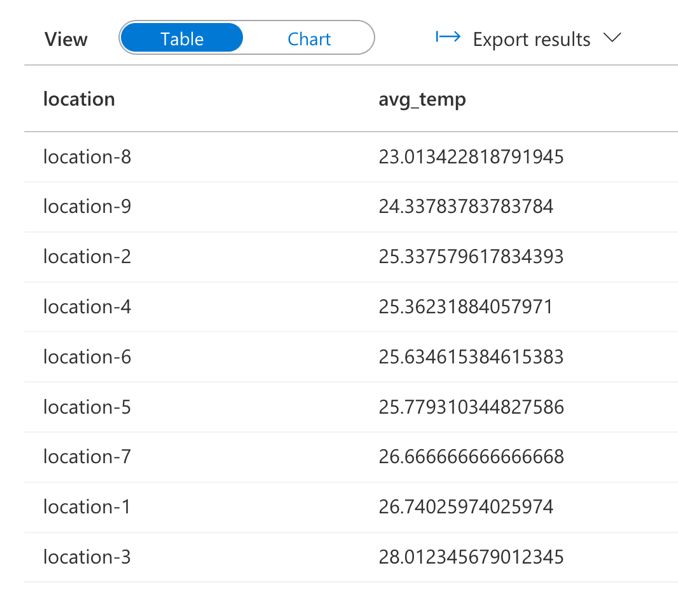
This is followed by a basic aggregation which involves calculating the average temperature across all devices in each location:
average_temp = iotdata.groupBy("location").avg("temp") \
                        .withColumnRenamed("avg(temp)", "avg_temp") \
                        .orderBy("avg(temp)")

display(average_temp)
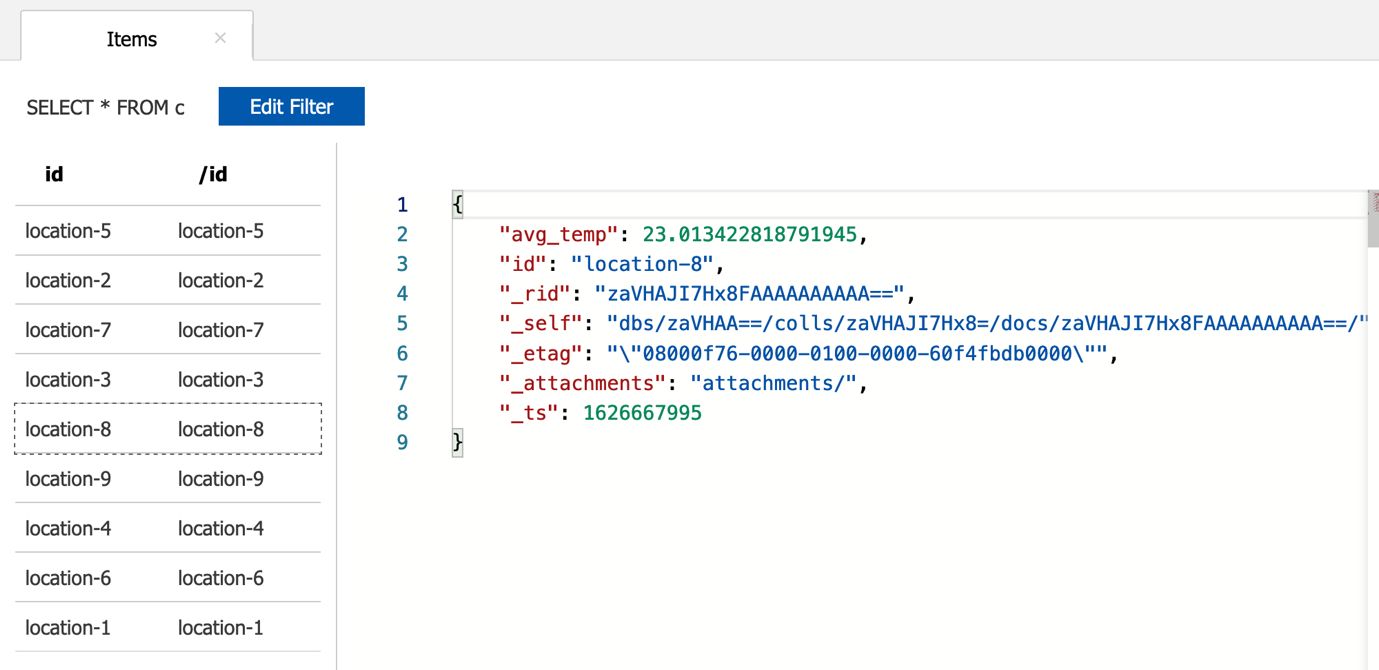
This DataFrame is written to another Azure Cosmos DB container (avg_temp).
The id attribute is used as the partition key (which is populated with the same value as the location name). This allows you to do point queries (least expensive) to get the average temperature across all devices for a specific location.
Please note that writes always go to the OLTP container (note cosmos.oltp format) and consume request units provisioned on the Azure Cosmos DB container:
average_temp_new = average_temp \
                    .withColumn("id", average_temp["location"]) \
                    .drop("location")

average_temp_new.write\
    .format("cosmos.oltp")\
    .option("spark.synapse.linkedService", "iotcosmos")\
    .option("spark.cosmos.container", "avg_temp")\
    .option("spark.cosmos.write.upsertEnabled", "true")\
    .mode('append')\
    .save()
Navigate to the Azure portal and check the avg_temp container in Azure Cosmos DB:
Note that the location data is of the form location-1, location-2, etc.—it does not make a lot of sense. What if you enrich this with the actual location name? It’s a good excuse to learn how to use Spark SQL tables in Synapse and join it with data from Azure Cosmos DB!
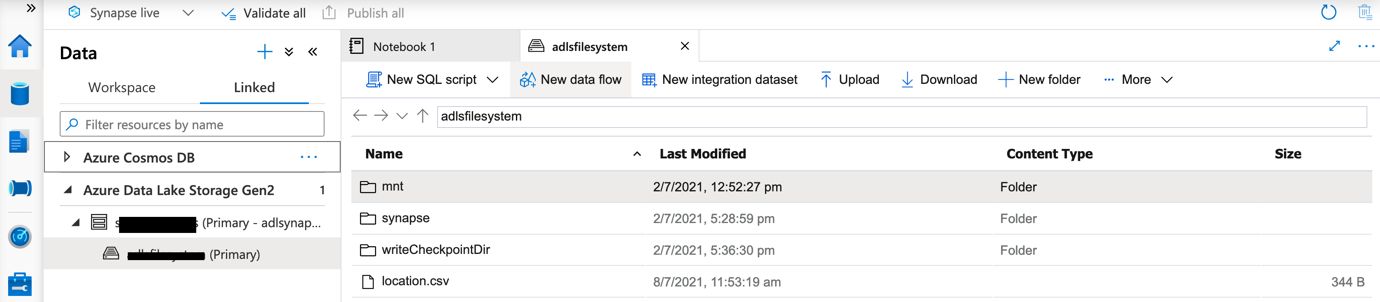
First, you need the location metadata to be stored in Azure Cosmos DB. This is available in the form of a CSV file—its contents are as follows:
name,info
location-1,New Delhi
location-2,New Jersey
location-3,New Orleans
location-4,Seattle
location-5,Colorado
location-6,Toronto
location-7,Montreal
location-8,Ottawa
location-9,New York
Upload this file to the ADLS filesystem associated with the Azure Synapse workspace:
Read the CSV info into a data frame:
locationInfo = (spark
                .read
                .csv("/location-metadata.csv", header=True, inferSchema='true')
              )

display(locationInfo)
Write the DataFrame to Azure Cosmos DB:

locations = locationInfo \
                    .withColumn("id", locationInfo["name"]) \
                    .drop("name")

locations.write\
            .format("cosmos.oltp")\
            .option("spark.synapse.linkedService", "iotcosmos")\
            .option("spark.cosmos.container", "locations")\
            .option("spark.cosmos.write.upsertEnabled", "true")\
            .mode('append')\
            .save()
Navigate to the Azure portal and check the locations container:
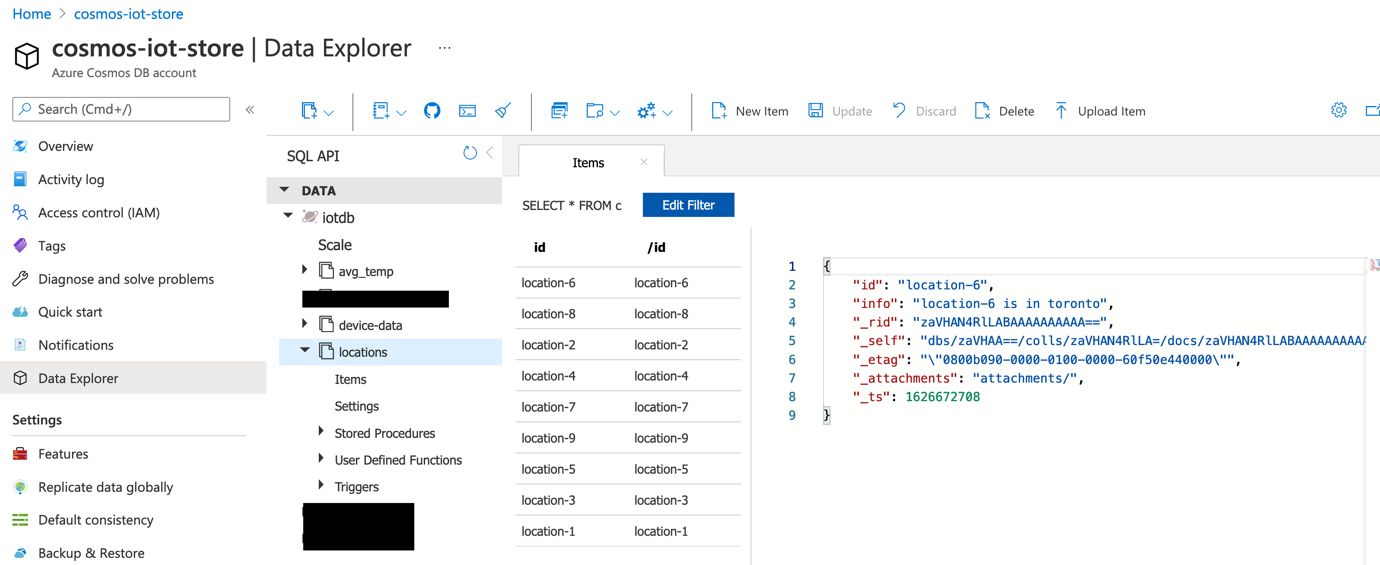
Start by creating a Spark database:
%%sql
create database iotcosmos
Create Spark tables on top of raw device data and the location metadata in Azure Cosmos DB. The first table is iotcosmos.iot_data:
%%sql
create table if not exists iotcosmos.iot_data using cosmos.olap options (
    spark.synapse.linkedService 'iotcosmos',
    spark.cosmos.container 'device-data'
)
The second table is iotcosmos.locations:
%%sql
create table if not exists iotcosmos.locations using cosmos.olap options (
    spark.synapse.linkedService 'iotcosmos',
    spark.cosmos.container 'locations'
)
Join the data in different tables, based on location:
avg_temp_enriched = spark.sql("select b.info, \
                            a.location, \
                            AVG(a.temp) \
                            from iotcosmos.iot_data a \
                             join iotcosmos.locations b \
                            on a.location = b.id \
                            group by a.location, b.info")

display(avg_temp_enriched)
The result is the average temperature across all devices in a location with the location name (enriched information). Finally, write it to the avg_temp_enriched container in Azure Cosmos DB:
avg_temp_enriched_with_id = avg_temp_enriched \
                    .withColumn("id", avg_temp_enriched["location"]) \
                    .withColumnRenamed("avg(temp)", "avg_temp") \
                    .drop("location")

display(avg_temp_enriched_with_id)

avg_temp_enriched_with_id.write\
    .format("cosmos.oltp")\
    .option("spark.synapse.linkedService", "iotcosmos")\
    .option("spark.cosmos.container", "avg_temp_enriched")\
    .option("spark.cosmos.write.upsertEnabled", "true")\
    .mode('append')\
    .save()
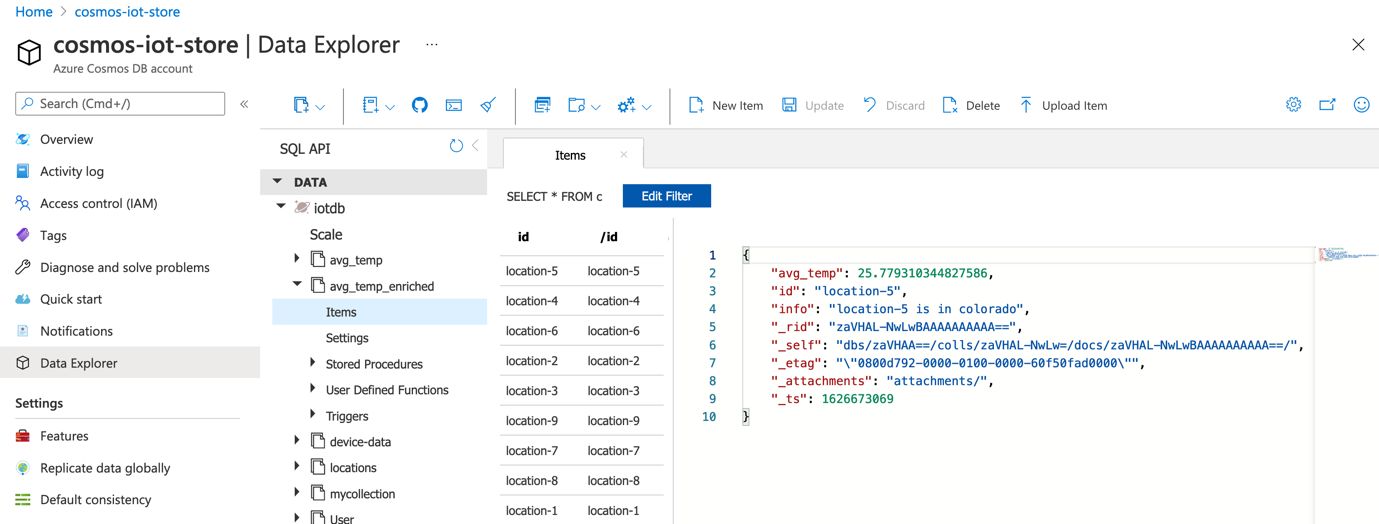
Navigate to the Azure portal and check the avg_temp_enriched container:
In the final section, you will deploy a Java application on Azure Spring Cloud to expose the aggregated temperature data in Azure Cosmos DB.
Deploy Spring Boot application to Azure Spring Cloud
Start by creating the Azure Spring Cloud application using Azure CLI. First, install the Azure Spring Cloud extension for the Azure CLI:
az extension add --name spring-cloud
Create the Azure Spring Cloud applications:
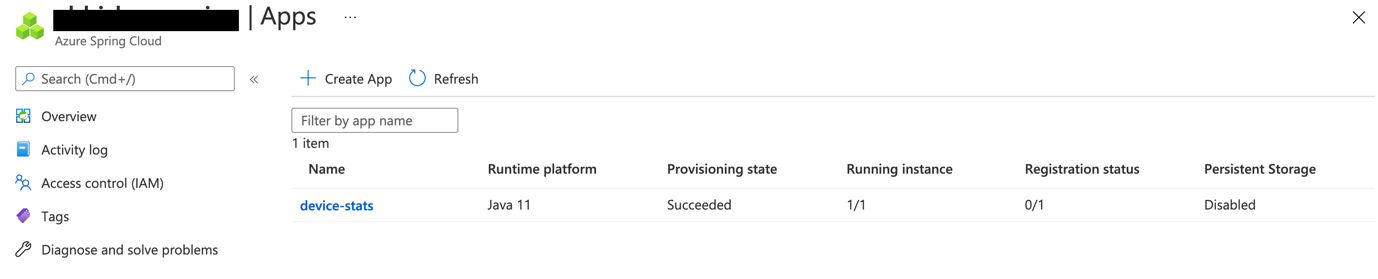
az spring-cloud app create -n device-stats -s <enter the name of Azure Spring Cloud service instance> -g <enter azure resource group name> --runtime-version Java_11 --assign-endpoint true
device-stats is the application name.
Before deploying the application, update the application.properties (in device-data-api/src/main/resources) file with Azure Cosmos DB account name and access key:
azure.cosmos.uri=https://<account name>.documents.azure.com:443/
azure.cosmos.key=<access key>
azure.cosmos.database=iotdb
cosmos.queryMetricsEnabled=true
Build the application JAR file:
cd device-data-api

export JAVA_HOME=<enter path to JDK e.g. /Library/Java/JavaVirtualMachines/zulu-11.jdk/Contents/Home>

mvn clean package
After you build the application, the JAR file should be available under the target directory.
To deploy the application JAR file:
az spring-cloud app deploy -n device-stats -s <enter the name of Azure Spring Cloud service instance> -g <enter azure resource group name> --jar-path target/device-data-api-0.0.1-SNAPSHOT.jar
While the application gets deployed and starts up, you can check the logs to monitor its progress:
az spring-cloud app logs -n device-stats -s <enter the name of Azure Spring Cloud service instance> -g <enter azure resource group name>
Navigate to the Azure portal and confirm that the application is up and running.
To invoke the REST API, you need to find the endpoint at which your application is accessible. You can just use the Azure portal for that, but it’s also possible to do it via Azure CLI:
az spring-cloud app show -n device-stats -s <enter the name of Azure Spring Cloud service instance> -g <enter azure resource group name> --query 'properties.url'
There are two endpoints supported by the application:
- One for listing all the devices with their respective (average) temperature readings
- The other for checking a specific device using its id (which in this example, happens to be location-1, location-2, etc.)
You can invoke the APIs with your browser or use a CLI tool such as curl.
To find information for all devices:
where az-spring-cloud is the name of the Azure Spring Cloud service instance

curl https://az-spring-cloud-device-stats.azuremicroservices.io/devices

# JSON output
[
  {
    "id": "location-6",
    "avg_temp": 29.21153846153846,
    "info": "Toronto"
  },
  {
    "id": "location-5",
    "avg_temp": 25.482142857142858,
    "info": "Colorado"
  },
  {
    "id": "location-2",
    "avg_temp": 23.28,
    "info": "New Jersey"
  },
  {
    "id": "location-4",
    "avg_temp": 21.6875,
    "info": "Seattle"
  },
  {
    "id": "location-8",
    "avg_temp": 22.408163265306122,
    "info": "Ottawa"
  },
  {
    "id": "location-3",
    "avg_temp": 27.428571428571427,
    "info": "New Orleans"
  },
  {
    "id": "location-7",
    "avg_temp": 27.82857142857143,
    "info": "Montreal"
  },
  {
    "id": "location-9",
    "avg_temp": 21.9811320754717,
    "info": "New york"
  },
  {
    "id": "location-1",
    "avg_temp": 25.53846153846154,
    "info": "New Delhi"
  }
]
For a specific location (location-2):
curl https://az-spring-cloud-device-stats.azuremicroservices.io/devices/location-2
# JSON output
{
  "id": "location-2",
  "avg_temp": 25.337579617834393,
  "info": "New Jersey"
}
Conclusion
This blog demonstrates how you can use PaaS services along with Confluent Cloud (SaaS) on Azure to build a solution for processing and analyzing IoT data. Thanks to Confluent Cloud and Azure Cosmos DB, you don’t have to set up and maintain complex distributed systems, such as a database or event streaming platform. Confluent Cloud and its rich set of Kafka connectors along with Azure Synapse Link for Azure Cosmos DB allow you to build data pipelines and run near-real-time analytics on your operational data, at scale—all without the burden of developing complex, homegrown ETL (Extract-Load-Transform) systems. Running these connectors on Kubernetes let you reap all the benefits, including scalability, fault tolerance, and much more!
New features
- Azure Cosmos DB fully managed connector – Developed in partnership with Microsoft and Confluent teams, the Cosmos DB fully managed sink connector allows microservices to easily communicate with each other and downstream apps.
- Azure Synapse fully managed connector – Within the Synapse workspace, data can be synced to dedicated SQL pools from Confluent Cloud via the fully managed Synapse sink connector, enabling real-time streaming analytics.
Next Steps
Join Confluent and Microsoft for our interactive IoT Forum to learn about IoT use cases and see interactive demos with Confluent Cloud and Azure integrations.


