New in Confluent Cloud: Making Data & Pipelines Accessible for AI-Ready Streaming | Learn More
How to Deploy Confluent Platform on Pivotal Container Service (PKS) with Confluent Operator
This tutorial describes how to set up an Apache Kafka® cluster on Enterprise Pivotal Container Service (Enterprise PKS) using Confluent Operator, which allows you to deploy and run Confluent Platform at scale on virtually any Kubernetes platform, including Pivotal Container Service (PKS). With Enterprise PKS, you can deploy, scale, patch, and upgrade all the Kubernetes clusters in your system without downtime.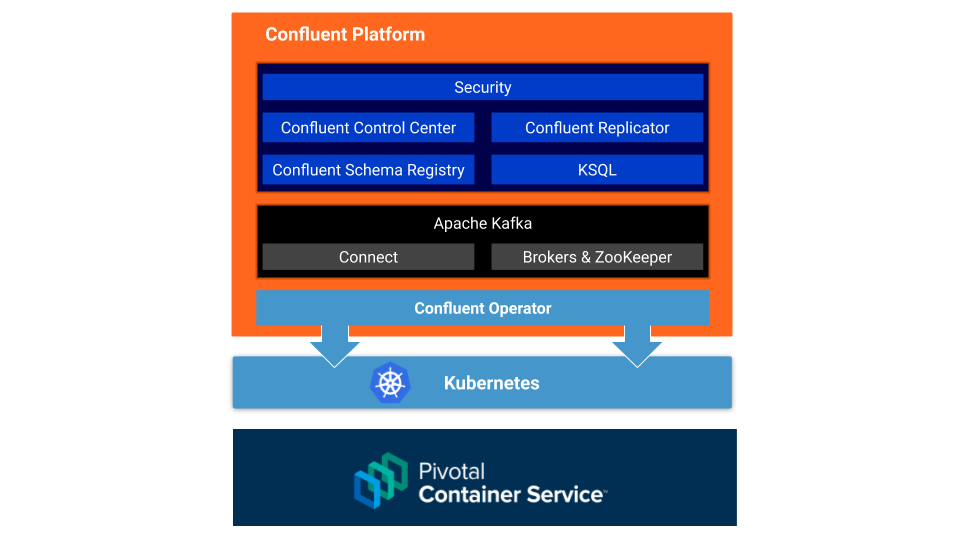
You’ll start by creating a Kafka cluster in Enterprise PKS using Confluent Operator. Then, you’ll configure it to expose external endpoints so the cluster will be available for use outside of the Enterprise PKS environment. This is useful in cases where you are deploying a Pivotal Application Service (PAS) that produces and/or consumes to Kafka running in Enterprise PKS.
Let’s begin!
Requirements
- Access to PKS: for this tutorial, a PKS cluster (PKS 1.4.0) with one master node and six worker nodes was used. Your PKS environment URL, username, and password are needed.
- Ensure that your PKS environment has access to Docker because Confluent Operator packages are released as container images.
- Install the PKS Command Line Interface (CLI) on your laptop. You may need to create an account on Pivotal Network in order to sign in and download.
- A sample PKS Helm Chart file, such as this file we are using
- The Kubernetes command line tool kubectl
- Install Helm 2.9+.
- Download and expand Confluent Platform (.tar or .zip). (Note: this is technically not required for deployment, but you need access to the scripts in the expanded bin/ directory for the external verification section of this tutorial.)
- Download and expand the Confluent Helm bundle tarball, as seen in step 1 of the documentation.
Operator and Kafka Setup Tasks
Run all the following command line tasks in a terminal unless explicitly noted otherwise.
- Run pks login -a https://api.pks.example.cf-app.com:9021 -u confluent -p confluent-password -k using the URL, username, and password from the first requirement in the section above.
- Run pks get-credentials confluent-cluster.
- Issue kubectl config use-context confluent-cluster to point kubectl to the Enterprise PKS cluster by default.
- Configure Tiller to use a Helm Chart with Enterprise PKS.
- Create a pks.yaml Helm Chart file ( in the helm/providers directory wherever your Confluent Operator distribution was expanded. For this example, you can expand the Confluent Operator tarball to ~/dev/confluent-operator-20190726-v0.65.0 and create a file in ~/dev/confluent-operator-20190726-v0.65.0/helm/providers.
- In the helm/ directory in your terminal, run the command below:
helm install \ -f ./providers/pks.yaml \ --name operator \ --namespace operator \ --set operator.enabled=true \ ./confluent-operator - Validate that Confluent Operator is running kubectl get pods -n operator. You should see something similar to the following after issuing this command:
NAME                          READY   STATUS              RESTARTS   AGE
cc-manager-7bf99846cc-qx2hb   1/1     ContainerCreating             1          6m40s
cc-operator-798b87b77-lx962   1/1     ContainerCreating             0          6m40s
Wait until the status changes from ContainerCreating to Running.
- Install ZooKeeper with the following command, similar to how you previously installed Operator:
helm install \ -f ./providers/pks.yaml \ --name zookeeper \ --namespace operator \ --set zookeeper.enabled=true \ ./confluent-operator - Check on the status via the kubectl get pods -n operator sample output:
kubectl get pods -n operator

NAME                          READY   STATUS              RESTARTS   AGE
cc-manager-7bf99846cc-qx2hb   1/1     Running             1          6m40s
cc-operator-798b87b77-lx962   1/1     Running             0          6m40s
zookeeper-0                   0/1     ContainerCreating   0          15s
zookeeper-1                   0/1     ContainerCreating   0          15s
zookeeper-2                   0/1     Pending             0          15s
Wait until the ZooKeeper pods are in Running status before proceeding to the next step. It takes approximately one minute.
- Install Kafka with the following command:
helm install \
    -f ./providers/pks.yaml \
    --name kafka \
    --namespace operator \
    --set kafka.enabled=true \
    ./confluent-operator
Issue kubectl get pods -n operator and wait for the status of the kafka-0, kafka-1, and kafka-2 pods to be Running.
At this point, the setup is complete and you are ready to verify that the installation is successful.
Before beginning verification, some of you may be wondering about the rest of the Confluent Platform, such as Schema Registry, KSQL, Control Center, etc. Based on the steps you just went through, I suspect you already know the answer. Nevertheless, here’s an example of deploying Schema Registry:
helm install -f ./providers/pks.yaml --name schemaregistry --namespace operator --set schemaregistry.enabled=true ./confluent-operator
Verification of the Kafka cluster setup
In this tutorial, verification involves both internal and external verification of tasks because you configured your pks.yaml file for exposing external endpoints.
Internal verification
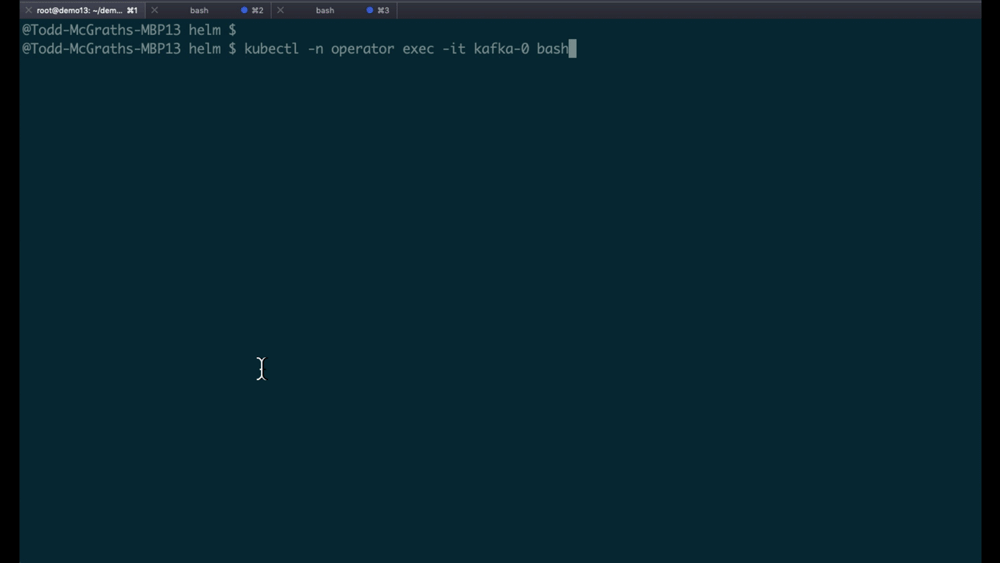
Internal verification involves connecting to one of the nodes in the cluster and ensuring there is communication amongst the nodes by executing various Kafka scripts.
- Run kubectl -n operator exec -it kafka-0 bash
- There are no editors on Kafka cluster nodes, so create a properties file with cat via:
cat << EOF > kafka.properties
sasl.mechanism=PLAIN
sasl.jaas.config=org.apache.kafka.common.security.plain.PlainLoginModule required username=test password=test123;
bootstrap.servers=kafka:9071
security.protocol=SASL_PLAINTEXT
EOF
- Then, the following command should return successfully: kafka-broker-api-versions --command-config kafka.properties --bootstrap-server kafka:9071
This is what running through these three steps looks like:
External validation
For external validation, you can interact with your Kafka cluster from the outside, such as performing these steps on your laptop. Make sure to have Confluent Platform downloaded and extracted, and have the scripts available in the bin/ directory.
- Determine the external IP addresses from the kubectl get services -n operator “EXTERNAL-IP” column:
NAME                   TYPE           CLUSTER-IP       EXTERNAL-IP
kafka                  ClusterIP      None
kafka-0-internal       ClusterIP      10.100.200.223
kafka-0-lb             LoadBalancer   10.100.200.231   35.192.236.163
kafka-1-internal       ClusterIP      10.100.200.213
kafka-1-lb             LoadBalancer   10.100.200.200   35.202.102.184
kafka-2-internal       ClusterIP      10.100.200.130
kafka-2-lb             LoadBalancer   10.100.200.224   104.154.134.167
kafka-bootstrap-lb     LoadBalancer   10.100.200.6     35.225.209.199
- Next, you need to set the name resolution for the external IP. Long term, you’d probably create DNS entries, but in this tutorial, simply update your local /etc/hosts file. As an example, here are some specific entries you can make to your local /etc/hosts file:
35.192.236.163 b0.supergloo.com b0
35.202.102.184 b1.supergloo.com b1
104.154.134.167 b2.supergloo.com b2
35.225.209.199 kafka.supergloo.com kafka
It is critical to map b0, b1, and b2 hosts to their corresponding kafka-0, kafka-1, and kafka-2 external IPs. The same goes for the bootstrap mapping. (Note: the domain supergloo.com was configured in the pks.yaml file.)
- For a quick canary test, ping one of the entries to ensure that name resolution is working correctly, such as ping kafka.supergloo.com.
- In the directory where you expanded your Confluent Platform download, create a kafka.properties file with the following content:
sasl.mechanism=PLAIN
sasl.jaas.config=org.apache.kafka.common.security.plain.PlainLoginModule required username=test password=test123;
bootstrap.servers=kafka.supergloo.com:9071
security.protocol=SASL_PLAINTEXT
- Run some commands to ensure external connectivity, such as the command for creating a topic:
bin/kafka-topics --create --command-config kafka.properties --zookeeper localhost:2181/kafka-operator --replication-factor 3 --partitions 1 --topic example
- List the newly created topic via:
bin/kafka-topics --list --command-config kafka.properties --bootstrap-server kafka.supergloo.com:9092
Congratulations!
You’ve completed the tutorial and deployed a Kafka cluster to Enterprise PKS using Confluent Operator!
Next up in part 2, we’ll walk through how to deploy a sample Spring Boot application to PAS and configure it to produce and consume for the Kafka cluster created in this tutorial.
Want more?
For more, check out Kafka Tutorials and find full code examples using Kafka, Kafka Streams, and KSQL.
Did you like this blog post? Share it now
Subscribe to the Confluent blog


Customer Intelligence Hub: A Single Pane of Glass for Customer Insight and Action
Customer Intelligence Hub unifies customer signals into a real-time, AI-powered view that helps GTM teams prioritize risk, identify opportunity, and act faster with contextual insights.