New in Confluent Cloud: Making Data & Pipelines Accessible for AI-Ready Streaming | Learn More
Confluent Is Now Certified Ready on AWS Outposts
Are you looking for a way to run AWS services on premises in your own datacenter? I am excited to share today that we have completed validation of support for running Confluent Platform on AWS Outposts. AWS Outposts delivers fully managed, configurable compute and storage racks built with Amazon Web Services (AWS) designed hardware that allows you to run instances as you would on Amazon EC2 locally in your datacenter or co-location facility. You get all these resources locally while seamlessly connecting to a broad array of cloud-based AWS services.
We are also excited to announce that we are AWS Outposts Ready partner certified—one the highest designations that an Amazon Partner Network (APN) Partner can achieve. This means that Confluent Platform has been certified for integration with AWS Outposts, giving you the assurance that can run your production workloads on Confluent Platform locally and securely.
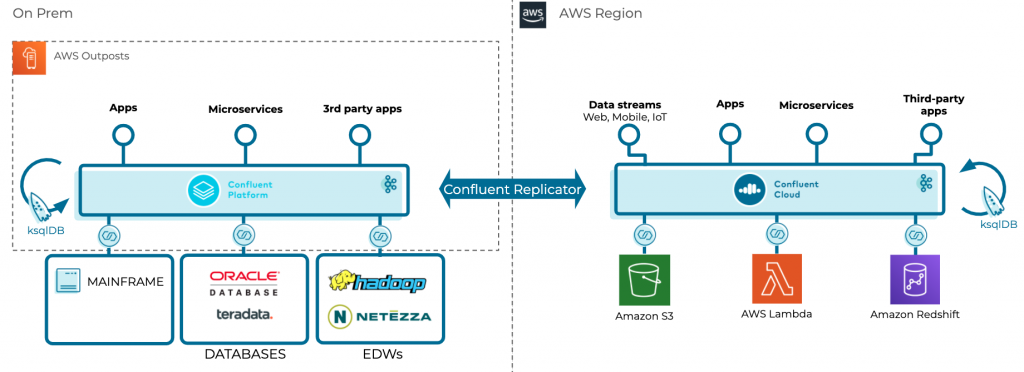
We completed testing of Confluent Platform on Outposts and can now connect various on-premises event sources like legacy databases, proprietary storages, and/or monolithic applications to AWS, serving as a data hub for hybrid designs. Confluent Platform is an enterprise-ready platform that complements Apache Kafka® with advanced capabilities designed to help accelerate application development and connectivity, enable digital transformations through stream processing, simplify enterprise operations at scale and meet stringent architectural requirements. The advantages of running Confluent Platform on AWS Outposts include:
- Running AWS Services on premises
With AWS Outposts, you can run Confluent Platform on Amazon EC2 and leverage Amazon Elastic Block Store (Amazon EBS) provisioned directly through the AWS Command Line Interface (AWS CLI) or CloudFormation. This enables you to seamlessly extend your Amazon Virtual Private Cloud (Amazon VPC) on premises, run AWS services locally on Outposts, and connect to a broad range of services available in the local AWS Region. You can use the same Amazon APIs, tools, and security controls to run, manage, and secure your event-driven applications on premises, just as in the cloud.
- Storing and processing data on premises
AWS Outposts allows you to securely stream, store, and process customer data that needs to remain on Confluent Platform or in countries where there is no AWS region using the same AWS controls you are accustomed to. This may help address the requirements of companies in highly regulated industries and/or those located in countries with data residency laws. This also provides ultra-low latency event streaming performance to your on-premises systems.
- A truly consistent hybrid experience
AWS Outposts delivers a truly consistent hybrid experience by offering the same hardware infrastructure, services, APIs, management, and operations on premises as in the cloud. Confluent extends this functionality with Confluent Replicator and Cluster Linking services that provide bidirectional, fault-tolerant replication of Kafka topics between Confluent clusters.
- Fully managed infrastructure
AWS Outposts is fully managed and supported by AWS. Your Outposts are delivered, installed, monitored, patched, and updated by AWS. With Outposts, you can reduce the time, resources, operational risk, and maintenance downtime required for managing IT infrastructure. Confluent extends this model by providing enterprise support for every component of the Confluent Platform on Outposts, including Apache Kafka, Apache ZooKeeper, ksqlDB, Confluent Schema Registry, REST Proxy, Replicator, Cluster Linking, and more.
In collaboration with AWS, we are able to provide a true hybrid experience with a unified control plane for AWS infrastructure, as well as a unified event streaming platform to build out your next-generation event-driven applications. Thus, you can overcome challenges that exist due to data locality requirements and running complex hybrid scenarios between on-premise and AWS services.
Next, let’s walk through how we set up our environment.
How we did it
This section covers how we deployed Confluent Platform to Outposts during our validation process. I will cover the connectivity you will need to have between your Outposts instances, AWS, and the internet. Then, we will delve into building a custom Amazon Machine Image (AMI) on top of Ubuntu Linux that will be used as a basis for all of the instances we deploy. Next, we will run through a few updates that you need to make to the CloudFormation template supplied below. Finally, we will close with how to verify that your deployment was successful.
Connectivity Requirements
Let’s first discuss the connectivity that EC2 instances running in your Outposts will need:
- Access to Amazon S3 via the internet, an S3 gateway, or VPC endpoint
- Internet access to pull down Ansible and Confluent binaries
- If you have strict requirements for internet access, you may want to consider hosting these files in your datacenter and make slight changes to the CloudFormation script. However, this is out of scope for this blog post.
Building a custom AMI
Follow these steps to create the customer Ubuntu 18.04 AMI:
- Launch a new EC2 instance in the same region as your Outposts using the latest Ubuntu 18.04 HVM x86 AMI:ec:

- Set up a key pair and open up SSH access to our source IP address
- Use SSH to access this new instance
- Update system packages:
sudo apt-get update -y
- Install pip3:
sudo apt install python3-pip -y
- Install Ansible with pip so that it uses python3:
pip3 install ansible --user

vi .bashrc

export PATH=$PATH:$HOME/.local/bin

source .bashrc
sudo cp .local/bin/ansible* /usr/bin

sudo su
pip3 install ansible --user
- Install awscli with pip3:
pip3 install awscli --user
sudo cp .local/bin/aws* /usr/bin

sudo su
pip3 install awscli --user
- Install boto3:
pip3 install boto3 --user

sudo su
pip3 install boto3 --user
- Install CloudFormation helper scripts:
sudo apt-get install python-pip -y
sudo pip install https://s3.amazonaws.com/cloudformation-examples/aws-cfn-bootstrap-latest.tar.gz
sudo cp /usr/local/init/ubuntu/cfn-hup /etc/init.d/cfn-hup
sudo chmod +x /etc/init.d/cfn-hup
sudo update-rc.d cfn-hup defaults
sudo service cfn-hup start
- .bash_history is not created until the user logs out:
logout
- Add ANSIBLE_SSH_USER:
vi /home/ubuntu/.bashrc

export ANSIBLE_SSH_USER=ubuntu

source .bashrc

sudo su

vi /root/.bashrc

export ANSIBLE_SSH_USER=ubuntu

source /root/.bashrc
- Remove the ssh keys from the system:
rm .ssh/authorized_keys
sudo shred -u /etc/ssh/*_key /etc/ssh/*_key.pub

sudo su
rm .ssh/authorized_keys
shred -u /etc/ssh/*_key /etc/ssh/*_key.pub
- Disable local root access:
sudo passwd -l root
- After creating the .bash_history file, we can remove the file and clear history:
rm .bash_history

sudo su
rm .bash_history
history -c && history -w && exit

history -c && history -w
- Build AMI from the instance using the AWS GUI or CLI. Be sure your AMI is set up in the same AWS Region as your Outposts.
- In the AWS console, go to EC2 > Images > AMIs to see your new AMI. Be sure to copy down the AMI ID, as we will use this value in our CloudFormation template.
Updating and running CloudFormation
- Locally download the CloudFormation template.
- Update the following sections:
- RegionMap: Add your custom AMI to the region of your Outposts. In the example below, I used ami-0081b1729374885e9 in us-west-2:
  "Mappings": {
    "RegionMap": {
      "ap-northeast-1"    : { "AMIId" : ""},
        "ap-south-1"      : { "AMIId" : ""},
        "ap-southeast-1"  : { "AMIId" : ""},
        "ap-southeast-2"  : { "AMIId" : ""},
        "ca-central-1"    : { "AMIId" : ""},
        "eu-central-1"    : { "AMIId" : ""},
        "eu-west-1"       : { "AMIId" : ""},
        "eu-west-2"       : { "AMIId" : ""},
        "sa-east-1"       : { "AMIId" : ""},
        "us-east-1"       : { "AMIId" : ""},
        "us-east-2"       : { "AMIId" : ""},
        "us-west-2"       : { "AMIId" : "ami-0081b1729374885e9"}
    }
-
- Parameters/*InstanceType: Your Outposts will have a unique setup in terms of the instance family and sizes. Please be sure to customize your setup accordingly.
    "InventoryInstanceType" : {
      "Description" : "Choose EC2 instance type for Ansible Inventory Node",
      "Type" : "String",
      "Default" : "t2.micro",
      "AllowedValues": [ "t2.micro", "t2.medium", "t2.small", "m5.large" ]
    },
    "BrokerInstanceType" : {
      "Description" : "Choose EC2 instance type for Kafka Broker",
      "Type" : "String",
      "Default" : "m4.large",
- Create a keypair in the region you wish to deploy the stack in. The keypair will be used to launch the instances.
- Upload the keypair into an S3 bucket. Enter the name of the S3 bucket during the creation of the stack.
- Run the updated CloudFormation template via the CloudFormation console.
- Enter a stack name and fill the appropriate parameters. Note the following parameters:
-
- Instance type: Use a small instance for the InventoryNode, larger instances for ksqlDB and Confluent Control Center, and medium-sized instances for everything else.
- In our example, we used m5.large for everything except ksqlDB and Control Center, which used m5.4xlarges.
- The BucketName parameter will take the name of the S3 bucket where the keypair is present. Note that the keypair is region specific.
- Choose the keypair that is present in the S3 bucket for the KeyName parameter.
- Choose the private and public subnets of your existing VPC. The private subnet route table must be associated with an internet gateway as the instances in the private subnet will require an internet connection for updating packages and patching.
- Make sure that the subnets selected belong to the same VPC that has been selected for the parameter VPCId.
-
- Enter a stack name and fill the appropriate parameters. Note the following parameters:
- The Ansible InventoryNode should continue to deploy Confluent Platform.. Upon creation of the stack, the nodes will be launched with the Ansible inventory node being the last to be created. You can track the progress of the playbook by logging into the Ansible inventory node:
$ vi /var/log/cloud-init-output.log
If there are any errors in the parameters entered, the cloud-init-output.log will have a log saying that it failed to send an cfn-signal.
Verifying cluster deployment
- Depending on the internet connection, the stack will take up to 15–20 minutes to finish.
- The Confluent Control Center dashboard can be viewed from its public address and private address on port 9021. The rest of the components can be accessed through the Ansible inventory node.
- The Ansible script that runs as part of the cloud formation script will test and verify connectivity; however, to manually verify the cluster:
- Use SSH to log in to the Schema Registry node.
- Create a topic with a replication factor of three (for BROKER IP, please use a private IPs of one of the broker’s CloudFormation/Ansible setups).
kafka-topics –create –topic test-dr-topic –bootstrap-server <BROKER IP>:9092 –replication-factor 3 –partitions 1
- Produce messages to the topic:
kafka-avro-console-producer --broker-list <BROKER IP>:9092 --property schema.registry.url=http://localhost:8081 --property key.converter=StringConverter --topic test-dr-topic --property value.schema='{"type":"record","name":"myrecord","fields":[{"name":"f1","type":"string"}]}'
- Paste the following lines into the console:
    {"f1": "value1-a"}
    {"f1": "value2-a"}
    {"f1": "value3-a"}
Press Ctrl-C. Consume messages:
kafka-avro-console-consumer --from-beginning --topic test-dr-topic --bootstrap-server <BROKER IP>:9092 --property print.key=false --property schema.registry.url=http://localhost:8081
You should see three messages consumed:
    {"f1":"value1-a"}
    {"f1":"value2-a"}
    {"f1":"value3-a"}
Processed a total of 3 messages
Press Ctrl-C. Delete your test topic through the Confluent Control Center GUI.
And that’s a wrap!
Conclusion
AWS Outposts provides a new paradigm for running on-premises workloads together with Confluent Platform for truly event-driven, hybrid, and mission-critical use cases. We covered many of the advanced features of AWS Outposts and walked through the exact process used to get Confluent Platform up and running for our AWS Outposts Ready partner certification. We hope this helps you on your path to event streaming.
If you’d like more details, I encourage you to learn more about AWS Outposts and get started with Confluent Platform today.
Did you like this blog post? Share it now
Subscribe to the Confluent blog


Customer Intelligence Hub: A Single Pane of Glass for Customer Insight and Action
Customer Intelligence Hub unifies customer signals into a real-time, AI-powered view that helps GTM teams prioritize risk, identify opportunity, and act faster with contextual insights.