How to Make Your Open Source Apache Kafka Connector Available on Confluent Hub
Do you have data you need to get into or out of Apache Kafka®? Kafka connectors are perfect for this. There are many connectors out there, usually for well-known and widely adopted technologies, and if you want to integrate with a system that does not already have a connector, consider writing your own. Even if you end up being the only user of the connector, the Kafka Connect default settings give you fault tolerance, retries, and durability to ensure your data is persisted.
OpenSky Network is a non-profit association that provides open access to real-life air traffic data, which works great as a source of data for my project. But I needed to get it into Kafka in order to use it. I originally thought of just writing a Kafka producer, but I would have ended up writing code that the Kafka Connect framework already provides. Being new to the Kafka Connect framework and API, I wanted more time. Once I decided to write my next connector, I knew it would save overall development time and provide many features for me: configuration, load-balancing, data format conversion.
There is certainly more to writing a connector than I thought, and now I hope to share my learnings and help others write their own. And if it works out for you too, share it with the Apache Kafka community through the Confluent Hub. The source code for my OpenSky Network Source Connector is found on GitHub.
Full transparency: the process of writing my connector involved unnecessary technical debt. My haste to get the data into Kafka caused me to cut corners and leave out important functionality. However, what I failed to implement was not actually that hard, and if you focus on doing it right from the start (unlike me), your end result will be better and more rewarding.
Finally, no matter how awesome you think your connector is, developers will be excited about using it after they see it working. I’m also going to show an example of the connector in action with ksqlDB and visualize the data in Elasticsearch and Kibana.
Writing a connector for Kafka Connect
There are many resources out there to help you write connectors, such as So You Want to Write a Connector? by Randall Hauch. When I attended this talk, I realized all of the additional benefits of leveraging the Kafka Connect framework instead of writing just a Kafka producer. In what follows, I’ll cover six key points to remember when writing your own connector. As Kafka Connect evolves, you can always reference the Connector Developer Guide for the latest information.
Connector scalability with task parallelism
Apache Kafka is all about scalability, and this is pretty easy once the data is in Kafka, but getting started can be rather hard. Parallelism for each connector involves how it connects to the source or sink system, not how it connects to Kafka. For example, in a JDBC source connector reading from a database, tables cannot be shared between workers, so a table is the smallest unit of work (two workers cannot both read from the same table). Context around the execution model of connectors can be found in From Zero to Hero with Kafka Connect.
OpenSky’s RESTful endpoint allows for query parameters to limit the amount of data being requested, which enables you to segregate data requested between Connect workers. An OpenSky API RESTful endpoint provides query parameters to specify a bounding box, a geospatial region of interest. This allows you to leverage multiple tasks for querying OpenSky. If the configuration of the connector does not provide any bounding boxes, only a single task is ever created.
It’s important to write unit tests around work allocation between tasks. I initially tested my connector with the connector’s max tasks equal to the number of bounding boxes. When I started testing more complex configurations, I saw uneven distribution of work between tasks. It turned out that my math for distributing the bounding boxes between the tasks was wrong, so I fixed it.
Connector naming
Currently, the connectors on the Confluent Hub follow this naming structure: kafka-connect-<technology>. For me, this is kafka-connect-opensky.
Connector configuration
Single Message Transform (SMT) support in Kafka Connect allows deployments of the connector to meet the needs of the user without requiring various configurations for excluding fields or alternating names to fields. Chris Matta’s blog post How to Use Single Message Transforms in Kafka Connect provides a great introduction.
Schemas
One of Kafka Connect’s most important functions is abstracting data into a generic format that can be serialized in any way that the end user desires, using the appropriate converter. As a connector author, you must make sure that you can translate the raw data of the source system into something that adheres to the Kafka Connect data model.
The raw data provided by your source system may not be well structured. For OpenSky Network, the data was a CSV array within a JSON response, with an aircraft datapoint as follows:
["a3b87f","DAL688 ","United States", 1575117478, 1575117480, -84.9541, 39.0612, 2476.5, false, 130.91, 293.14, 12.03, null, 2468.88, "3753", false, 0]
Two considerations here—the first being how to model the schema. I chose to nest fields that were of the same logical entity, such as the geospatial values of latitude and longitude. Since the connector is specific to a particular source and therefore a particular schema, it makes sense to be as opinionated as possible in modeling the schema. For sources that are generic (such as the JDBC source connector), this is usually not feasible.
The second consideration is the naming convention for the schema (e.g., camelCase vs. snake-case). Since ksqlDB is case insensitive, delimiting with the hyphen (snake-case) has its advantages. However, Java code generation of JSON or Apache Avro™ with underscores generates nonstandard Java syntax. I find it easier to code structures in a case-sensitive way and use Single Message Transforms or to rename fields within my ksqlDB queries. For the OpenSky connector, I used camel case as shown below:
{
  "location" : {
    "lat" : -84.9541,
    "lon": 39.0612
  }
  "geometricAltitude" : 2468.88
}
It’s best to be consistent and use Single Message Transforms only when necessary.
Committing offsets
Whenever a connector is started, restarted, or moved from one node in the Connect cluster to another, committed offsets are used to resume reading from a checkpoint. OpenSky can provide unchanged data (as it is stateless and doesn’t know what it has already provided). Keeping the application’s current timestamp in memory works until there is a worker rebalance.
The Connect API provides a very easy abstraction for handling this. All you have to do is define a map that represents the key and a map that has the updated value, and include them in the SourceRecord. The framework takes care of storing them.
Map key = Collections.singletonMap("boundingBox", BoundingBoxUtil.toString(boundingBox));
Map nextOffset = Collections.singletonMap("timestamp", currentTimestamp);
New SourceRecord(key, nextOffset, ...);
Reading the current value is just as easy, and it is provided for you from the processing context.
Map<String, Object> currentOffset = context.offsetStorageReader().offset(key);
Tests
Using Tom Akehurst’s WireMock project was valuable for my unit tests, and testing the task was simple as seen in OpenSkySourceTaskSpec.groovy. The more you leverage from the Kafka Connect API, the easier it is to write tests, as the framework code is already tested.
Distributing the connector
The Confluent Hub is a repository of Kafka Connect connectors and other components.

The information on Confluent Hub pulls from the manifest you create for your connector. You can learn more in the Component Manifests documentation, which covers all of the fields available and required. In particular, confluent-hub is a command line utility for installing connectors on a Kafka Connect cluster.
When you make your connector available, you should decide what license you want to use. The Java library that I was using to get the OpenSky data was LGPL licensed, which meant that I could not license my connector as Apache 2.0 (which I wanted). Fortunately, the OpenSky API call is so simple that I wrote it myself. For those who may not be so lucky, carefully reviewing licensing of the third party libraries you are using is important for determining the appropriate license for your connector and ensuring they are compatible.
If you’re a vendor who offers support for your connector, Confluent will verify the connector for free and add a Verified Gold banner to the card on the hub. You can check out the Verified Integrations Program or email vip@confluent.io for more information.
Putting your connector into action
Create the OpenSky connector to read from OpenSky and write it to a topic called flights. See the project’s README for specifics on configuration options. A RESTful POST to http://localhost:8083/connectors, if you are running connect locally, with the given content will create the connector.
{
    "name": "opensky",
    "config": {
        "connector.class": "com.github.nbuesing.kafka.connect.opensky.OpenSkySourceConnector",
        "tasks.max": "1",
        "topic": "flights",
        "interval" : 10
    }
}
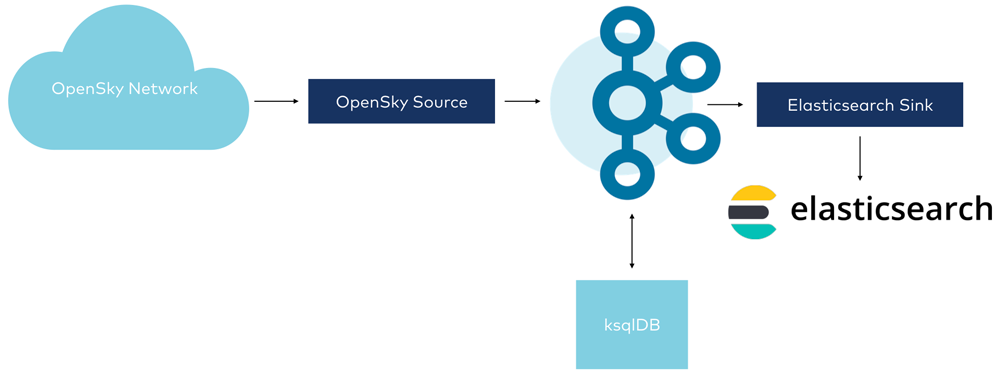
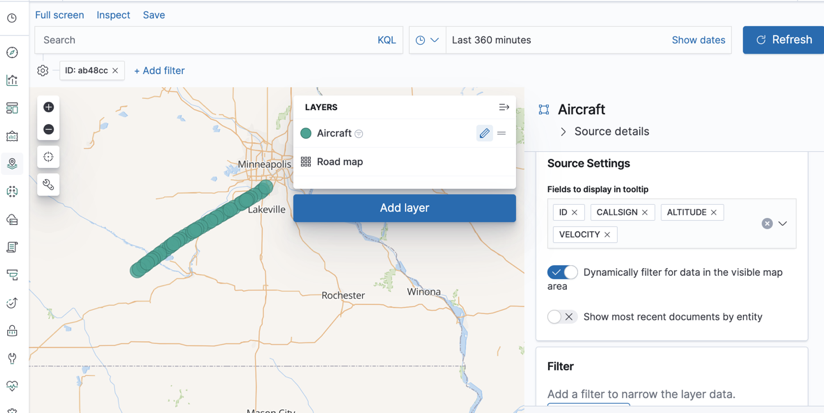
Here’s an example of the connector in action, streaming data from OpenSky into Kafka and then into Elasticsearch for visualization in Kibana:
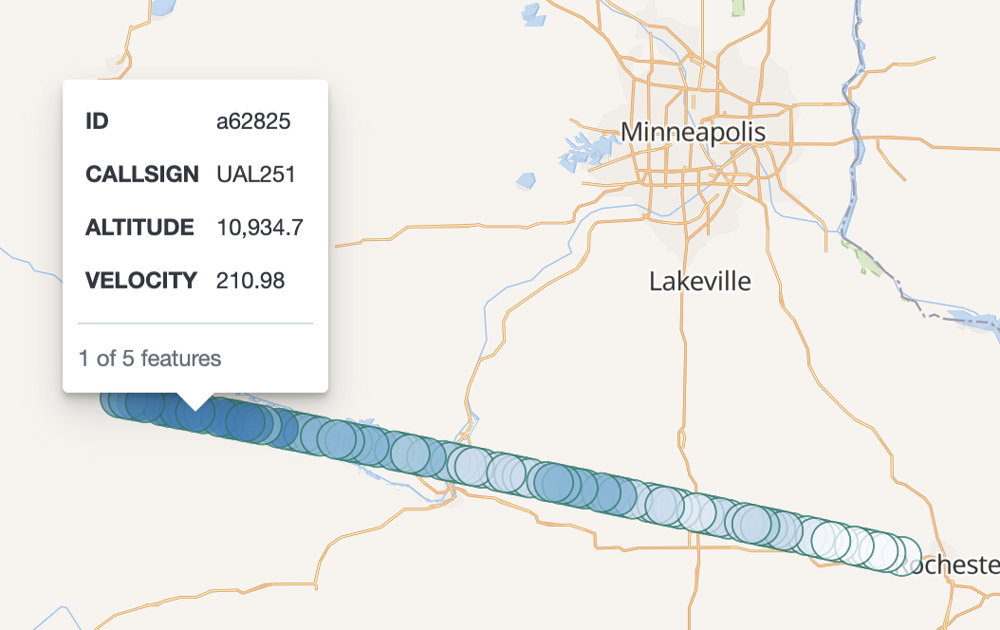
With this running, you can see flight paths and data for a given aircraft:
ksqlDB enhances the functionality with user-defined functions (UDFs). I have three functions, one making the ksqlDB syntax more readable, and two others to allow for building a complex aggregate. You can find these in the OpenSky demo project.
Start the connector
{
  "name": "opensky",
  "config": {
    "connector.class": "com.github.nbuesing.kafka.connect.opensky.OpenSkySourceConnector",
    "tasks.max": "1",
    "topic": "flights",
    "interval" : 10
  }
}
Create the stream
From the ksqlDB CLI, create the stream, which is very simple if the connector is producing in Avro, since ksqlDB leverages the Avro schema for data typing.
create stream flights with (KAFKA_TOPIC='flights', VALUE_FORMAT='avro');
Verify the source data
Once created, verify that it has data. Also, notice the elegant layout ksqlDB introduces, making it a lot easier to inspect your query results.
ksql> select rowkey, id, callsign, location from flights emit changes limit 5;
+--------+---------+-----------+----------------------------+
|ROWKEY  |ID       |CALLSIGN   |LOCATION                    |
+--------+---------+-----------+----------------------------+
|aa56db  |aa56db   |UAL1734    |{LAT=38.7897, LON=-77.0316} |
|a3b87f  |a3b87f   |DAL2410    |{LAT=32.9686, LON=-94.5838} |
|8a02fe  |8a02fe   |GIA089     |{LAT=42.233, LON=34.8362}   |
|4b1805  |4b1805   |SWR207J    |{LAT=42.5911, LON=-1.5307}  |
|ad19f2  |ad19f2   |SKW5036    |{LAT=40.7903, LON=-105.7774}|
Limit Reached
Query terminated
If you do not see any results, it could be your ksqlDB setup (see Robin Moffatt’s blog post). Setting auto.offset.reset to earliest is helpful: SET 'auto.offset.reset'='earliest';.
Elasticsearch and Kibana
Elasticsearch provides document storage and indexing. Kibana allows you to visualize Elasticsearch data. They are excellent open source products that allow you to see your data without needing to write any code.
Elasticsearch setup
To view geospatial data, you can use Elasticsearch and Kibana. This blog post uses Elasticsearch 7.4. There are some changes between Elasticsearch 6 and 7, so be sure to research those differences. One useful reference is Robin Moffatt’s Kafka Connect and Elasticsearch article.
Before sending any data to Elasticsearch, create a dynamic mapping template to ensure the data types for fields:
- All fields that end in _TS are dates
- The field called LOCATION is indexed as a geo_point
curl -X PUT http://localhost:9200/_template/kafkaconnect \
    -H "Content-Type:application/json" \
    -d '{
  "index_patterns": ["*"],
  "settings": {
    "number_of_shards": 1,
    "number_of_replicas": 0
  },
  "mappings": {
    "_source": { "enabled": true },
    "dynamic_templates": [
      {
        "longs_as_dates": {
          "match_mapping_type": "long",
          "match" : "*_TS",
          "mapping": { "type": "date" }
        }
      }
    ],
    "properties": {
      "LOCATION": { "type": "geo_point" }
    }
  }
}'
It’s essential to establish the index template before streaming any data into Elasticsearch, otherwise it is not applied.
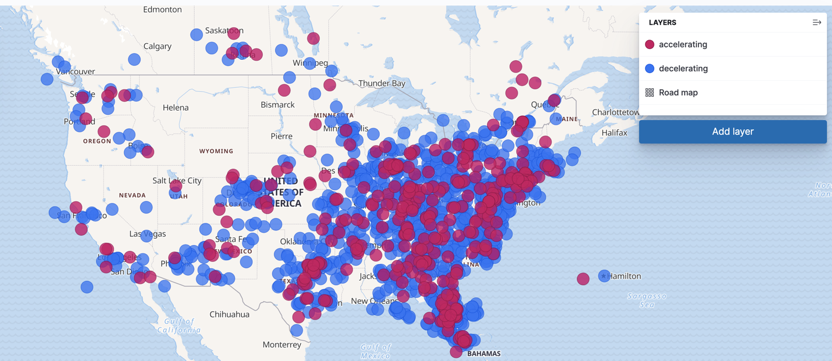
With Elasticsearch and Kibana, visualization of the OpenSky Network data is easy. In the first example below, we view an aircraft flight path. In the second example, we identify aircraft that are accelerating or decelerating.
Viewing aircraft aggregations
ksqlDB stream
The purpose of this ksqlDB stream is to place every flight update into Elasticsearch and to set the location as a geo_point type and lastcontact as a date type. If key.ignore is true for the Elasticsearch connector, there is no need to rekey and repartition, but duplicates index as separate documents.
CREATE STREAM all_updates
    WITH (
        KAFKA_TOPIC='all_updates',
        PARTITIONS=5,
        REPLICAS=3,
        TIMESTAMP='updated_ts'
    )
    as select rowkey + '_' + cast(lastcontact as string) as key,
    lastcontact as updated_ts,
    id,
    callsign,
    geo_point(location) as location,
    velocity as velocity,
    geometricaltitude as altitude
    from flights
    partition by key;
The geo_point function is not a default function provided by ksqlDB. It is a user-defined function, part of my ksqlDB UDFs project. If you do not want to add UDFs, the same behavior is achievable with the syntax below. For more details, please see the complete documentation on syntax.
CAST(location->lat AS VARCHAR) + ',' + CAST(location->lon AS VARCHAR) as location
When writing your first UDF, look at the existing code for UDFs in the ksqlDB codebase, and pick something simple. Note: the UDFs created to aid in visualization of the aircraft data were not the first functions I’ve ever written.
An important configuration to understand with the Elasticsearch sink connector is key.ignore. When true, the topic/partition/offset is used for the document key, causing Elasticsearch to index every message. However, if duplicates are entered into the system, they would also be entered into Elasticsearch as well. In the above example, I am rekeying the stream to aircraft ID and timestamp, so if duplicates do make it into the system, Elasticsearch only creates a single document.
CLI validation
Verify that the stream is working correctly by using the Kafka CLI. Ensure ROWKEY is the composite and LOCATION is a string element without the nested structure, as it is for the flights stream.
ksql> select rowkey, location from all_updates emit changes limit 5;
+-----------------------+--------------------+
|ROWKEY                 |LOCATION            |
+-----------------------+--------------------+
|4b1800_1575811539000   |40.1754,-3.1471     |
|e8026e_1575811538000   |-9.682,-78.2619     |
|c02264_1575811540000   |35.9276,-90.0861    |
|4b1880_1575811539000   |51.9907,-3.3787     |
|4cc2a2_1575811539000   |40.3821,-3.0455     |
Streaming data from Kafka to Elasticsearch
Use the Elasticsearch sink connector to push data from Kafka into Elasticsearch. Here, we specify the topic we created through ksqlDB.
Create an Elasticsearch index by creating an Elasticsearch sink connector. See the documentation for all configuration options. For Elasticsearch 7.4, set type.name to an empty string. Setting key.ignore determines if the key is used for the document index or if the topic/partition/offset of the Kafka topic is used. Also set behavior.on.malformed.documents to warn, at least during development.
curl -X POST http://localhost:8083/connectors \
    -H "Content-Type:application/json" \
    -d '{
  "name": "elastic-all_updates",
  "config": {
    "connector.class": "io.confluent.connect.elasticsearch.ElasticsearchSinkConnector",
    "topics": "all_updates",
    "connection.url": "http://elasticsearch:9200",
    "key.ignore": "false",
    "schema.ignore": "true",
    "type.name": "",
    "key.converter": "org.apache.kafka.connect.storage.StringConverter",
    "behavior.on.malformed.documents": "warn"
  }
}'
If successful, an index of all_updates should show up in Kibana’s index.
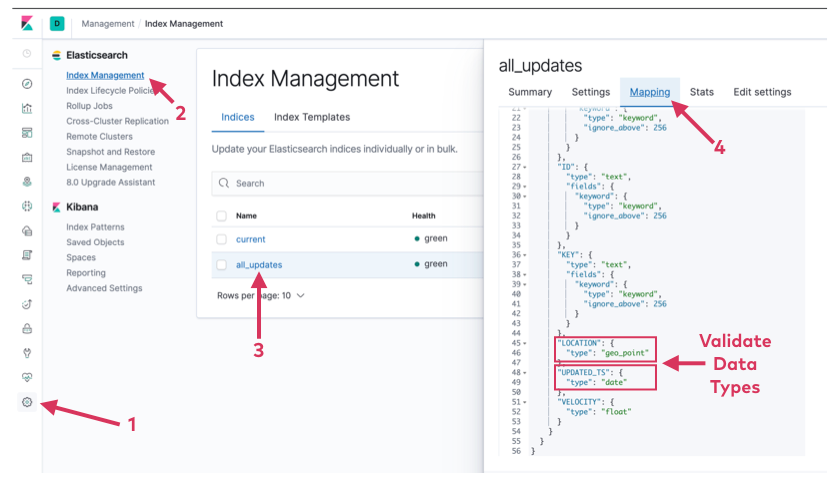
Visualizing the data with Kibana
With the Elasticsearch index created and LOCATION and UPDATED_TS fields properly typed, you can visualize the data via Kibana maps.
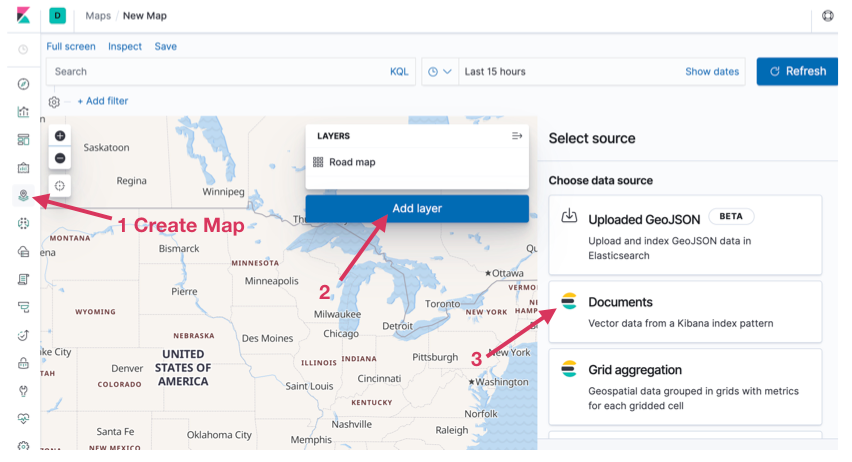
Create the map and layer on that map by pulling in an Elasticsearch document, as shown below. When adding the layer, you can give it the name and fields you want displayed when data entry is selected. This allows for filters to be applied quickly when visualizing a single aircraft.
Using filters, you can see all updates to the given aircraft and consider additional filters as desired.
What if we do not want to capture all updates for a given aircraft and instead only use the latest data, so that rekeying the data is not necessary?
OpenSky provides the timestamp of when data is obtained from the aircraft as well as the current velocity. Both values are needed for computing acceleration. To use them in other user-defined functions, I’ve created a TimestampedUdf.java function to combine the values.
ksql> select velocity, lastcontact, timestamped(velocity, lastcontact) as v_ts from flights emit changes limit 5;
+----------+----------------+-------------------------------------------+
|VELOCITY  |LASTCONTACT     |V_TS                                       |
+----------+----------------+-------------------------------------------+
|92.68     |1575811496000   |{VALUE=92.68, TIMESTAMPED=1575811496000}   |
|277.86    |1575811539000   |{VALUE=277.86, TIMESTAMPED=1575811539000}  |
|230.75    |1575811539000   |{VALUE=230.75, TIMESTAMPED=1575811539000}  |
|236.94    |1575811540000   |{VALUE=236.94, TIMESTAMPED=1575811540000}  |
|182.21    |1575811539000   |{VALUE=182.21, TIMESTAMPED=1575811539000}  |
A timestamped user-defined function is necessary to pass both values to the acceleration aggregate function.
Starting with Confluent Platform 5.4, the Udaf interface provides a separation between the aggregate value (A) and output value (O), in addition to a map function that takes the aggregate and returns it into a different result type. This allows for more complex aggregates, as it can store a complex structure and return a single value.
package io.confluent.ksql.function.udaf;

public interface Udaf<I, A, O> {
    A initialize();
    A aggregate(I var1, A var2);
    A merge(A var1, A var2);
    O map(A var1);
}
By leveraging the map function, AccelerationUdf.java keeps the current and previous timestamped velocity but only returns the acceleration value.
Now, create a table with the current acceleration of the aircraft.
CREATE TABLE accel
    WITH (
        KAFKA_TOPIC='accel',
        PARTITIONS=5,
        REPLICAS=3
    )
    as select
    id,
    acceleration(timestamped(velocity, lastcontact)) as acceleration
    from flights
    group by id;
Then create a stream that joins updating flight information with the current acceleration data.
CREATE stream current
    WITH (
        KAFKA_TOPIC='current',
        PARTITIONS=5,
        REPLICAS=3
    )
    as select
      flights.lastcontact as updated_ts,
      flights.id as id,
      flights.callsign as callsign,
      geo_point(flights.location) as location,
      flights.velocity as velocity,
      flights.geometricaltitude as altitude,
      accel.acceleration
    from flights
    join accel on accel.id = flights.id;
Finally, repeat what you did for flight path tracking, push the newly created stream to Elasticsearch, and create a map in Kibana.
curl -X POST http://localhost:8083/connectors \
    -H "Content-Type:application/json" \
    -d '{
  "name": "elastic-current",
  "config": {
    "connector.class": "io.confluent.connect.elasticsearch.ElasticsearchSinkConnector",
    "topics": "current",
    "connection.url": "http://elasticsearch:9200",
    "key.ignore": "false",
    "schema.ignore": "true",
    "type.name": "",
    "key.converter": "org.apache.kafka.connect.storage.StringConverter",
    "behavior.on.malformed.documents": "warn"
  }
}'
Now we can visualize only the aircraft that are accelerating and decelerating by creating a two-layer Kibana map with a filter on acceleration>0 and acceleration≤0 for each of those layers.
This real-time aircraft data is now ready for ksqlDB to push into Elasticsearch for visualization in Kibana.
Check out this excellent blog post: Integrating Elasticsearch and ksqlDB for Powerful Data Enrichment and Analytics, for even more about ksqlDB and Elasticsearch.
Conclusion
As with any piece of software, the amount of time it takes to finalize it can be a challenge. The Confluent Hub has done an excellent job making this process easy and assures users of these connectors that they are using installable, executable code.
If you’re writing a connector, consider submitting it to the Confluent Hub. Feel free to email hub-help@confluent.io if you have any questions and see the documentation.
Now that you have lifted off, sit back and enjoy the flight.
このブログ記事は気に入りましたか?今すぐ共有
Confluent ブログの登録


