Top 5 Things Every Apache Kafka Developer Should Know
Apache Kafka® is an event streaming platform used by more than 30% of the Fortune 500 today. There are numerous features of Kafka that make it the de-facto standard for an event streaming platform, and in this blog post, I explain what I think are the top five things every Kafka developer should know.
Some items in our top five are performance related, while others are about the key architectural concepts that make Kafka tick. I hope that at the end of this blog post, you’ll walk away with a deeper understanding of how Kafka works, as well as with a new trick or two up your sleeve.
What we’ll cover
- Tip #1: Understand message delivery and durability guarantees
- Tip #2: Learn about the new sticky partitioner in the producer API
- Tip #3: Avoid “stop-the-world” consumer group rebalances by using cooperative rebalancing
- Tip #4: Master the command line tools
- Tip #5: Use the power of record headers
- Recap
Tip #1: Understand message delivery and durability guarantees
For data durability, the KafkaProducer has the configuration setting acks. The acks configuration specifies how many acknowledgments the producer receives to consider a record delivered to the broker. The options to choose from are:
- none: The producer considers the records successfully delivered once it sends the records to the broker. This is basically “fire and forget.”
- one: The producer waits for the lead broker to acknowledge that it has written the record to its log.
- all: The producer waits for an acknowledgment from the lead broker and from the following brokers that they have successfully written the record to their logs.
As you can see, there is a trade-off to make here—and that’s by design because different applications have different requirements. You can opt for higher throughput with a chance for data loss, or you may prefer a very high data durability guarantee at the expense of a lower throughput.
Now let’s take a second to talk a little bit about the acks=all scenario. If you produce records with acks set to all to a cluster of three Kafka brokers, it means that under ideal conditions, Kafka contains three replicas of your data—one for the lead broker and one each for two followers. When the logs of each of these replicas all have the same record offsets, they are considered to be in sync. In other words, these in-sync replicas have the same content for a given topic partition. Take a look at the following illustration to clearly picture what’s going on:
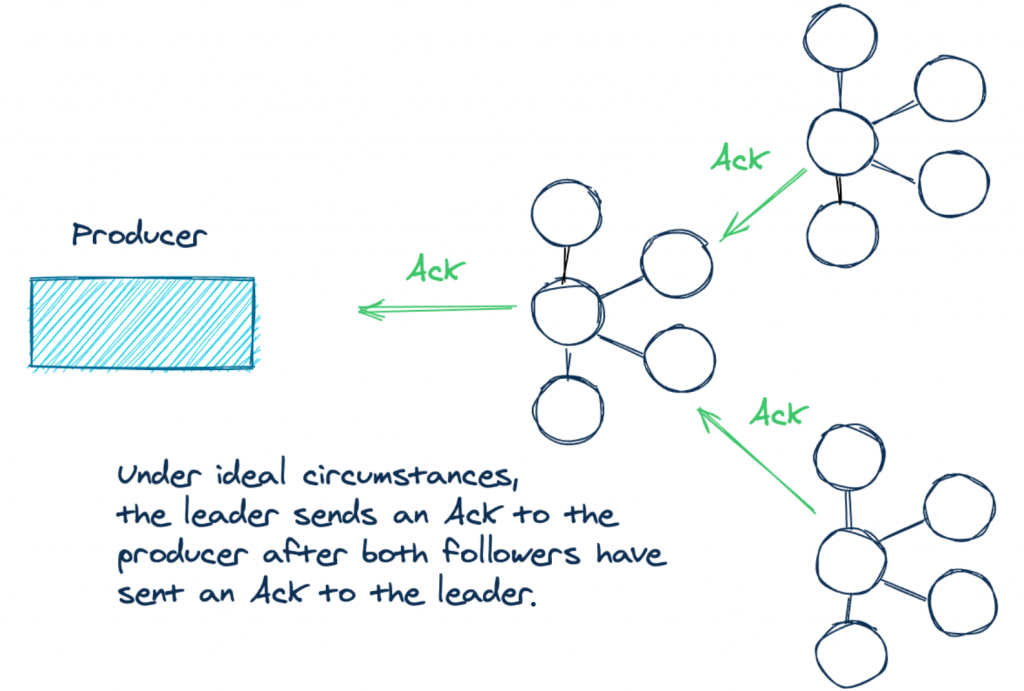
But there’s some subtlety to using the acks=all configuration. What it doesn’t specify is how many replicas need to be in sync. The lead broker will always be in sync with itself. But you could have a situation where the two following brokers can’t keep up due to network partitions, record load, etc. So when a producer has a successful send, the actual number of acknowledgments could have come from only one broker! If the two followers are not in sync, the producer still receives the required number of acks, but it’s only the leader in this case.
For example:
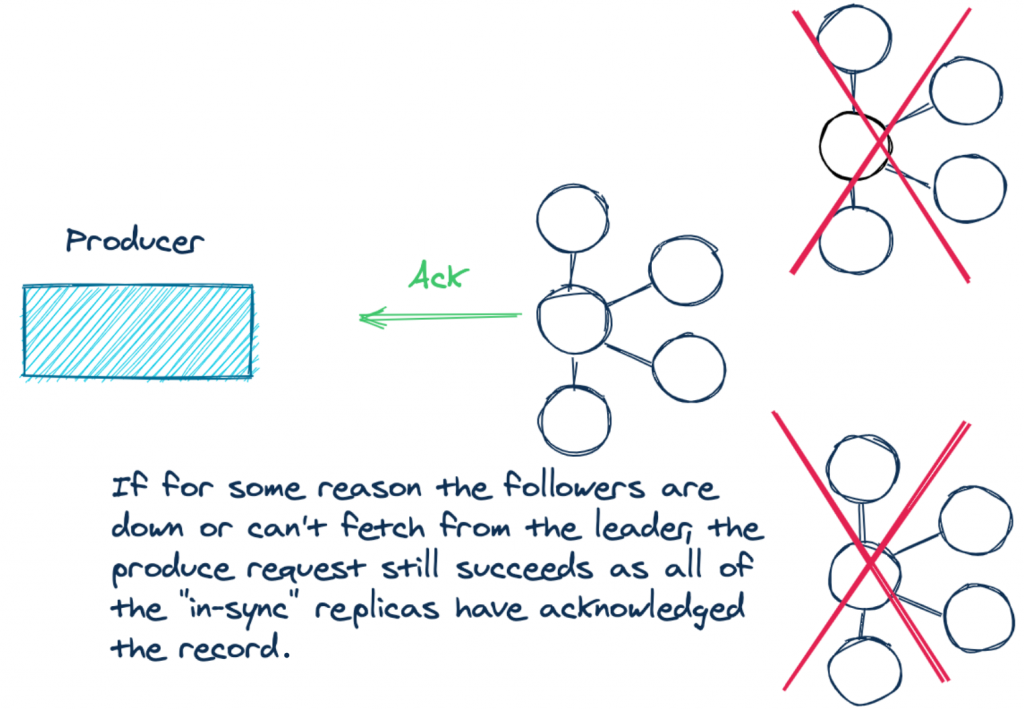
By setting acks=all, you are placing a premium on the durability of your data. So if the replicas aren’t keeping up, it stands to reason that you want to raise an exception for new records until the replicas are caught up.
In a nutshell, having only one in-sync replica follows the “letter of the law” but not the “spirit of the law.” What we need is a guarantee when using the acks=all setting. A successful send involves at least a majority of the available in-sync brokers.
There just so happens to be one such configuration: min.insync.replicas. The min.insync.replicas configuration enforces the number of replicas that must be in sync for the write to proceed. Note that the min.insync.replicas configuration is set at the broker or topic level and is not a producer configuration. The default value for min.insync.replicas is one. So to avoid the scenario described above, in a three-broker cluster, you’d want to increase the value to two.
Let’s revisit our previous example from before and see the difference:
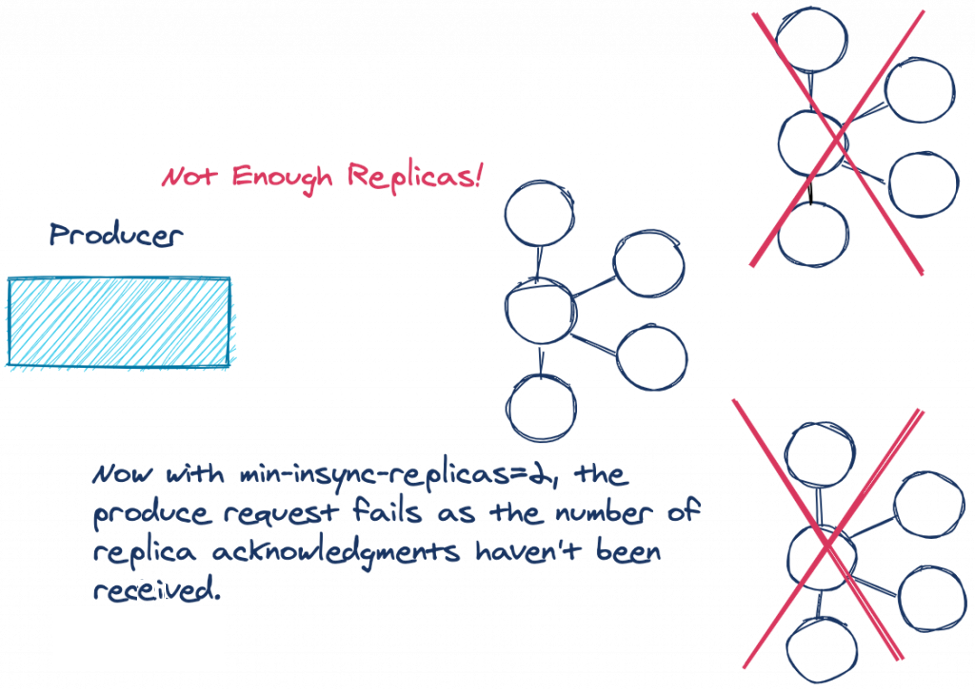
If the number of replicas that are in sync is below the configured amount, the lead broker won’t attempt to append the record to its log. The leader throws either a NotEnoughReplicasException or NotEnoughReplicasAfterAppendException, forcing the producer to retry the write. Having replicas out of sync with the leader is considered a retryable error, so the producer will continue to retry and send the records up to the configured delivery timeout.
So by setting the min.insync.replicas and producer acks configurations to work together in this way, you’ve increased the durability of your data.
Now let’s move on to the next items in our list: improvements to the Kafka clients. Over the past year, the Kafka producer and Kafka consumer APIs have added some new features that every Kafka developer should know.
Tip #2: Learn about the new sticky partitioner in the producer API
Kafka uses partitions to increase throughput and spread the load of messages to all brokers in a cluster. Kafka records are in a key/value format, where the keys can be null. Kafka producers don’t immediately send records, instead placing them into partition-specific batches to be sent later. Batches are an effective means of increasing network utilization. There are three ways the partitioner determines into which partition the records should be written.
The partition can be explicitly provided in the ProducerRecord object via the overloaded ProducerRecord constructor. In this case, the producer always uses this partition.
If no partition is provided, and the ProducerRecord has a key, the producer takes the hash of the key modulo the number of partitions. The resulting number from that calculation is the partition that the producer will use.
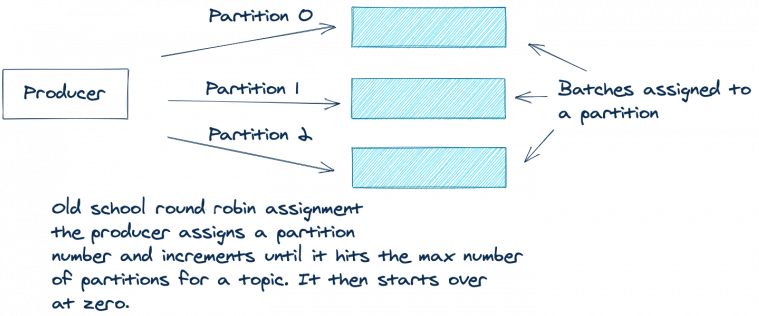
If there is no key and no partition present in the ProducerRecord, then previously Kafka used a round robin approach to assign messages across partitions. The producer would assign the first record in the batch to partition zero, the second to partition one, and so on, until the end of the partitions. The producer would then start over with partition zero and repeat the entire process for all remaining records.
The following illustration depicts this process:
The round robin approach works well for even distribution of records across partitions. But there’s one drawback. Due to this “fair” round robin approach, you can end up sending multiple sparsely populated batches. It’s more efficient to send fewer batches with more records in each batch. Fewer batches mean less queuing of produce requests, hence less load on the brokers.
Let’s look at a simplified example where you have a topic with three partitions to explain this. For the sake of simplicity, let’s assume that your application produced nine records with no key, all arriving at the same time:
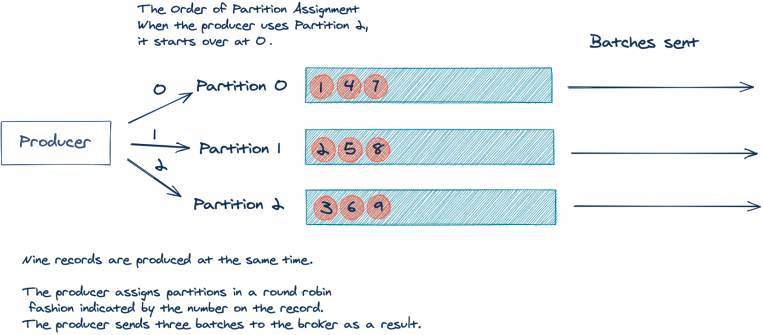
As you can see above, the nine incoming records will result in three batches of three records. But, it would be better if we could send one batch of nine records. As stated before, fewer batches result in less network traffic and less load on the brokers.
Apache Kafka 2.4.0 added the sticky partitioner approach, which now makes this possible. Instead of using a round robin approach per record, the sticky partitioner assigns records to the same partition until the batch is sent. Then, after sending a batch, the sticky partitioner increments the partition to use for the next batch. Let’s revisit our illustration from above but updated using the sticky partitioner:
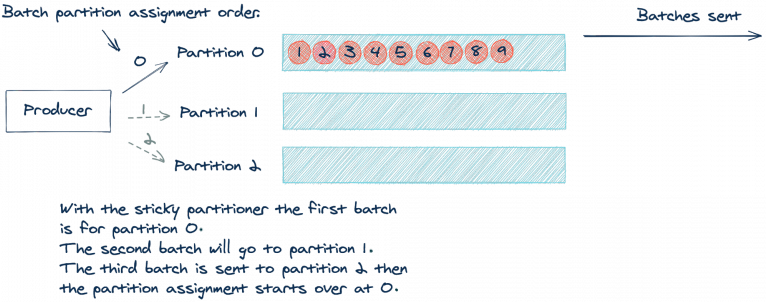
By using the same partition until a batch is full or otherwise completed, we’ll send fewer produce requests, which reduces the load on the request queue and reduces latency of the system as well. It’s worth noting that the sticky partitioner still results in an even distribution of records. The even distribution occurs over time, as the partitioner sends a batch to each partition. You can think of it as a “per-batch” round robin or “eventually even” approach.
To learn more about the sticky partitioner, you can read the Apache Kafka Producer Improvements with the Sticky Partitioner blog post and the related KIP-480 design document.
Now let’s move on to the consumer changes.
Tip #3: Avoid “stop-the-world” consumer group rebalances by using cooperative rebalancing
Kafka is a distributed system, and one of the key things distributed systems need to do is deal with failures and disruptions—not just anticipate failures, but fully embrace them. A great example of how Kafka handles this expected disruption is the consumer group protocol, which manages multiple instances of a consumer for a single logical application. If an instance of a consumer stops, by design or otherwise, Kafka will rebalance and make sure another instance of the consumer takes over the work.
As of version 2.4, Kafka introduced a new rebalance protocol: cooperative rebalancing. But before we dive into the new protocol, let’s look in a bit more detail at the consumer group basics.
Let’s assume you have a distributed application with several consumers subscribed to a topic. Any set of consumers configured with the same group.id form one logical consumer called a consumer group. Each consumer in the group is responsible for consuming from one or more partitions of the subscribed topic(s). These partitions are assigned by the leader of the consumer group.
Here’s an illustration demonstrating this concept:
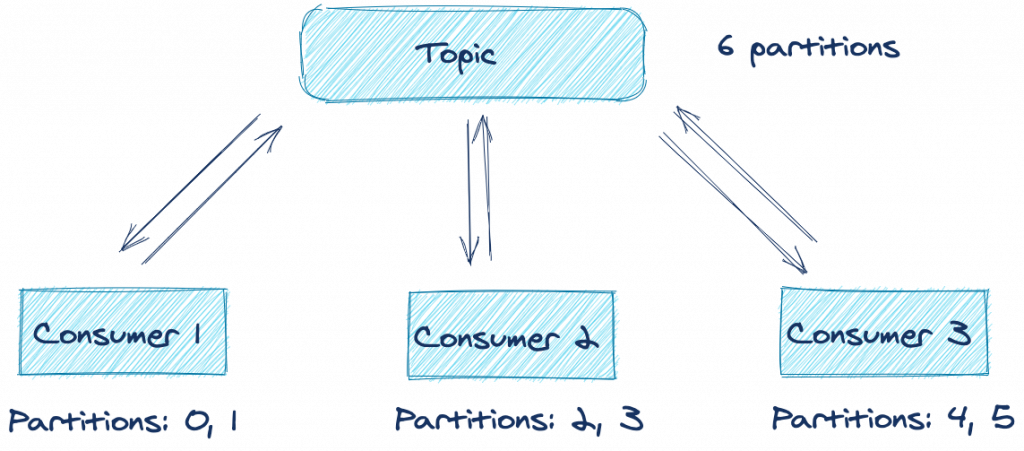
From the above illustration, you can see that under optimal conditions, all three consumers are processing records from two partitions each. But what happens if one of the applications suffers an error or can’t connect to the network anymore? Does processing for those topic partitions stop until you can restore the application in question? Fortunately, the answer is no, thanks to the consumer rebalancing protocol.
Here’s another illustration showing the consumer group protocol in action:
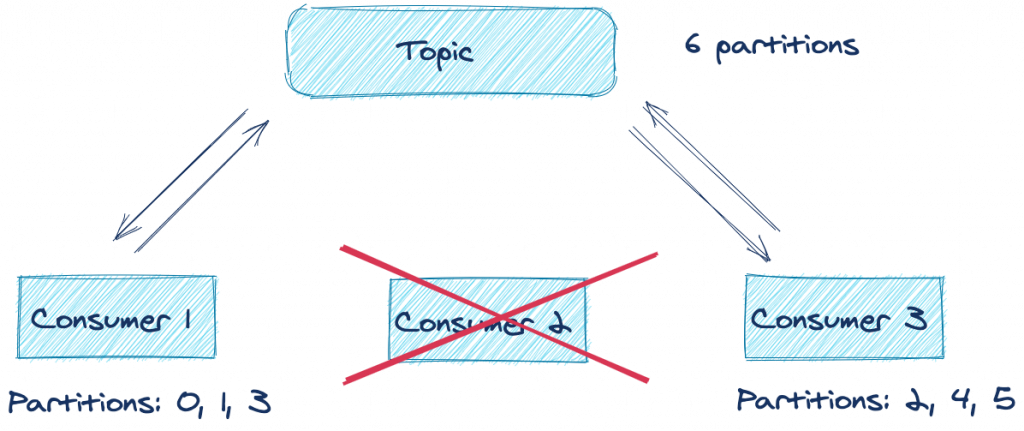
As you can see, Consumer 2 fails for some reason and either misses a poll or triggers a session timeout. The group coordinator removes it from the group and triggers what is known as a rebalance. A rebalance is a mechanism that attempts to evenly distribute (balance) the workload across all available members of a consumer group. In this case, since Consumer 2 left the group, the rebalance assigns its previously owned partitions to the other active members of the group. So as you can see, losing a consumer application for a particular group ID doesn’t result in a loss of processing on those topic partitions.
There is, however, a drawback of the default rebalancing approach. Each consumer gives up its entire assignment of topic partitions, and no processing takes place until the topic partitions are reassigned—sometimes referred to as a “stop-the-world” rebalance. To compound the issue, depending on the instance of the ConsumerPartitionAssignor used, consumers are simply reassigned the same topic partitions that they owned prior to the rebalance, the net effect being that there is no need to pause work on those partitions.
This implementation of the rebalance protocol is called eager rebalancing because it prioritizes the importance of ensuring that no consumers in the same group claim ownership over the same topic partitions. Ownership of the same topic partition by two consumers in the same group would result in undefined behavior.
While it is critical to keep any two consumers from claiming ownership over the same topic partition, it turns out that there is a better approach that provides safety without compromising on time spent not processing: incremental cooperative rebalancing. First introduced to Kafka Connect in Apache Kafka 2.3, this has now been implemented for the consumer group protocol too. With the cooperative approach, consumers don’t automatically give up ownership of all topic partitions at the start of the rebalance. Instead, all members encode their current assignment and forward the information to the group leader. The group leader then determines which partitions need to change ownership—instead of producing an entirely new assignment from scratch.
Now a second rebalance is issued, but this time, only the topic partitions that need to change ownership are involved. It could be revoking topic partitions that are no longer assigned or adding new topic partitions. For the topic partitions that are in both the new and old assignment, nothing has to change, which means continued processing for topic partitions that aren’t moving.
The bottom line is that eliminating the “stop-the-world” approach to rebalancing and only stopping the topic partitions involved means less costly rebalances, thus reducing the total time to complete the rebalance. Even long rebalances are less painful now that processing can continue throughout them. This positive change in rebalancing is made possible by using the CooperativeStickyAssignor. The CooperativeStickyAssignor makes the trade-off of having a second rebalance but with the benefit of a faster return to normal operations.
To enable this new rebalance protocol, you need to set the partition.assignment.strategy to use the new CooperativeStickyAssignor. Also, note that this change is entirely on the client side. To take advantage of the new rebalance protocol, you only need to update your client version. If you’re a Kafka Streams user, there is even better news. Kafka Streams enables the cooperative rebalance protocol by default, so there is nothing else to do.
Tip #4: Master the command line tools
The Apache Kafka binary installation includes several tools located in the bin directory. While you’ll find several tools in that directory, I want to show you the four tools that I think will have the most impact on your day-to-day work. I’m referring to the console-consumer, console-producer, dump-log, and delete-records.
Kafka console producer
The console producer allows you to produce records to a topic directly from the command line. Producing from the command line is a great way to quickly test new consumer applications when you aren’t producing data to the topics yet. To start the console producer, run this command:
kafka-console-producer --topic  \
                        --broker-list <broker-host:port>
After you execute the command, there’s an empty prompt waiting for your input—just type in some characters and hit enter to produce a message.
Using the command line producer in this way does not send any keys, only values. Luckily, there is a way to send keys as well. You just have to update the command to include the necessary flags:
kafka-console-producer --topic  \
                       --broker-list <broker-host:port> \
                       --property parse.key=true \
                       --property key.separator=":"
The choice of the key.separator property is arbitrary. You can use any character. And now, you can send full key/value pairs from the command line! If you are using Confluent Schema Registry, there are command line producers available to send records in Avro, Protobuf, and JSON Schema formats.
Now let’s take a look at the other side of the coin: consuming records from the command line.
Kafka console consumer
The console consumer gives you the ability to consume records from a Kafka topic directly from the command line. Being able to quickly start a consumer can be an invaluable tool in prototyping or debugging. Consider building a new microservice. To quickly confirm that your producer application is sending messages, you can simply run this command:
kafka-console-consumer --topic  \
                          --bootstrap-server <broker-host:port>
After you run this command, you’ll start seeing records scrolling across your screen (so long as data is currently being produced to the topic). If you want to see all the records from the start, you can add a --from-beginning flag to the command, and you’ll see all records produced to that topic.
kafka-console-consumer --topic <topic-name> \
                          --bootstrap-server <broker-host:port> \
                          --from-beginning
If you are using Schema Registry, there are command line consumers available for Avro, Protobuf, and JSON Schema encoded records. The Schema Registry command line consumers are intended for working with records in the Avro, Protobuf or JSON formats, while the plain consumers work with records of primitive Java types: String, Long, Double, Integer, etc. The default format expected for keys and values by the plain console consumer is the String type.
If the keys or values are not strings, you’ll need to provide the deserializers via the command line flags --key-deserializer and --value-deserializer with the fully qualified class names of the respective deserializers.
You may well have noticed that by default, the console consumer only prints the value component of the messages to the screen. If you want to see the keys as well, you can do so by including the necessary flags:
kafka-console-consumer --topic  \
                          --bootstrap-server <broker-host:port> \
  --property print.key=true
  --property key.separator=":"
As with the producer, the value used for the key separator is arbitrary, so you can choose any character you want to use.
Dump log
Sometimes when you’re working with Kafka, you may find yourself needing to manually inspect the underlying logs of a topic. Whether you’re just curious about Kafka internals or you need to debug an issue and verify the content, the kafka-dump-log command is your friend. Here’s a command used to view the log of an example topic aptly named example:
  kafka-dump-log \
  --print-data-log \
  --files  ./var/lib/kafka/data/example-0/00000000000000000000.log
- The --print-data-log flag specifies to print the data in the log.
- The --files flag is required. This could also be a comma-separated list of files.
For a full list of options and a description of what each option does, run kafka-dump-log with the --help flag.
Running the command above yields something like this:
Dumping ./var/lib/kafka/data/example-0/00000000000000000000.log
Starting offset: 0
baseOffset: 0 lastOffset: 0 count: 1 baseSequence: -1 lastSequence: -1 producerId: -1 producerEpoch: -1 partitionLeaderEpoch: 0 isTransactional: false isControl: false position: 0 CreateTime: 1599775774460 size: 81 magic: 2 compresscodec: NONE crc: 3162584294 isvalid: true
| offset: 0 CreateTime: 1599775774460 keysize: 3 valuesize: 10 sequence: -1 headerKeys: [] key: 887 payload: -2.1510235
baseOffset: 1 lastOffset: 9 count: 9 baseSequence: -1 lastSequence: -1 producerId: -1 producerEpoch: -1 partitionLeaderEpoch: 0 isTransactional: false isControl: false position: 81 CreateTime: 1599775774468 size: 252 magic: 2 compresscodec: NONE crc: 2796351311 isvalid: true
| offset: 1 CreateTime: 1599775774463 keysize: 1 valuesize: 9 sequence: -1 headerKeys: [] key: 5 payload: 33.440664
| offset: 2 CreateTime: 1599775774463 keysize: 8 valuesize: 9 sequence: -1 headerKeys: [] key: 60024247 payload: 9.1408728
| offset: 3 CreateTime: 1599775774463 keysize: 1 valuesize: 9 sequence: -1 headerKeys: [] key: 1 payload: 45.348946
| offset: 4 CreateTime: 1599775774464 keysize: 6 valuesize: 10 sequence: -1 headerKeys: [] key: 241795 payload: -63.786373
| offset: 5 CreateTime: 1599775774465 keysize: 8 valuesize: 9 sequence: -1 headerKeys: [] key: 53596698 payload: 69.431393
| offset: 6 CreateTime: 1599775774465 keysize: 8 valuesize: 9 sequence: -1 headerKeys: [] key: 33219463 payload: 88.307875
| offset: 7 CreateTime: 1599775774466 keysize: 1 valuesize: 9 sequence: -1 headerKeys: [] key: 0 payload: 39.940350
| offset: 8 CreateTime: 1599775774467 keysize: 5 valuesize: 9 sequence: -1 headerKeys: [] key: 78496 payload: 74.180098
| offset: 9 CreateTime: 1599775774468 keysize: 8 valuesize: 9 sequence: -1 headerKeys: [] key: 89866187 payload: 79.459314
There’s lots of information available from the dump-log command. You can clearly see the key, payload (value), offset, and timestamp for each record. Keep in mind that this data is from a demo topic that contains only 10 messages, so with a real topic, there will be substantially more data. Also note that in this example, the keys and values for the topic are strings. To run the dump-log tool with key or value types other than strings, you’ll need to use either the --key-decoder-class or the --value-decoder-class flags.
Delete records
Kafka stores records for topics on disk and retains that data even once consumers have read it. However, records aren’t stored in one big file but are broken up into segments by partition where the offset order is continuous across segments for the same topic partition. Because servers do not have infinite amounts of storage, Kafka provides settings to control how much data is retained, based on time and size:
- The time configuration controlling data retention is log.retention.hours, which defaults to 168 hours (one week)
- The size configuration log.retention.bytes controls how large segments can grow before they are eligible for deletion
However, the default setting for log.retention.bytes is -1, which allows the log segment size to be unlimited. If you’re not careful and haven’t configured the retention size as well as the retention time, you could have a situation where you will run out of disk space. Remember, you never want to go into the filesystem and manually delete files. Instead, we want a controlled and supported way to delete records from a topic in order to free up space. Fortunately, Kafka ships with a tool that deletes data as required.
The kafka-delete-records has two mandatory parameters:
- --bootstrap-server: the broker(s) to connect to for bootstrapping
- --offset-json-file: a JSON file containing the deletion settings
Here’s an example of the JSON file:
{
   "partitions": [
                  {"topic": "example", "partition": 0, "offset": -1}
                 ],
                 "version":1
 }
As you can see, the format of the JSON is simple. It’s an array of JSON objects. Each JSON object has three properties:
- Topic: the topic to delete from
- Partition: the partition to delete from
- Offset: the offset you want the delete to start from, moving backward to lower offsets
For this example, I’m reusing the same topic from the dump-log tool, so it’s a very simple JSON file. If you had more partitions or topics, you would simply expand on the JSON config file above.
I want to discuss how to choose the offset in the JSON config file. Because the example topic contains only 10 records, you could easily calculate the starting offset to start the deletion process. But in practice, you most likely won’t know off the top of your head what offset to use. Also bear in mind that offset != message number, so you can’t just delete from “message 42.” If you supply a -1, then the offset of the high watermark is used, which means you will delete all the data currently in the topic. The high watermark is the highest available offset for consumption (the offset of the last successfully replicated message, plus one).
Now to run the command, just enter this on the command line:
kafka-delete-records --bootstrap-server <broker-host:port> \
                     --offset-json-file offsets.json
After running this command, you should see something like this on the console:
Executing records delete operation
Records delete operation completed:
partition: example-0  low_watermark: 10
The results of the command show that Kafka deleted all records from the topic partition example-0. The low_watermark value of 10 indicates the lowest offset available to consumers. Because there were only 10 records in the example topic, we know that the offsets ranged from 0 to 9 and no consumer can read those records again. For more background on how deletes are implemented, you can read KIP-107 and KIP-204.
Tip #5: Use the power of record headers
Apache Kafka 0.11 introduced the concept of record headers. Record headers give you the ability to add some metadata about the Kafka record, without adding any extra information to the key/value pair of the record itself. Consider if you wanted to embed some information in a message, such as an identifier for the system from which the data originated. Perhaps you want this for lineage and audit purposes and in order to facilitate routing of the data downstream.
Why not just append this information to the key? Then you could extract the part needed and you would be able to route data accordingly. But adding artificial data to the key poses two potential problems.
- First, if you are using a compacted topic, adding information to the key would make the record incorrectly appear as unique. Thus, compaction would not function as intended.
- For the second issue, consider the effect if one particular system identifier dominates in the records sent. You now have a situation where you could have significant key skew. Depending on how you are consuming from the partitions, the uneven distribution of keys could have an impact on processing by increasing latency.
These are two situations where you might want to use headers. The original KIP proposing headers provides some additional cases as well:
- Automated routing of messages based on header information between clusters
- Enterprise APM tools (e.g., Appdynamics or Dynatrace) need to stitch in “magic” transaction IDs for them to provide end-to-end transaction flow monitoring.
- Audit metadata is recorded with the message, for example, the client-id that produced the record.
- Business payload needs to be encrypted end to end and signed without tamper, but ecosystem components need access to metadata to achieve tasks.
Now that I’ve made a case for using headers, let’s walk through how you can add headers to your Kafka records.
Adding headers to Kafka records
Here’s the Java code to add headers to a ProducerRecord:
ProducerRecord<String, String> producerRecord = new ProducerRecord<>("bizops", "value");
producerRecord.headers().add("client-id", "2334".getBytes(StandardCharsets.UTF_8));
producerRecord.headers().add("data-file", "incoming-data.txt".getBytes(StandardCharsets.UTF_8));
// Details left out for clarity
producer.send(producerRecord);
- Create an instance of the ProducerRecord class
- Call the ProducerRecord.headers() method and add the key and value for the header
- Adding another header
There’s a few things we need to point out with the code example here. The header interface expects a String key and the value as a byte array. Even though you provide a key, you can add as many headers with the same key if needed. Duplicate keys will not overwrite previous entries with the same key.
Also, there are overloaded ProducerRecord constructors that accept an Iterable<Header>. You could create your own concrete class that implements the Header interface and passes in a collection that implements the Iterable interface. However, in practice, the simple method shown here should suffice.
Now that you know how to add headers, let’s take a look at how you can access headers from the consumer side of things.
Retrieving headers
This is how you can access headers when consuming records:
//Details left out for clarityConsumerRecords<String, String> consumerRecords = consumer.poll(Duration.ofSeconds(1));
for (ConsumerRecord<String, String> consumerRecord : consumerRecords) { for (Header header : consumerRecord.headers()) {
System.out.println("header key " + header.key() + "header value " + new String(header.value())); } }
- Iterating over the ConsumerRecords
- For each ConsumerRecord, iterating over the headers
- Header processing
From the code above, you can see that to process the headers, simply use the ConsumerRecord.headers() method to return the headers. In our example above, we’re printing the headers out to the console for demonstration purposes. Once you have access to the headers, you can process them as needed. For reading headers from the command line, KIP-431 adds support for optionally printing headers from the ConsoleConsumer, which will be available in the Apache Kafka 2.7.0 release.
You can also use kafkacat to view headers from the command line. Here’s an example command:
kafkacat -b kafka-broker:9092 -t my_topic_name -C \
  -f '\nKey (%K bytes): %k
  Value (%S bytes): %s
  Timestamp: %T
  Partition: %p
  Offset: %o
  Headers: %h\n'
Recap
You now have read the top five tips for working with Apache Kafka. To recap, we understand:
- Message durability and its relationship with delivery guarantees
- The sticky partitioner in the producer API
- The command line tools
- The power of record headers
And yet, there is still so much more to learn! Head over to Confluent Developer and Kafka Tutorials to see what’s going on.
このブログ記事は気に入りましたか?今すぐ共有
Confluent ブログの登録


