Neu in Confluent Cloud: Daten & Pipelines für KI-fähiges Streaming zugänglich machen | Mehr erfahren
The Simplest Useful Kafka Connect Data Pipeline in the World…or Thereabouts – Part 1
This short series of articles is going to show you how to stream data from a database (MySQL) into Apache Kafka® and from Kafka into both a text file and Elasticsearch—all with the Kafka Connect API.
Why? To demonstrate how easy it is to integrate data from sources into targets, with no coding needed!
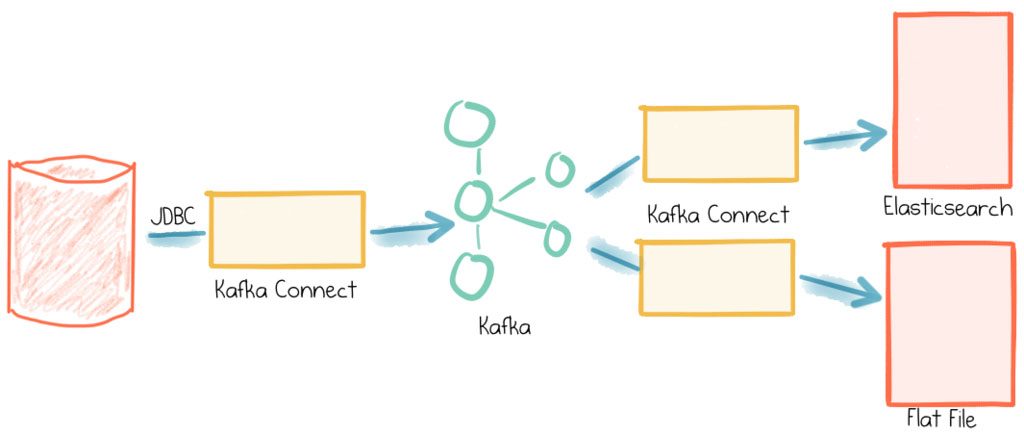
- Pull data using JDBC Kafka Connect connector, based on a timestamp column in the source table to identify new and modified rows
- Stream data to an Elasticsearch index
- Also stream data to a flat file—just because we can!
Whilst you can build this out on your laptop, you can use it as the repeatable basis for building streaming data pipelines that are going to scale horizontally with Kafka and Kafka Connect to handle anywhere from a few messages here and there up to billions of messages per day if you wanted to. Whilst the pipeline built here is pretty simple and linear, with Kafka acting as the “data backbone” in an architecture it is easy for it to grow to be the central integration point for numerous data feeds in and out, not to mention driving real time applications, stream processing, and more.
This article presumes that you know what Kafka is, that you appreciate that with the Connect and Streams APIs there’s more to Kafka than just awesome pub/sub distributed messaging at scale, and you’ve drunk the Kafka Connect Kool-Aid. This article presents a nuts and bolts example of building a nice simple pipeline. There are a couple of rough edges on the way, so this is as much for my reference in the future, as your benefit, dear reader….
An important note here is that whilst I’m running this all on a single node, I am still using Kafka Connect Distributed. Why? Because it is a piece of cake to move to a different machine or scale out at a later date if I want to, since my configs and offsets are already stored in Kafka itself. If I’m using Kafka Connect Standalone and wanted to scale out, I’d need to move my config from local flat file and apply them through the distributed mode’s REST API instead.
Getting Started
This is built on Confluent Platform 3.3, Elasticsearch 5.4, and MySQL 5.7—all running natively on the Mac. I also make heavy use of jq, which is a powerful command line tool for pretty-printing JSON, as well as more powerful manipulation and filtering of it too if you want. I use brew to install these:
brew install mysql elasticsearch kibana jq
For Confluent Platform, I downloaded the zip and unpacked, but you can also run with Docker if you want. I made a couple of changes to the default config.
To use the JDBC connector, you’ll need to make available the relevant JDBC driver for your source database. The connector ships with drivers for PostgreSQL and sqlite—for all others download the appropriate JAR and place it in share/java/kafka-connect-jdbc. You can find the relevant downloads here for MySQL, Oracle, SQL Server, DB2, and Teradata.
First, fire up the Confluent Platform, using the Confluent CLI:
$ <path/to/CLI>/confluent local start
 Starting zookeeper
 zookeeper is [UP]
 Starting kafka
 kafka is [UP]
 Starting schema-registry
 schema-registry is [UP]
 Starting kafka-rest
 kafka-rest is [UP]
 Starting connect
 connect is [UP]
Create a Database Table and Some Data
MySQL is one of the most popular open source RDBMS. It’s worth noting that I’m just using MySQL because it’s easy to install and get going with, but what I’m building here is as applicable to any other RDBMS that supports JDBC (Oracle, SQL Server, PostgreSQL, etc etc). Assuming you’ve installed it with brew, first start the server:
brew services start mysql
And then start a command prompt for it:
$ mysql -uroot
Welcome to the MySQL monitor.  Commands end with ; or \g.
Your MySQL connection id is 8
Server version: 5.7.19 Homebrew
Copyright (c) 2000, 2017, Oracle and/or its affiliates. All rights reserved. Oracle is a registered trademark of Oracle Corporation and/or its affiliates. Other names may be trademarks of their respective owners.
Type 'help;' or '\h' for help. Type '\c' to clear the current input statement. mysql>
Next create a user, database, and a table:
mysql> GRANT ALL PRIVILEGES ON *.* TO 'rmoff'@'localhost' IDENTIFIED BY 'pw'; Query OK, 0 rows affected, 1 warning (0.00 sec)mysql> create database demo; Query OK, 1 row affected (0.00 sec)
mysql> use demo; Database changed
mysql> create table foobar (c1 int, c2 varchar(255),create_ts timestamp DEFAULT CURRENT_TIMESTAMP , update_ts timestamp DEFAULT CURRENT_TIMESTAMP ON UPDATE CURRENT_TIMESTAMP ); Query OK, 0 rows affected (0.04 sec)
mysql> show tables; +----------------+ | Tables_in_demo | +----------------+ | foobar | +----------------+
1 row in set (0.00 sec)
mysql>
Insert some data and check it’s been stored. Note that the create_ts and update_ts automagically get populated:
mysql> insert into foobar (c1,c2) values(1,'foo'); Query OK, 1 row affected (0.01 sec)mysql> select * from foobar;
+------+------+---------------------+---------------------+ | c1 | c2 | create_ts | update_ts | +------+------+---------------------+---------------------+ | 1 | foo | 2017-08-03 22:38:25 | 2017-08-03 22:38:25 | +------+------+---------------------+---------------------+
1 row in set (0.00 sec)
mysql>
Please note that this will not work on MySQL versions earlier than 5.6
Create Kafka Connect Source JDBC Connector
The Confluent Platform ships with a JDBC source (and sink) connector for Kafka Connect. You can see full details about it here.
To configure the connector, first write the config to a file (for example, /tmp/kafka-connect-jdbc-source.json). Here I’ve added some verbose comments to it, explaining what each item does. These comments are purely for annotation, and are ignored by Kafka Connect:
To load the connector config into Connect using the lovely Confluent CLI, simply run:
$ <path/to/CLI>/confluent local load jdbc_source_mysql_foobar_01 -- -d /tmp/kafka-connect-jdbc-source.json
And then to check its status:
<path/to/CLI>/confluent local status jdbc_source_mysql_foobar_01
{
  "name": "jdbc_source_mysql_foobar_01",
  "connector": {
    "state": "RUNNING",
    "worker_id": "127.0.0.1:8083"
  },
  "tasks": [
    {
      "state": "RUNNING",
      "id": 0,
      "worker_id": "127.0.0.1:8083"
    }
  ]
}
If the task state is FAILED then you need to dig into the error message and fix it before continuing. Check both the state returned from the REST call, and also the logs from Kafka Connect itself.
For the full set of functionality of connector management you would use the REST API, the reference for which is here. When working with the REST API directly I use Paw to build and test my REST calls, you can of course use whatever you’d like (a couple of Chrome app alternatives here 1 2). A nice thing about Paw is that it gives you the option to export calls to formats such as curl for easy scripting and re-use.
Test that the Source Connector is Working
We’ll use the avro console consumer to check the topic:
./bin/kafka-avro-console-consumer \
--bootstrap-server localhost:9092 \
--property schema.registry.url=http://localhost:8081 \
--property print.key=true \
--from-beginning \
--topic mysql-foobar
You should see almost instantly the row of data that we inserted above, now on the Kafka topic:
null {"c1":{"int":1},"c2":{"string":"foo"},"create_ts":1501796305000,"update_ts":1501796305000}
Return to your MySQL session and insert/update some data:
$ mysql --user=rmoff --password=pw demo mysql: [Warning] Using a password on the command line interface can be insecure. Reading table information for completion of table and column names You can turn off this feature to get a quicker startup with -AWelcome to the MySQL monitor. Commands end with ; or \g. Your MySQL connection id is 61 Server version: 5.7.19 Homebrew
Copyright (c) 2000, 2017, Oracle and/or its affiliates. All rights reserved.
Oracle is a registered trademark of Oracle Corporation and/or its affiliates. Other names may be trademarks of their respective owners.
Type 'help;' or '\h' for help. Type '\c' to clear the current input statement.
mysql> insert into foobar (c1,c2) values(2,'foo'); Query OK, 1 row affected (0.00 sec)
mysql> insert into foobar (c1,c2) values(3,'foo'); Query OK, 1 row affected (0.00 sec)
mysql> update foobar set c2='bar' where c1=1; Query OK, 1 row affected (0.01 sec) Rows matched: 1 Changed: 1 Warnings: 0
mysql> select * from foobar; +------+------+---------------------+---------------------+ | c1 | c2 | create_ts | update_ts | +------+------+---------------------+---------------------+ | 1 | bar | 2017-08-03 22:38:25 | 2017-08-03 22:44:52 | | 2 | foo | 2017-08-03 22:44:25 | 2017-08-03 22:44:25 | | 3 | foo | 2017-08-03 22:44:30 | 2017-08-03 22:44:30 | +------+------+---------------------+---------------------+ 3 rows in set (0.00 sec)
mysql>
In your console consumer session you should see original first row, plus the additional data appearing in the topic – both the two new rows (c1=2, c1=3), as well as the updated row (c1=1).
null    {"c1":{"int":1},"c2":{"string":"foo"},"create_ts":1501796305000,"update_ts":1501796305000}
null    {"c1":{"int":2},"c2":{"string":"foo"},"create_ts":1501796665000,"update_ts":1501796665000}
null    {"c1":{"int":3},"c2":{"string":"foo"},"create_ts":1501796670000,"update_ts":1501796670000}
null    {"c1":{"int":1},"c2":{"string":"bar"},"create_ts":1501796305000,"update_ts":1501796692000}
This is pretty cool – the update_ts column is managed automagically by MySQL (other RDBMS have similar functionality), and Kafka Connect’s JDBC connector is using this to pick out new and updated rows from the database.
As a side note here, Kafka Connect tracks the offset of the data that its read using the connect-offsets topic. Even if you delete and recreate the connector, if the connector has the same name it will retain the same offsets previously stored. So if you want to start from scratch, you’ll want to change the connector name – for example, use an incrementing suffix for each test version you work with. You can actually check the content of the connect-offsets topic easily:
$ ./bin/kafka-console-consumer \ --bootstrap-server localhost:9092 \ --from-beginning \ --property print.key=true \ --topic connect-offsets["jdbc_source_mysql_foobar_01",{"table":"foobar"}] {"timestamp_nanos":0,"timestamp":1501796305000}
Stream Data from Kafka to File
Kafka Connect supports numerous sinks for data, including Elasticsearch, S3, JDBC, and HDFS as part of the Confluent Platform. There’s also a simple FileStreamSinkConnector which streams the contents of a Kafka topic to a file.
Here’s the config – as before with optional but illuminating _comment fields to explain what’s going on:
Load it up into Connect:
$ <path/to/CLI>/confluent local load file-sink-mysql-foobar -- -d /tmp/kafka-connect-file-sink.json
Check the connector status – remember it takes a few seconds for it to start up:
$ <path/to/CLI>/confluent local file-sink-mysql-foobar
{
 "name": "file-sink-mysql-foobar",
 "connector": {
 "state": "RUNNING",
 "worker_id": "127.0.0.1:8083"
 },
 "tasks": [
 {
 "state": "RUNNING",
 "id": 0,
 "worker_id": "127.0.0.1:8083"
 }
 ]
}
Now in the named file you’ll see the existing contents of the message:
$ tail -f /tmp/kafka-mysql-foobar.txt
Struct{c1=1,c2=foo,create_ts=Thu Aug 03 22:38:25 BST 2017,update_ts=Thu Aug 03 22:38:25 BST 2017}
Struct{c1=2,c2=foo,create_ts=Thu Aug 03 22:44:25 BST 2017,update_ts=Thu Aug 03 22:44:25 BST 2017}
Struct{c1=3,c2=foo,create_ts=Thu Aug 03 22:44:30 BST 2017,update_ts=Thu Aug 03 22:44:30 BST 2017}
Struct{c1=1,c2=bar,create_ts=Thu Aug 03 22:38:25 BST 2017,update_ts=Thu Aug 03 22:44:52 BST 2017}
and if you add another row to the table in mySQL:
mysql> insert into foobar (c1,c2) values (4,'bar');
Query OK, 1 row affected (0.00 sec)
it will show up in the text file:
Struct{c1=4,c2=bar,create_ts=Thu Aug 03 23:00:47 BST 2017,update_ts=Thu Aug 03 23:00:47 BST 2017}
and if you still have the avro console consumer running, in that too:
null {"c1":{"int":4},"c2":{"string":"bar"},"create_ts":1501797647000,"update_ts":1501797647000}
Summary
Here we’ve built out the first part of our pipeline, streaming changes from MySQL into Kafka, and from Kafka to a text file. Streaming to text files isn’t always so useful, but serves well for a simple example. In the next post in this series we will see a much more common requirement—streaming data from Kafka to Elasticsearch.
Other Posts in this Series:
Part 2: The Simplest Useful Kafka Connect Data Pipeline in the World…or Thereabouts – Part 2
Part 3: The Simplest Useful Kafka Connect Data Pipeline in the World…or Thereabouts – Part 3
Ist dieser Blog-Beitrag interessant? Jetzt teilen
Confluent-Blog abonnieren


