Neu in Confluent Cloud: Daten & Pipelines für KI-fähiges Streaming zugänglich machen | Mehr erfahren
Building a Real-Time Data Pipeline with Oracle CDC and MarkLogic Using CFK and Confluent Cloud
Today, enterprise technology is entering a watershed moment, businesses are moving to end-to-end automation, which requires integrating data from different sources and destinations in real time. Every industry from Internet to retail to services are leveraging NoSQL database technology for more agile development, reduced operational costs, and scalable operations. This institutes a need to model relational data as documents, define ways to access them within applications, and identify ways to migrate data from a relational database. This is where streaming data pipelines come into play.
Over the years, as the cloud’s on-demand resource availability, full-service, API-driven, pay-per-use model became popular and competitive, cloud infrastructure consolidation began, requiring the automated deployment of infrastructure to be simplified and scalable.
This blog post details one of the easiest ways to deploy an end-to-end streaming data pipeline that facilitates real-time data transfer from an on-premises relational datastore like Oracle PDB to a document-oriented NoSQL database, MarkLogic, with low latency, all deployed on the Kubernetes clusters provided by Google Cloud (GKE). Apache Kafka® is leveraged using Confluent Cloud on AWS, depicting a true multi-cloud deployment. Before getting into the details of implementation, the following terms are defined: Confluent Cloud, Confluent for Kubernetes (CFK), Oracle CDC, MarkLogic connectors, and Confluent Control Center.
Confluent Cloud is a fully managed, cloud-native Kafka service for connecting and processing all of your data, everywhere it’s needed, without all the overhead of infrastructure management. Confluent Cloud offers several components for building applications and pipelines including managed connectors, Schema Registry, and ksqlDB. The connectors utilized in this guide are self-managed. Confluent supports most of the open source connectors that are self-managed by customers. With a simple GUI-based configuration and elastic scaling with no infrastructure to manage, Confluent Cloud connectors make moving data in and out of Kafka an effortless task, giving you more time to focus on app development.
Confluent for Kubernetes (CFK) is a cloud-native control plane for deploying and managing Confluent in a private cloud environment. It provides a standard and simple interface to customize, deploy, and manage Confluent Platform through a declarative API. Confluent for Kubernetes enables:
- Risk management: CFK reduces risk and costly resource investments, utilizing best practices to run a secure, reliable, and production-ready platform for data in motion
- Faster time to value: Achieve faster time to value and significantly reduce operational burden, utilizing an API-driven automation methodology
- Operational efficiency: Operate efficiently everywhere, deploying to any private cloud to run data in motion workloads consistently and scaling to meet changing business demands with efficient use of resources
Oracle CDC Source connector captures each change to rows in an Oracle database and represents them as change event records in Kafka topics. The connector uses Oracle LogMiner to read the database redo log. The connector requires a database user with permissions to use LogMiner and permissions to select from all of the tables captured by the connector.
MarkLogic Sink connector subscribes to Kafka topics and pushes the messages into MarkLogic. It is built off of the Kafka Connect framework, and automatically supports pluggable encoding converters, single message transforms, and other useful features.
Confluent Control Center is a web-based tool for managing and monitoring Kafka clusters. It facilitates building and monitoring production data pipelines and streaming applications. This blog post leverages the Control Center for monitoring connectors bootstrapped to Confluent Cloud.
Confluent offers the flexibility to leverage fully managed connectors on Confluent Cloud and deploy a hybrid architecture with a combination of self- and fully managed connectors.
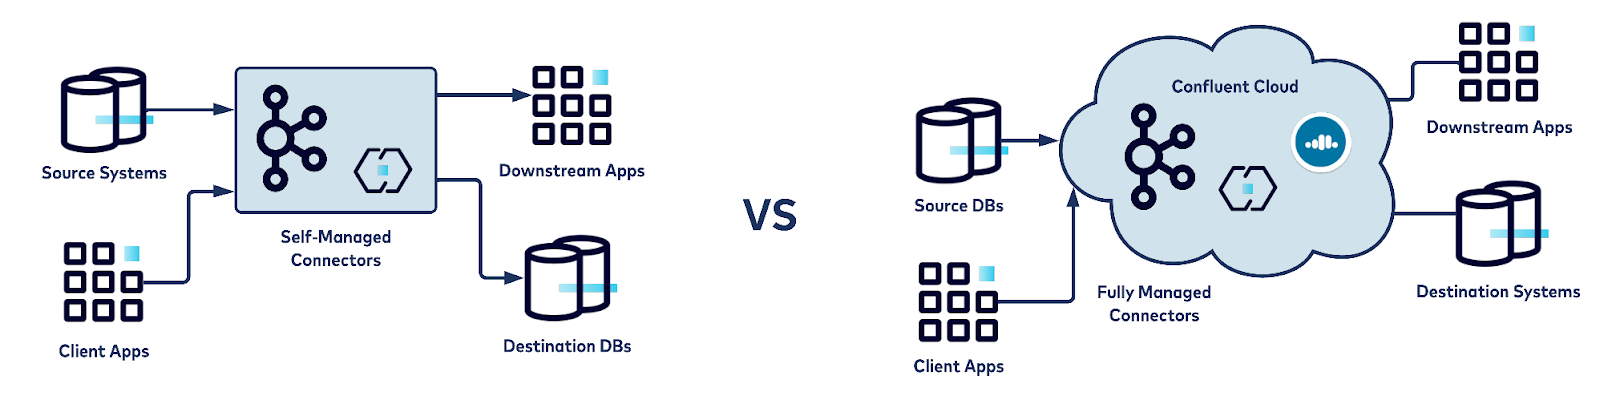
Diagram illustrates self-managed versus fully managed connectors
Confluent can help move relational data into a NoSQL datastore
Confluent’s Oracle CDC Source connector allows you to reliably and cost-effectively implement continuous real-time syncs that offload data from an Oracle Database (on-prem or on cloud ) to Confluent. The MarkLogic Sink connector can stream that data from Confluent to MarkLogic stores. The connectors can be deployed on any cloud provider of your choice in minutes, by leveraging Confluent for Kubernetes (CFK). For this blog post, GKE is leveraged to deploy connectors. Mark logic is hosted on AWS. A Confluent Cloud account is also created within AWS.
In a modular approach, we will walk you through the process of creating a self-managed Oracle CDC Source connector and self-managed MarkLogic Sink connector on GKE using CFK, bootstrapping against a Kafka cluster on Confluent Cloud.
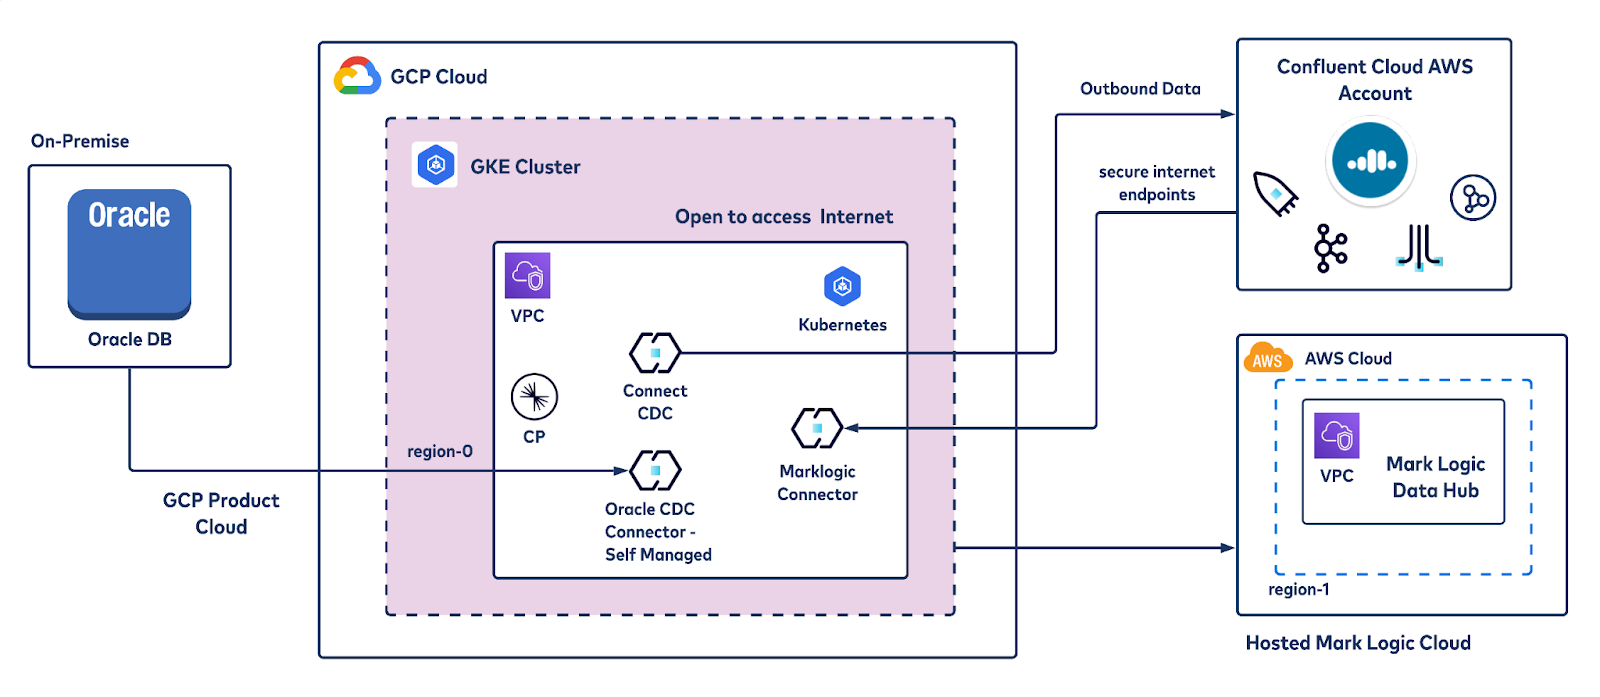
Reference architecture of the data pipeline
This blog post shows you how to:
- Deploy Confluent for Kubernetes (CFK) on GKE
- Perform Confluent Cloud integration with the locally deployed Control Center
- Bootstrap Control Center with Confluent Cloud
- Deploy a self-managed Oracle CDC connector via Docker images
- Deploy a self-managed MarkLogic Sink connector
Deploy Confluent for Kubernetes (CFK) on GKE
The Confluent for Kubernetes (CFK) bundle contains Helm charts, templates, and scripts for deploying Confluent Platform to your Kubernetes cluster. This tutorial deploys CFK using Helm charts.
Prerequisites
Before you start the deployment, ensure that you have set up the prerequisites listed below.
- A GKE Kubernetes cluster—any CNCF conformant version
- Helm 3 installed on the client machine where you intend to run the Confluent Cloud CLI commands
- Kubectl installed on the client machine where you intend to run the Confluent Cloud CLI commands
- Confluent Cloud CLI installed on the client machine where you intend to run the CLI commands
- A namespace “confluent” created in the Kubernetes cluster
- Kubectl configured to target the Confluent namespace:
kubectl config set-context --current --namespace=confluent
- This repo cloned to the Kubernetes workstation:
git clone git@github.com:confluentinc/confluent-kubernetes-examples.git
Deploy Confluent for Kubernetes
To complete the scenario, follow these steps:
- Set the current Confluent directory
- Deploy Confluent for Kubernetes
Set the current Confluent directory
Log in to the GKE node where you’d like to create the Docker file that deploys Confluent Platform. Change to the directory where you downloaded the files, and set the CONFLUENT_HOME environment variable:
export CONFLUENT_HOME=<Tutorial directory>/quickstart-deploy
Deploy Confluent for Kubernetes
Set up the Helm chart:
helm repo add confluentinc https://packages.confluent.io/helm
Install Confluent for Kubernetes using Helm
Run the command below to install the Confluent for Kubernetes operator:
helm upgrade --install operator confluentinc/confluent-for-kubernetes
Check that the Confluent for Kubernetes pod is up and running:
kubectl get pods
Desired output:
kubectl get pods
NAME                                                           READY     STATUS    RESTARTS            AGE
confluent-operator-64f68489fc-fqkpm   1/1              Running   0                        22m
Confluent Cloud integration
The workflow defined in this article encompasses Kafka bootstrapped from Confluent Cloud and self-managed Confluent connectors. You will set up a hybrid cloud integration framework that deploys the Confluent Platform on Google Kubernetes engine, consisting of components like connectors and ksqlDB, etc.
CFK will install Confluent Platform components as custom resources that can be customized whenever required, according to the varying workloads. In this section, you will learn how to configure all components in a single file and deploy all components using the kubectl apply command.
Components of Confluent Platform typically include Kafka brokers, ZooKeeper, Schema Registry, ksqlDB, and Kafka Connect with RBAC-enabled security features. Since this tutorial leverages Kafka from Confluent Cloud, Kafka components are not included in the YAML file that specifies how to deploy Confluent Platform on GKE.
Prepare Docker images of connectors
Since you want to run the Oracle CDC and MarkLogic connectors in a Kubernetes cluster, you need to create custom Docker images of these connectors and make them available to CFK. You can use the following steps:
- Log in to your Kubernetes cluster
- Navigate to the directory quickstart-deploy and create a Docker file with the content below:
FROM confluentinc/cp-kafka-connect-base:latest
USER root
RUN confluent-hub install confluentinc/kafka-connect-oracle-cdc:2.0.1 --no-prompt
RUN confluent-hub install marklogic/kafka-marklogic-connector:1.6.0 --no-prompt
- Build a custom Docker image using the above Docker file
docker build -t <yourdockerrepo>/customconnect:0.1 .
docker push <yourdockerrepo>/customconnect:0.1
You can also leverage Google Compute Engine or Google Container Registry.
Deploy configuration secrets
Confluent for Kubernetes provides auto-generated certificates for Confluent Platform components to use for inter-component TLS. You need to generate and provide a root Certificate Authority (CA).
Generate a CA pair to use in this tutorial:
openssl genrsa -out $CONFLUENT_HOME/ca-key.pem 2048
openssl req -new -key $CONFLUENT_HOME/ca-key.pem -x509
-days 1000
-out $CONFLUENT_HOME/ca.pem
-subj "/C=US/ST=CA/L=MountainView/O=Confluent/OU=Operator/CN=TestCA"
Create a Kubernetes secret for inter-component TLS:
kubectl create secret tls ca-pair-sslcerts --cert=$CONFLUENT_HOME/ca.pem --key=$CONFLUENT_HOME/ca-key.pem
Provide authentication credentials
Confluent Cloud provides an API key for both Kafka and Schema Registry. You can use different types of API keys to manage access and authentication to different parts of the service. An API key consists of a key and a secret. You will configure Confluent for Kubernetes to use the API key when setting up Connect and ksqlDB to connect.
Create a Kubernetes secret object for Confluent Cloud access that contains file-based properties.
kubectl create secret generic cloud-plain \ --from-file=plain.txt=$CONFLUENT_HOME/creds-client-kafka-sasl-user.txtkubectl create secret generic cloud-sr-access
--from-file=basic.txt=$CONFLUENT_HOME/creds-schemaRegistry-user.txtkubectl create secret generic control-center-user
--from-file=basic.txt=$CONFLUENT_HOME/creds-control-center-users.txt
Deploy Confluent Platform on GKE
Now you can proceed to deploy the Confluent Platform. Since you are using Confluent for Kubernetes to deploy and manage connectors and ksqlDB against Confluent Cloud and Schema Registry, it will rely on a Kubernetes operator to deploy components. You are going to refer to the Kubernetes namespace being used as ‘confluent.’
Confluent Platform is configured leveraging a configuration file from this example Git repository:
$CONFLUENT_HOME/confluent-platform.yaml
In this YAML file, there is a custom resource configuration spec for each Confluent Platform component, and this specifies the replicas, image to use, resource allocations, etc. Modify the ‘Connect’ section of the YAML file as follows:
- Replace the value of application key with path to the Docker image created earlier
- Modify the application section of connect CRD to include:
<yourdockerrepo>/customconnect:0.1
- Modify the replicas section to reflect the number of replicas required
For example, the Connect section of the file is as follows:
---
apiVersion: platform.confluent.io/v1beta1
kind: Connect
metadata:
  name: connect
  namespace: confluent
spec:
  replicas: 1
  image:
    application: confluentinc/cp-server-connect:7.0.1
    init: confluentinc/confluent-init-container:2.2.0-1
  dependencies:
    kafka:
      bootstrapEndpoint: kafka:9071
---
Here’s what a confluent-platform.yaml file looks like while running Kafka Connect via Confluent Platform locally, bootstrapping to Confluent Cloud. Key elements note here are the bootstrapEndpoint and Schema Registry URL which are extracted from Confluent Cloud UI.
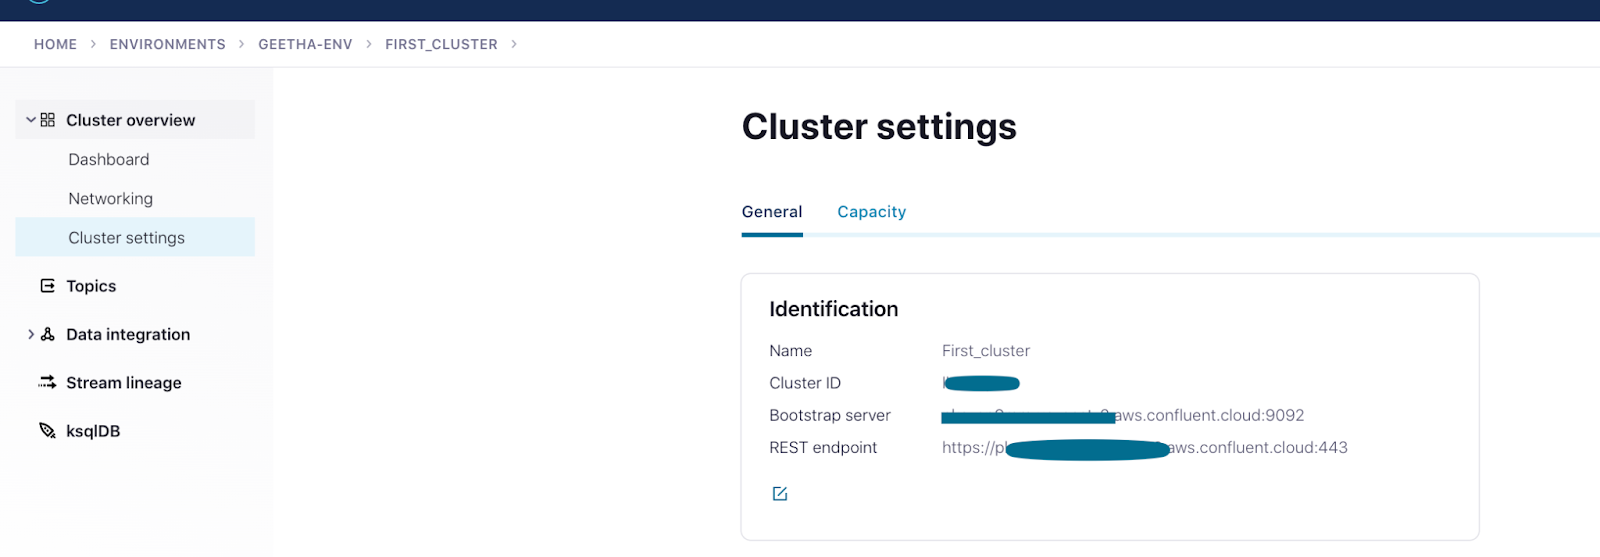
Confluent Cloud interface exhibiting cluster details
---
apiVersion: platform.confluent.io/v1beta1
kind: Connect
metadata:
  name: connect
  namespace: confluent
spec:
  replicas: 1
  image:
    application: ganne03/customconnect:1.0
    init: confluentinc/cp-init-container-operator:6.1.4.0
  tls:
    autoGeneratedCerts: true
  dependencies:
    kafka:
      bootstrapEndpoint: <cloudKafka_url>:9092
      authentication:
        type: plain
        jaasConfig:
          secretRef: cloud-plain
      tls:
        enabled: true
        ignoreTrustStoreConfig: true
    schemaRegistry:
      url: https://<cloudSR_url>
      authentication:
        type: basic
        basic:
          secretRef: cloud-sr-access
---
apiVersion: platform.confluent.io/v1beta1
kind: KsqlDB
metadata:
  name: ksqldb-tls
  namespace: confluent
spec:
  replicas: 1
  image:
    application: confluentinc/cp-ksqldb-server-operator:6.1.4.0
    init: confluentinc/cp-init-container-operator:6.1.4.0
  dataVolumeCapacity: 10Gi
  configOverrides:
    server:
    - ksql.internal.topic.replicas=3
    - ksql.logging.processing.topic.replication.factor=3
  dependencies:
    kafka:
      bootstrapEndpoint: <cloudKafka_url>:9092
      authentication:
        type: plain
        jaasConfig:
          secretRef: cloud-plain
      tls:
        enabled: true
        ignoreTrustStoreConfig: true
    schemaRegistry:
      url: https://<cloudSR_url>
      authentication:
        type: basic
        basic:
          secretRef: cloud-sr-access
---
apiVersion: platform.confluent.io/v1beta1
kind: ControlCenter
metadata:
  name: controlcenter
  namespace: confluent
spec:
  replicas: 1
  image:
    application: confluentinc/cp-enterprise-control-center-operator:6.1.4.0
    init: confluentinc/cp-init-container-operator:6.1.4.0
  dataVolumeCapacity: 10Gi
  authentication:
    type: basic
    basic:
      secretRef: control-center-user
  tls:
    autoGeneratedCerts: true
  configOverrides:
    server:
      - confluent.metrics.topic.max.message.bytes=8388608
  dependencies:
    kafka:
      bootstrapEndpoint: <cloudKafka_url>:9092
      authentication:
        type: plain
        jaasConfig:
          secretRef: cloud-plain
      tls:
        enabled: true
        ignoreTrustStoreConfig: true
    schemaRegistry:
      url: https://<cloudSR_url>
      authentication:
        type: basic
        basic:
          secretRef: cloud-sr-access
    ksqldb:
    - name: ksql-dev
      url: https://ksqldb.confluent.svc.cluster.local:8088
      tls:
        enabled: true
    connect:
    - name: connect-dev
      url:  https://connect.confluent.svc.cluster.local:8083
      tls:
        enabled: true
Deploy Confluent Platform with the above configuration:
kubectl apply -f $CONFLUENT_HOME/confluent-platform.yaml
Desired output:
connect.platform.confluent.io/connect created
ksqldb.platform.confluent.io/ksqldb-tls created
controlcenter.platform.confluent.io/controlcenter created
schemaregistry.platform.confluent.io/schemaregistry created
Check that all Confluent Platform resources are deployed
Run the kubectl command shown below to check the status of resources in the namespace. This should display the nodes that are commissioned for Kafka, ZooKeeper, and Connect.
kubectl get pods
confluent-operator-64f68489fc-fqkpm          1/1     Running   0          94m
connect-0                                    1/1     Running   0          25m
controlcenter-0                              1/1     Running   0          22m
kafka-0                                      1/1     Running   0          24m
kafka-1                                      1/1     Running   0          24m
kafka-2                                      1/1     Running   0          24m
ksqldb-0                                     1/1     Running   1          22m
schemaregistry-0                    	     1/1     Running   1          22m
schemaregistry-1                   	     1/1     Running   0          22m
schemaregistry-2                   	     1/1     Running   0          22m
zookeeper-0                                  1/1     Running   0          25m
zookeeper-1                          	     1/1     Running   0          25m
zookeeper-2                        	     1/1     Running   0          25m
kubectl get confluent
NAME REPLICAS READY STATUS AGE ksqldb.platform.confluent.io/ksqldb 1 1 RUNNING 12m NAME REPLICAS READY STATUS AGE schemaregistry.platform.confluent.io/schemaregistry 1 1 RUNNING 12m NAME REPLICAS READY STATUS AGE zookeeper.platform.confluent.io/zookeeper 1 1 RUNNING 12m NAME REPLICAS READY STATUS AGE kafka.platform.confluent.io/kafka 1 1 RUNNING 12m NAME REPLICAS READY STATUS AGE connect.platform.confluent.io/connect 1 1 RUNNING 12mNAME REPLICAS READY STATUS AGE schemaregistry.platform.confluent.io/schemaregistry 3 3 RUNNING 12m
NAME REPLICAS READY STATUS AGE controlcenter.platform.confluent.io/controlcenter 1 1 RUNNING 12m
Validate the status of Confluent Platform components, for example, to check Connect
kubectl describe connect
Spec: Dependencies: Kafka: Bootstrap Endpoint: kafka:9071 Image: Application: confluentinc/cp-server-connect:7.0.1 Init: confluentinc/confluent-init-container:2.2.0-1 Replicas: 1 Status: Cluster Name: connect Cluster Namespace: confluent Conditions: Last Probe Time: 2022-02-01T06:13:52Z Last Transition Time: 2022-02-01T06:16:56Z Message: Deployment has minimum availability. Reason: MinimumReplicasAvailable Status: True Type: platform.confluent.io/statefulset-available Last Probe Time: 2022-02-01T06:13:52Z Last Transition Time: 2022-02-01T06:16:56Z Message: Kubernetes resources ready. Reason: KubernetesResourcesReady Status: True Type: platform.confluent.io/resources-ready Last Probe Time: 2022-02-01T06:13:52Z Last Transition Time: 2022-02-01T06:13:52Z Message: Cluster is not being garbage collected Reason: Garbage Collection not triggered Status: False Type: platform.confluent.io/garbage-collecting Current Replicas: 1 Group Id: confluent.connect Internal Topic Names: confluent.connect-offsets confluent.connect-configs confluent.connect-status Kafka: Bootstrap Endpoint: kafka:9071 Operator Version: v0.174.21 Phase: RUNNING Ready Replicas: 1 Replicas: 1 Rest Config: Internal Endpoint: http://connect.confluent.svc.cluster.local:8083 Events: Type Reason Age From Message ---- ------ ---- ---- ------- Normal SuccessfulCreate 29m (x2 over 29m) connect resource type *v1.Service successfully created Normal SuccessfulCreate 29m (x2 over 29m) connect resource type *v1.ConfigMap successfully created Normal SuccessfulCreate 29m connect resource type *v1.StatefulSet successfully createdValidate in Control Center
You are going to leverage Control Center to monitor Confluent Platform, and see the created topic and data.
Set up port forwarding to Control Center web UI from local machine
kubectl port-forward controlcenter-0 9021:9021Browse to Control Center
Visit the local Control Center UI using the URL http://localhost:9021.
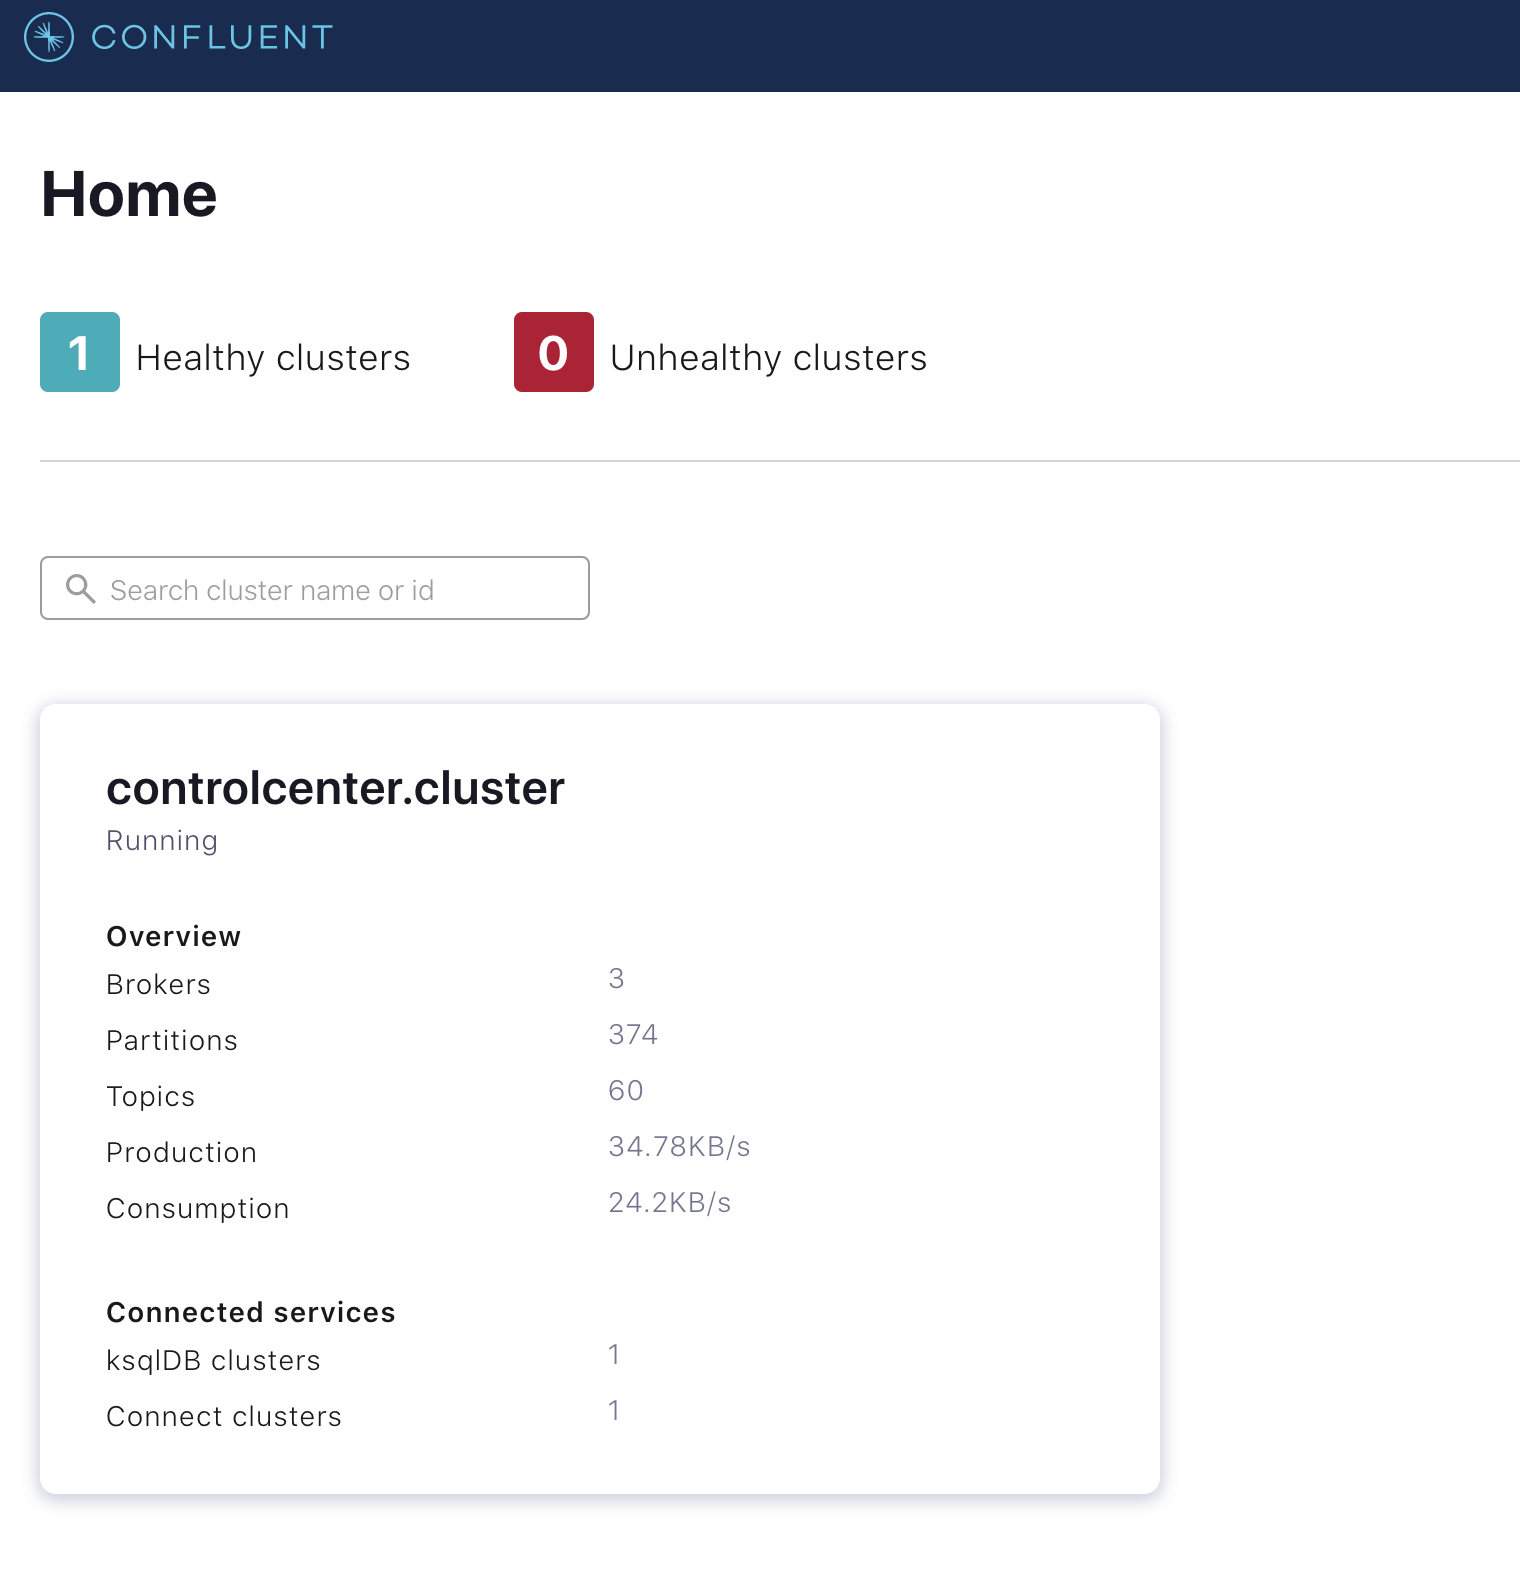
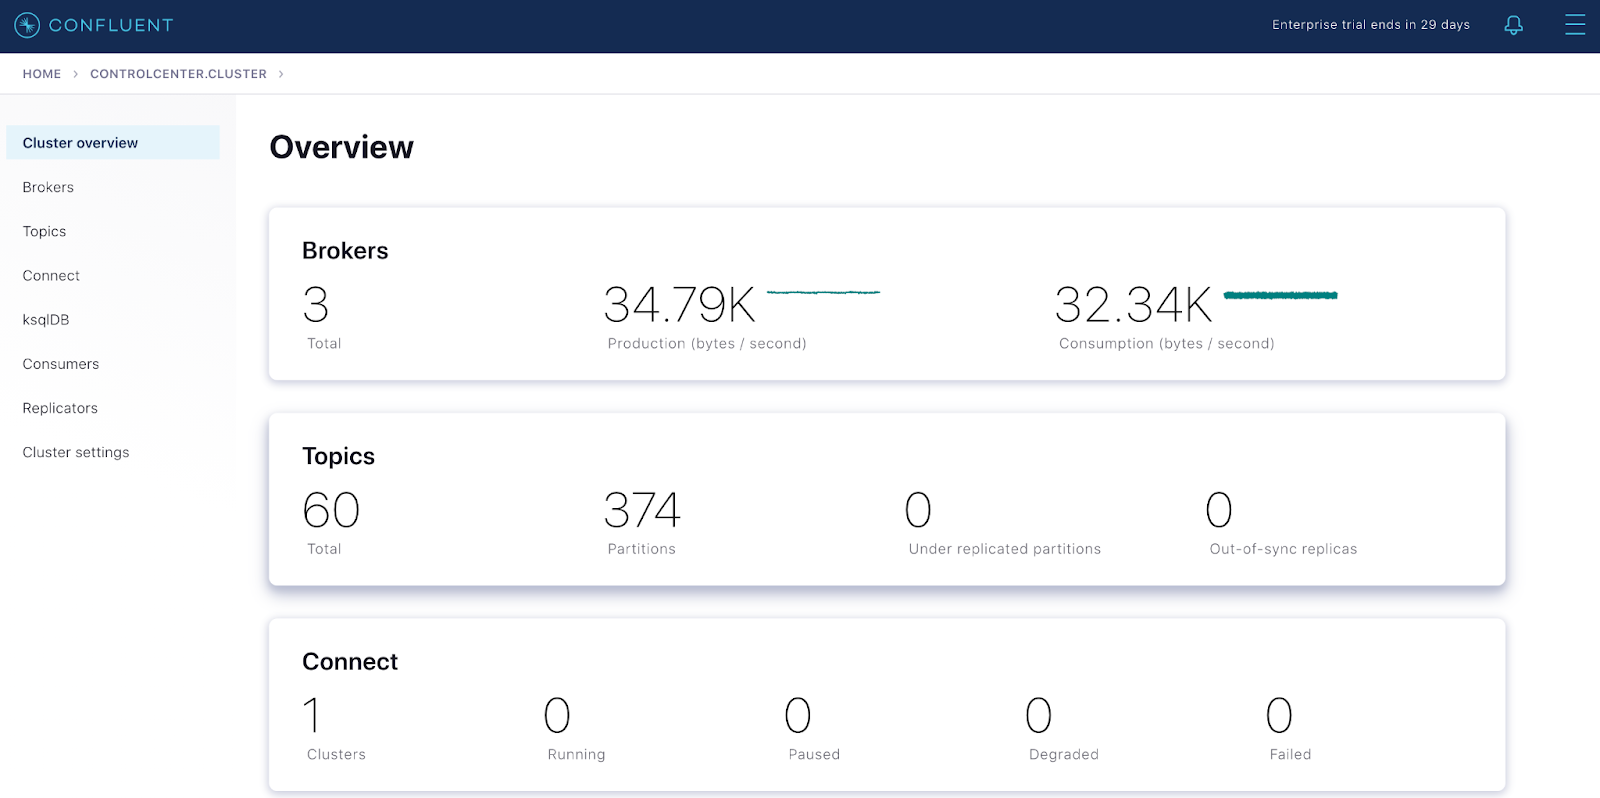
Control Center shows the healthy deployed Confluent Platform cluster
Control Center shows the metrics of the deployed Confluent Platform cluster
Visit the local Control Center UI using the URL. You are now set to deploy the connectors.
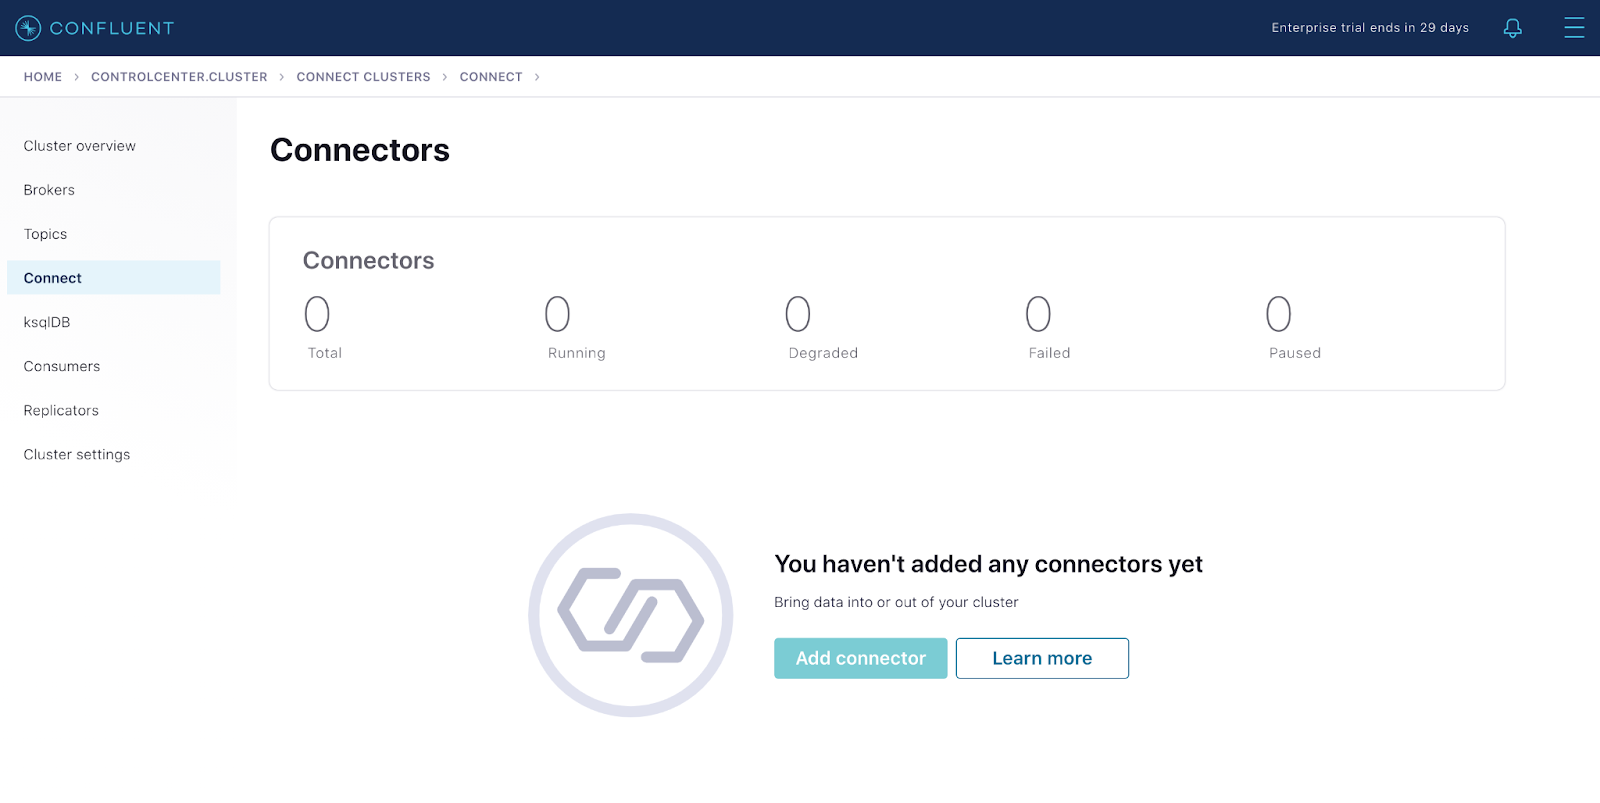
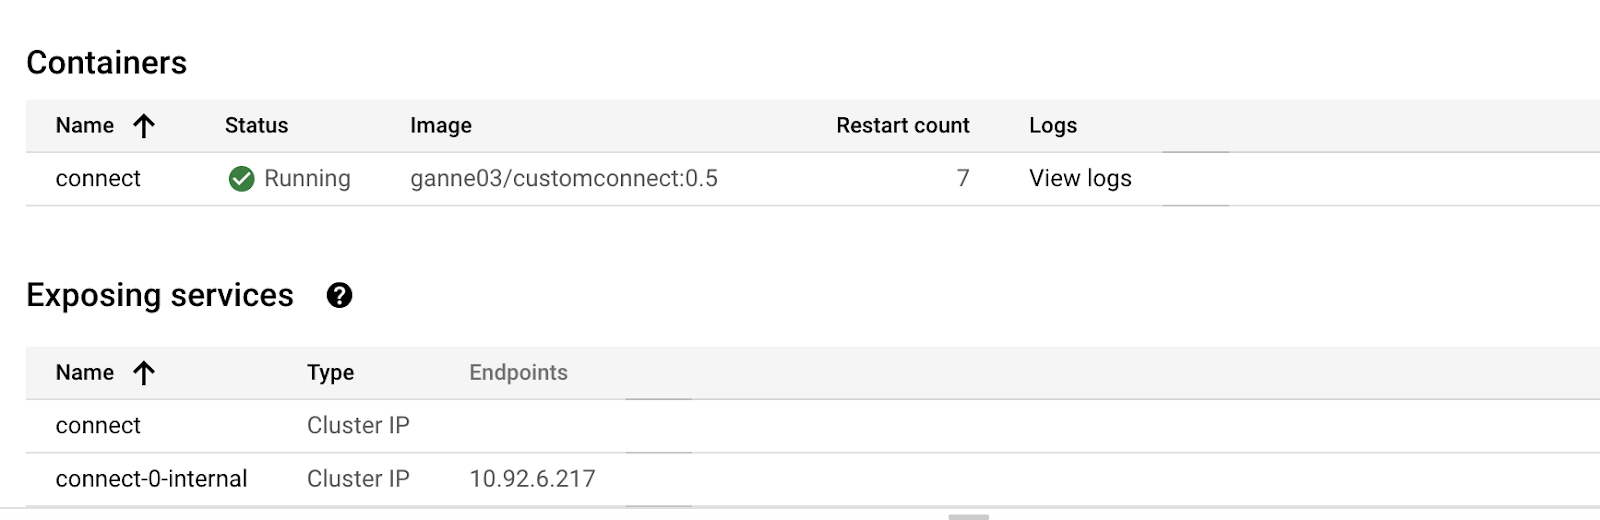
Control Center shows the connect cluster
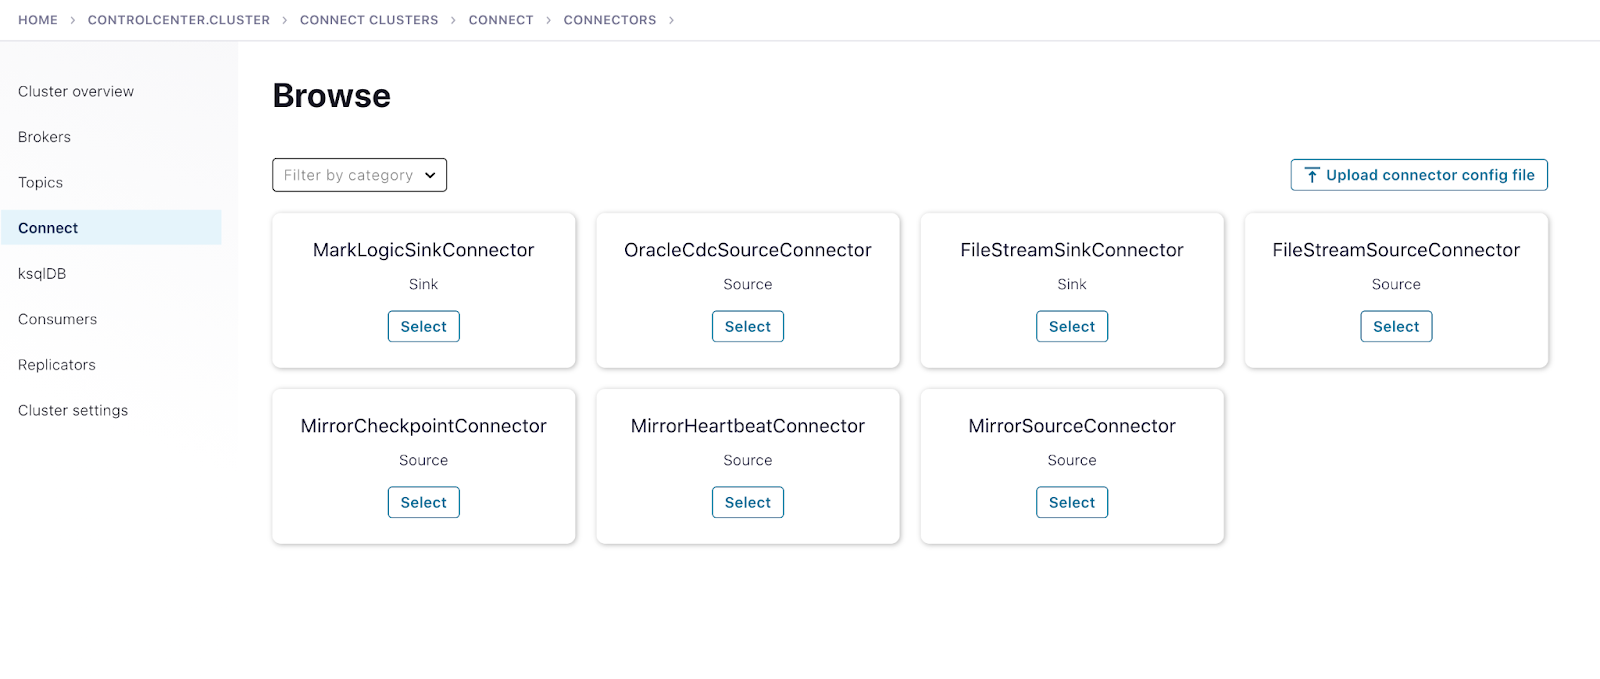
Control Center shows the deployed Oracle CDC and MarkLogic connectors
Deploy a self-managed Oracle CDC connector
This blog post leverages the scripts mentioned in this Confluent repository.
Database prerequisites
The connector requires a database user with role privileges to use LogMiner and to select from all tables captured by the connector. For this reason, before you start to deploy the CDC connector, you need to create a new database user for the connector and grant the prerequisite permissions mentioned below accordingly.
The connector supports Oracle Database 11g, 12c, 18c, and 19c, and can either start with a snapshot of the tables or start reading the logs from a specific Oracle system change number (SCN) or timestamp. Identify the appropriate Oracle database (CDB, PDB, or RDS) and perform the following steps using Confluent’s documentation:
- Configure database user privileges
- Turn on ARCHIVELOG mode
- Enable supplemental logging for all columns
- Grant the user Flashback query privileges
- Validate startup configuration and prerequisite completion
Configure Oracle CDC connector
You can use the Control Center UI or the Confluent CLI to configure the connector. This blog starts by using the CLI, so you can see the connector’s configuration and consider the individual configuration properties.
Deploy the connector from Control Center
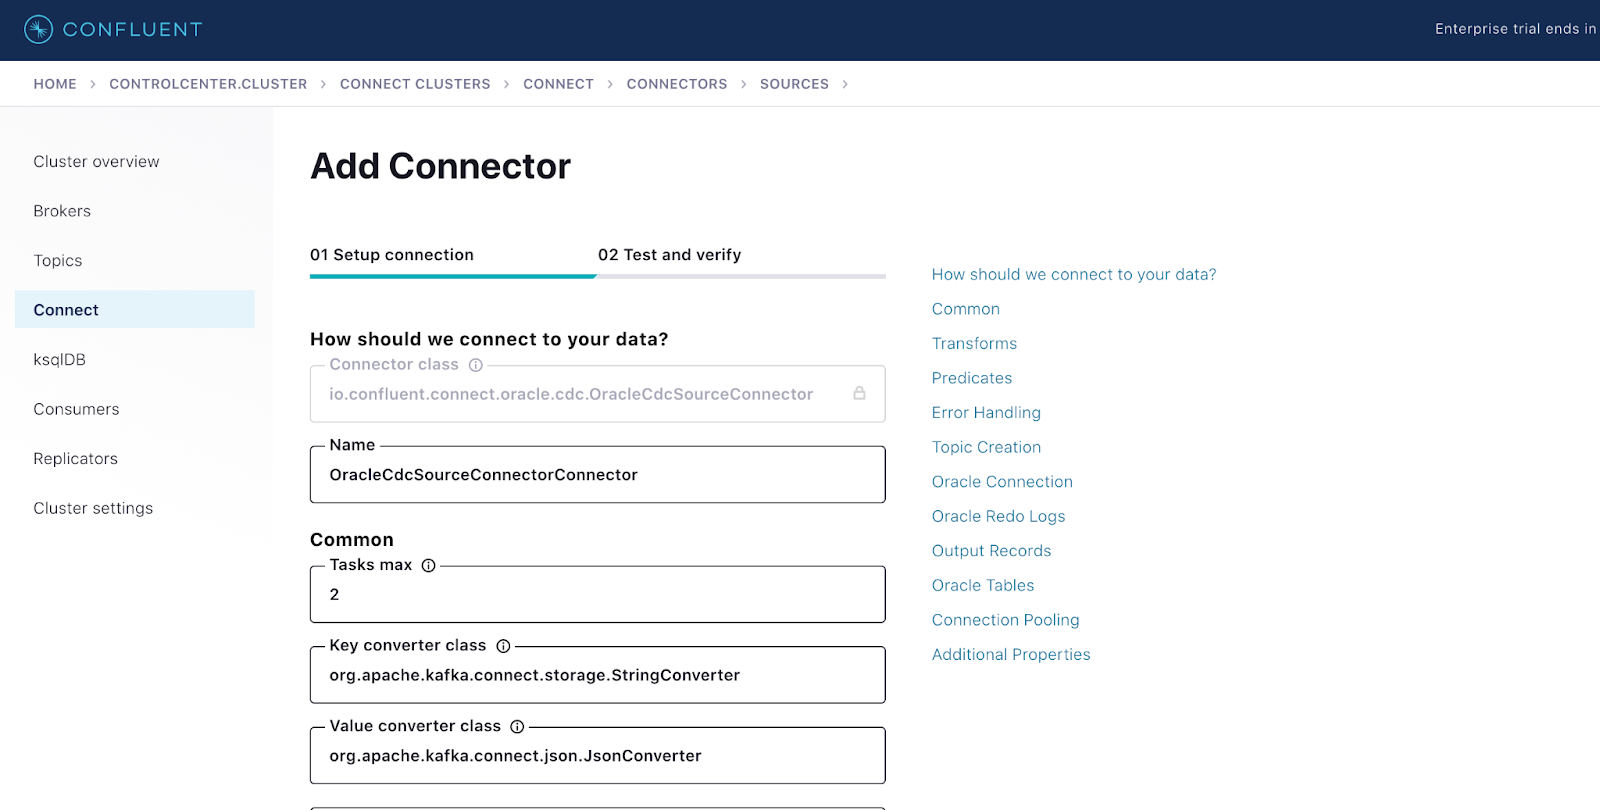
Configure Oracle CDC connector from Control Center
Create the connector configuration
The Kafka Connect instances have a REST API for managing connectors, available on port 8083 by default. You can issue requests to any Connect node, and you can identify these nodes using the GKE UI.
Create a connector configuration file on the machine from where you’d access the Kubernetes cluster to deploy the connector:
{
 "name": "OracleCDC_Mariposa",
 "config":{
   "connector.class": "io.confluent.connect.oracle.cdc.OracleCdcSourceConnector",
   "name": "cdc-oracle-source-cdb",
   "tasks.max":3,
   "oracle.server": "",
   "oracle.port": 1521,
   "oracle.sid":"ORCLCDB",
   "oracle.username": "C##MYUSER",
   "oracle.password": "mypassword",
   "start.from":"snapshot",
   "redo.log.topic.name": "oracle-redo-log-topic",
   "redo.log.consumer.bootstrap.servers":"<Ccloud-kakfa-botstrap-URL>:9092",
"redo.log.consumer.sasl.jaas.config":"org.apache.kafka.common.security.plain.PlainLoginModule required username=\"\" password=\"\";",
   "redo.log.consumer.security.protocol":"SASL_SSL",
   "redo.log.consumer.sasl.mechanism":"PLAIN",
   "table.inclusion.regex":"*.CUSTOMERS.*",
   "table.topic.name.template": "${databaseName}.${schemaName}.${tableName}",
"lob.topic.name.template":"${databaseName}.${schemaName}.${tableName}.${columnName}",
   "connection.pool.max.size": 20,
   "confluent.topic.replication.factor":3,
   "redo.log.row.fetch.size": 1,
   "numeric.mapping":"best_fit",
   "topic.creation.groups":"redo",
   "topic.creation.redo.include":"oracle-redo-log-topic",
   "topic.creation.redo.replication.factor":3,
   "topic.creation.redo.partitions":1,
   "topic.creation.redo.cleanup.policy":"delete",
   "topic.creation.redo.retention.ms":1209600000,
   "topic.creation.default.replication.factor":3,
   "topic.creation.default.partitions":5,
   "topic.creation.default.cleanup.policy":"compact",
 "confluent.topic.bootstrap.servers":"<ccloud-kakfa-botstrap-URL>:9092",
"confluent.topic.sasl.jaas.config":"org.apache.kafka.common.security.plain.PlainLoginModule required username=\"<CLOUD-API_KEY>\" password=\"<API_SECRET>\";",
"confluent.topic.security.protocol":"SASL_SSL", "confluent.topic.sasl.mechanism":"PLAIN" } }
For additional Connect worker configuration properties see the following:
- Connect and Schema Registry: Using Kafka Connect with Schema Registry
- Producer configuration properties: Kafka Producer
- Consumer configuration properties: Kafka Consumer
- SSL encryption properties: Encryption with SSL
- All Kafka configuration properties: Confluent Platform Configuration Reference
Create the connector via REST API
- Create your oracle-cdc-confluent-cloud.json file based on the above example
- Start the Oracle CDC Source connector using the following command:
curl -s -H "Content-Type: application/json" -X POST -d  \ @oracle-cdc-confluent-cloud.json  \ http://<ip-address-of-connect-worker>:8083/connectors/ | jq
ccloud kafka topic create oracle-redo-log-topic --partitions 1 --config cleanup.policy=delete  --config retention.ms=120960000
- Once you have created the connector, check the status to make sure it’s running:
curl -s "http://<ip-of-connect-worker>:8083/connectors/OracleCDC_DEMO/status"
Desired output:
{ “name":"cdc-oracle-source-cdb", "Connector":{ "state":"RUNNING", "Worker_id":"kafka-connect:8083"}," Tasks":[ {"id":0, "state":"RUNNING", "Worker_id":"kafka-connect:8083" }], "type":"source"} - As new records start to come into the Oracle table CUSTOMERS, the connector captures raw Oracle events in the oracle-redo-log-topic and writes the change events specific to the CUSTOMERS table to the ORCLCDB.C__MYUSER.CUSTOMERS topic. Verify the topic ORCLCDB.C__MYUSER.CUSTOMERS:
$ docker exec connect kafka-avro-console-consumer -bootstrap-server broker:9092 --property schema.registry.url=http://schema-registry:8081 --topic ORCLCDB.C__MYUSER.CUSTOMERS --from-beginning --max-messages 2
Expected result:
{"ID":"\u0001","FIRST_NAME":{"string":"Rica"},"LAST_NAME":{"string":"Blaisdell"},"EMAIL":{"string":"rblaisdell0@rambler.ru"},"GENDER":{"string":"Female"},"CLUB_STATUS":{"string":"bronze"},"COMMENTS":{"string":"Universal optimal hierarchy"},"CREATE_TS":{"long":1604047105216},"UPDATE_TS":{"long":1604047105000},"op_type":"R","table":"ORCLCDB.C##MYUSER.CUSTOMERS","scn":"1449498"}
{"ID":"\u0002","FIRST_NAME":{"string":"Ruthie"},"LAST_NAME":{"string":"Brockherst"},"EMAIL":{"string":"rbrockherst1@ow.ly"},"GENDER":{"string":"Female"},"CLUB_STATUS":{"string":"platinum"},"COMMENTS":{"string":"Reverse-engineered tangible interface"},"CREATE_TS":{"long":1604047105230},"UPDATE_TS":{"long":1604047105000},"op_type":"R","table":"ORCLCDB.C##MYUSER.CUSTOMERS","scn":"1449498"}
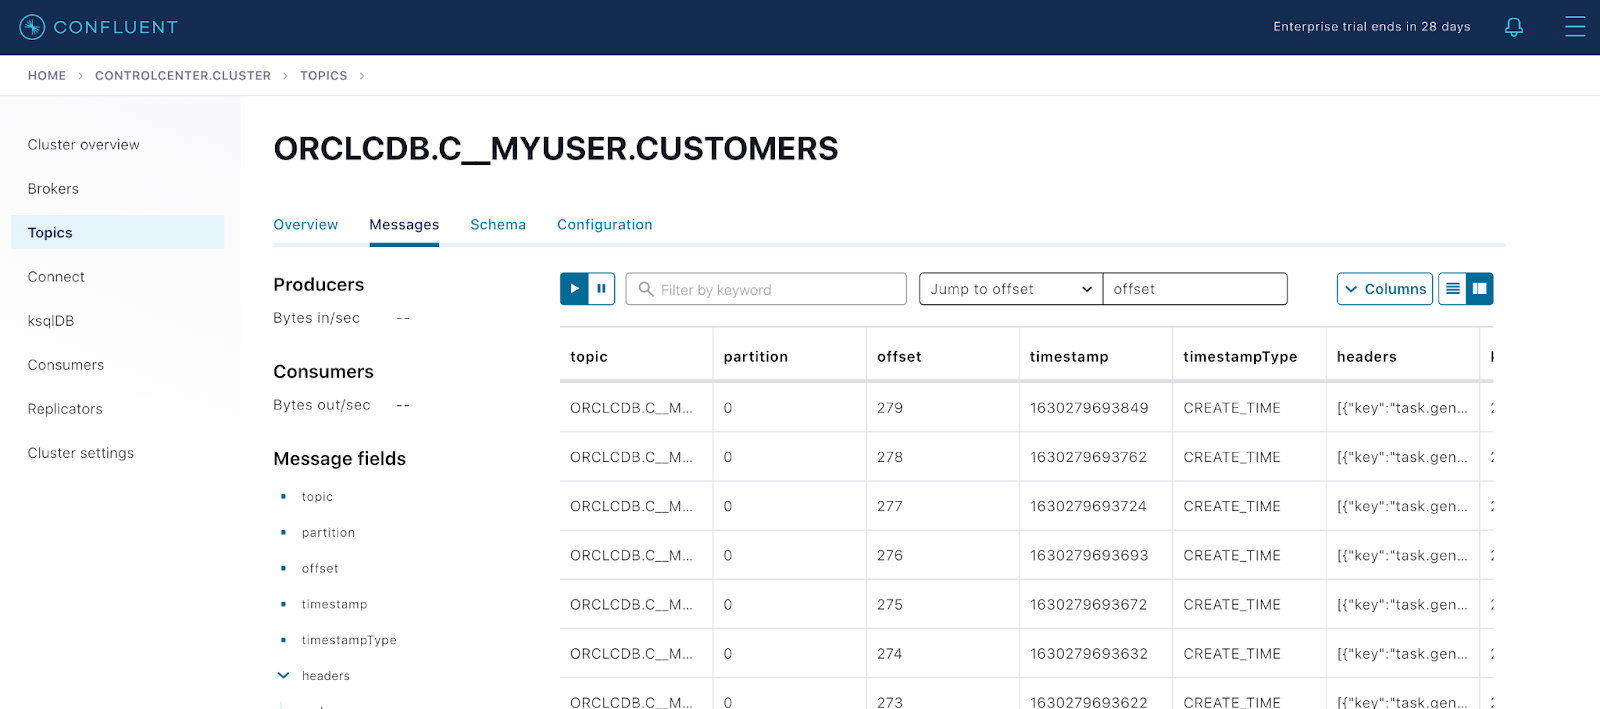
Messages view from Control Center UI
Deploy a self-managed MarkLogic Sink connector
Now that you have the data stream from the Oracle CUSTOMERS table in Kafka’s ORCLCDB.C__MYUSER.CUSTOMERS topic, you can put it to use. In this scenario, you are required to populate the MarkLogic NoSQL datastore by extracting data from Confluent Cloud, so you can do that using the MarkLogic Sink connector.
This is a Kafka sink connector for subscribing to Kafka topics, receiving messages from the topics, and loading the messages into MarkLogic. The connector then uses the MarkLogic Data Movement SDK (DMSDK) to efficiently store those messages in a MarkLogic database. As messages stream onto the Kafka topic, the threads of the DMSDK will aggregate the messages and then push the messages into the database based on a configured batch size and time-out threshold.
This blog post assumes you have a MarkLogic instance that is already configured and is up and running. In this particular case, MarkLogic is configured using a Docker image on an AWS EC2 machine. If you are interested in deploying in a similar fashion, please refer to this documentation and more information here.
Create the connector configuration
You can use the Control Center UI or the Confluent CLI to configure the connector. Start by using the CLI, so you can see the connector’s configuration and consider the individual configuration properties.
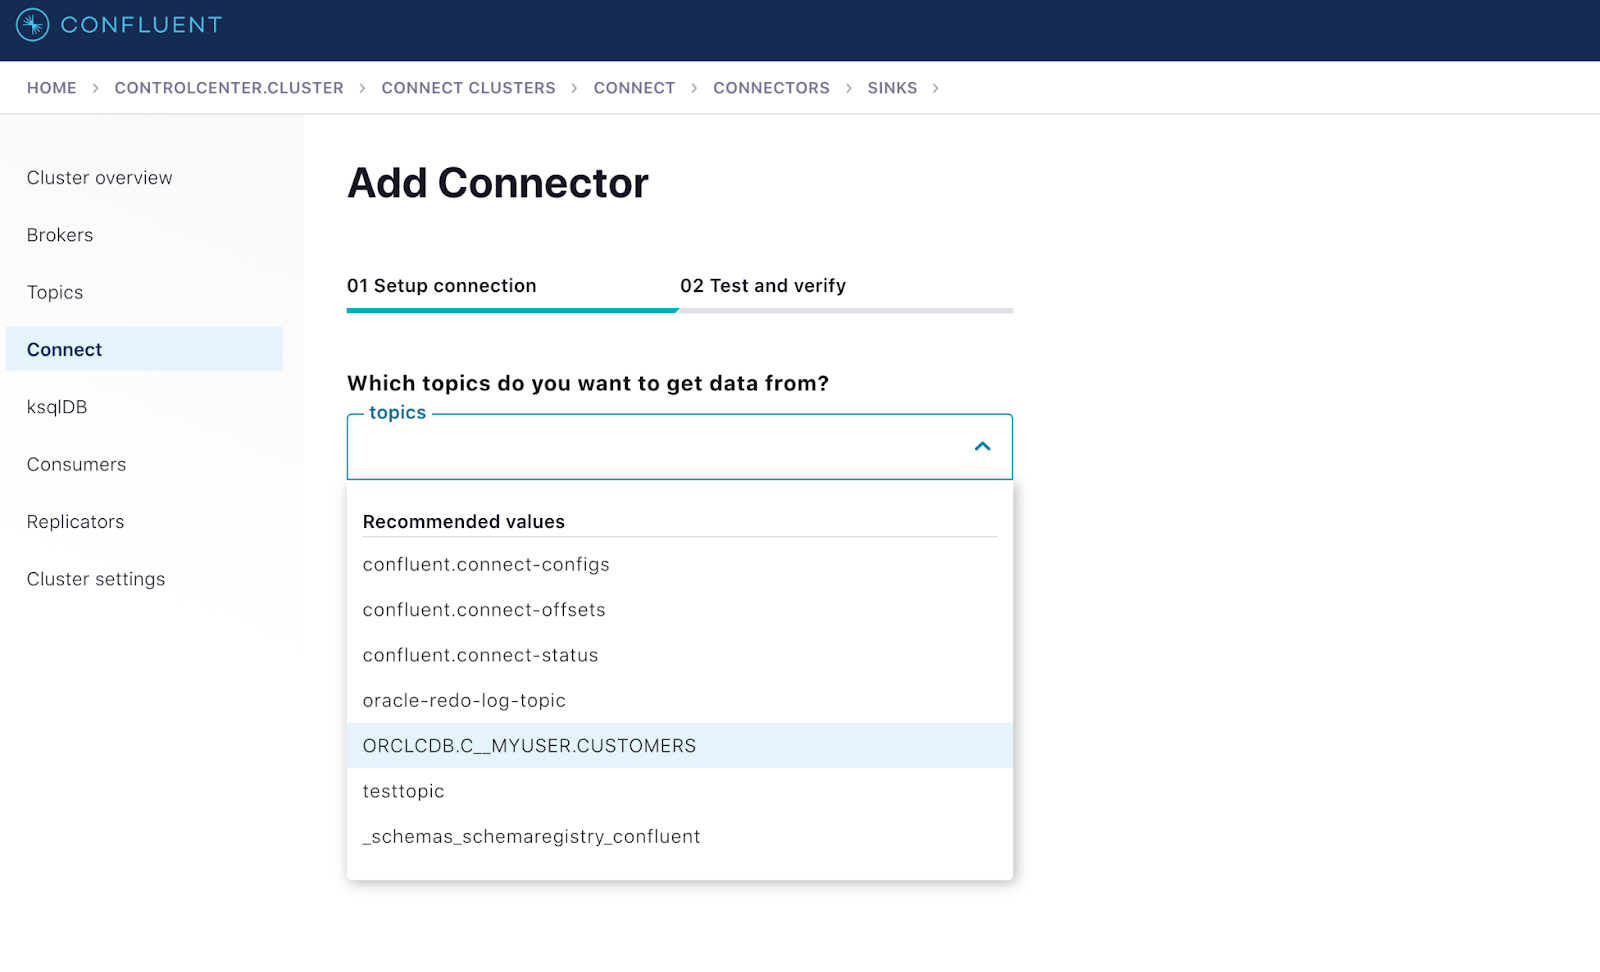
Shows MarkLogic Sink connector configured to consume data from a CDC topic
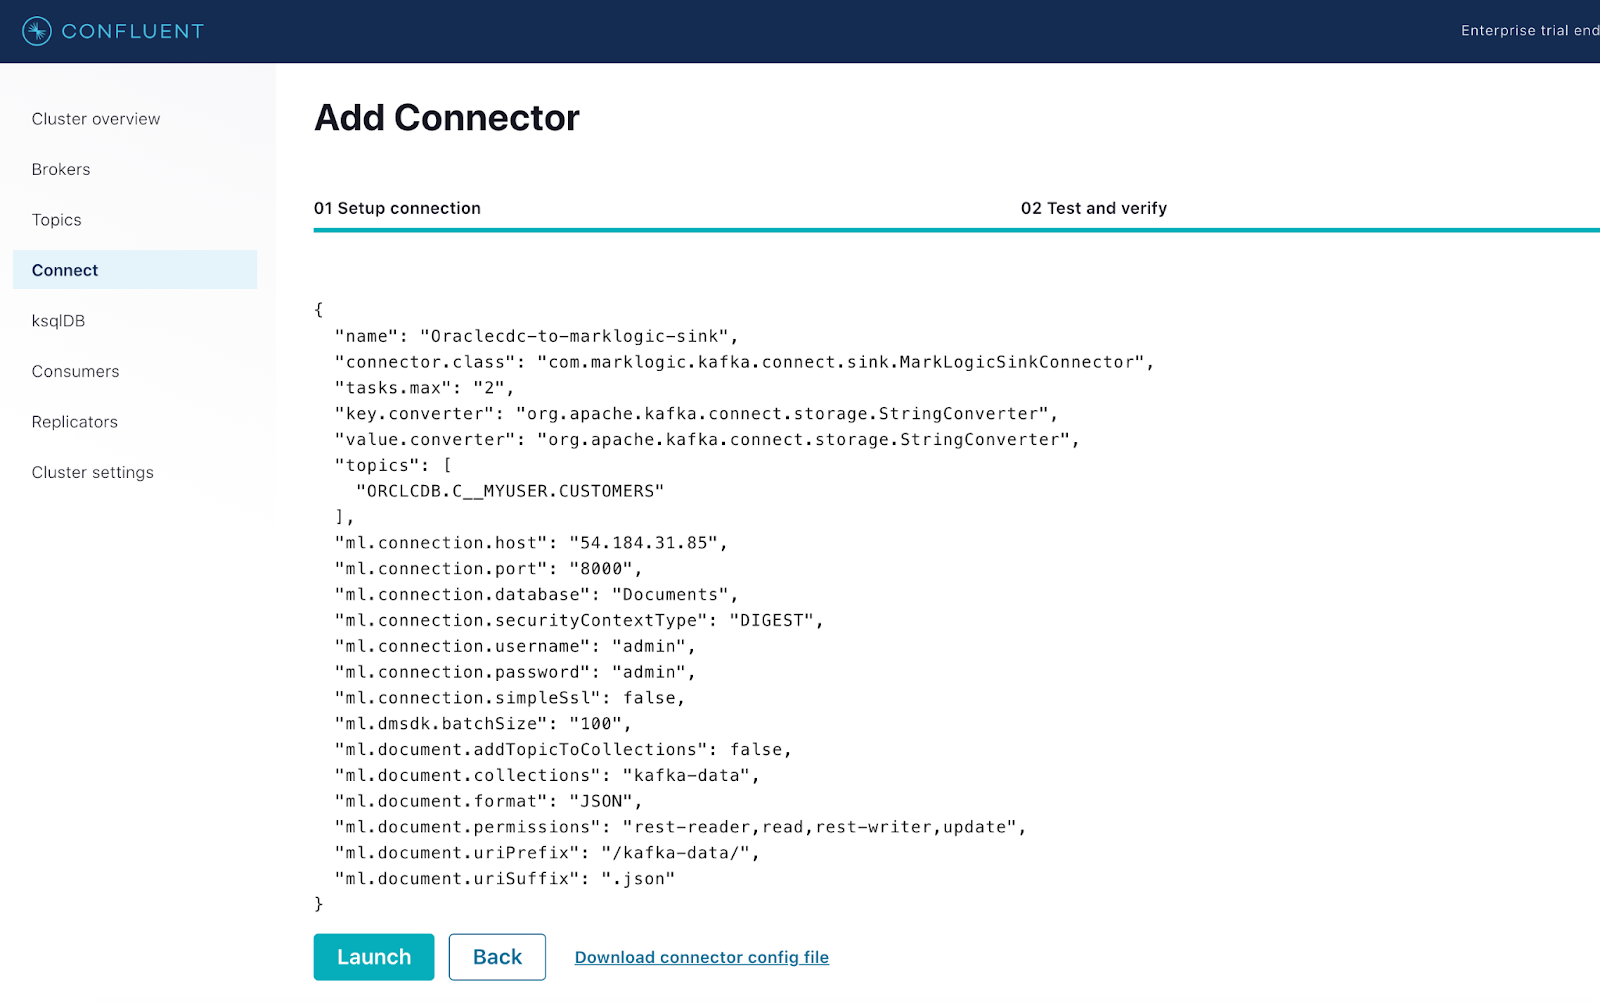
MarkLogic Sink connector ready to be deployed from Control Center UI
Create a connector configuration file on the machine from where you’d access the Kubernetes cluster to deploy the connector:
{
  "name": "marklogic-sink",
  "connector.class": "com.marklogic.kafka.connect.sink.MarkLogicSinkConnector",
  "tasks.max": "2",
  "key.converter": "org.apache.kafka.connect.storage.StringConverter",
  "value.converter": "org.apache.kafka.connect.storage.StringConverter",
  "topics": [
    "mltopic"
  ],
  "ml.connection.host": "54.184.31.85",
  "ml.connection.port": "8000",
  "ml.connection.database": "Documents",
  "ml.connection.securityContextType": "DIGEST",
  "ml.connection.username": "admin",
  "ml.connection.password": "admin",
  "ml.connection.simpleSsl": false,
  "ml.dmsdk.batchSize": "100",
  "ml.document.addTopicToCollections": false,
  "ml.document.collections": "kafka-data",
  "ml.document.format": "JSON",
  "ml.document.permissions": "rest-reader,read,rest-writer,update",
  "ml.document.uriPrefix": "/kafka-data/",
  "ml.document.uriSuffix": ".json"
}
Navigate to the Connect section of your Control Center and add the MarkLogic Sink connector to Confluent Platform. Utilize the configuration file above as a reference in order to properly configure the connector. The screenshots below depict the step-by-step procedure involved in the process.
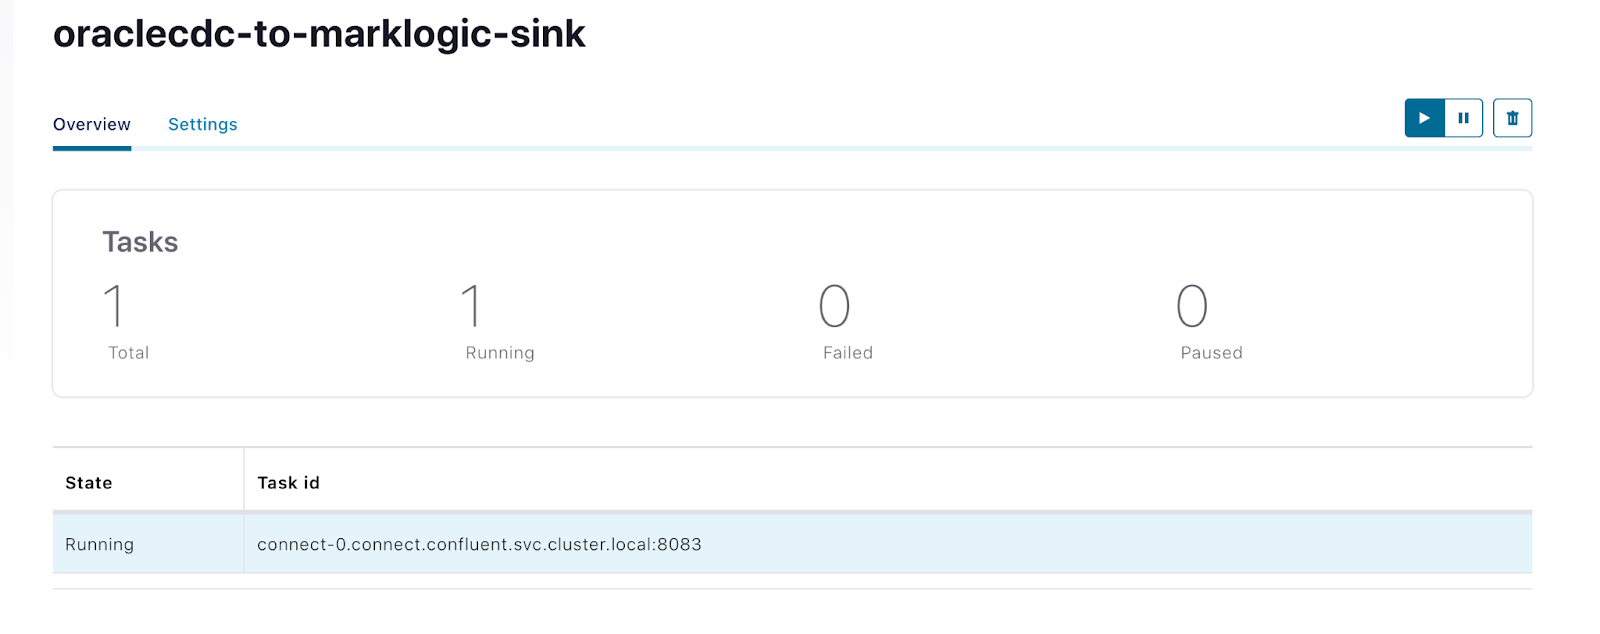
Status of MarkLogic Sink connector shown as running from Control Center
Alternatively, you can also configure the connector from CLI using the REST API as follows:
curl -X PUT \
     -H "Content-Type: application/json" \
     --data '{
               {
  "name": “oraclecdc-to-marklogic-sink",
  "connector.class": "com.marklogic.kafka.connect.sink.MarkLogicSinkConnector",
  "tasks.max": "2",
  "key.converter": "org.apache.kafka.connect.storage.StringConverter",
  "value.converter": "org.apache.kafka.connect.storage.StringConverter",
  "topics": [
    "mltopic"
  ],
  "ml.connection.host": "34.221.56.67",
  "ml.connection.port": "8000",
  "ml.connection.database": "Documents",
  "ml.connection.securityContextType": "DIGEST",
  "ml.connection.username": "admin",
  "ml.connection.password": "admin",
  "ml.connection.simpleSsl": false,
  "ml.dmsdk.batchSize": "100",
  "ml.document.addTopicToCollections": false,
  "ml.document.collections": "kafka-data",
  "ml.document.format": "JSON",
  "ml.document.permissions": "rest-reader,read,rest-writer,update",
  "ml.document.uriPrefix": "/kafka-data/",
  "ml.document.uriSuffix": ".json"
}
          }' \
     http://<connector-worker-ip-address>:8083/connectors/“oraclecdc-to-marklogic-sink/config | jq .
When the MarkLogic Sink connector starts running, it will immediately act as a consumer to the ORCLCDB.C__MYUSER.CUSTOMERS topic which has the data written by the Oracle CDC connector. The files will be imported into the MarkLogic database named ‘Documents’ into a collection called kafka-data. Select the database and hit Explore to view the newly populated data in your MarkLogic instance.
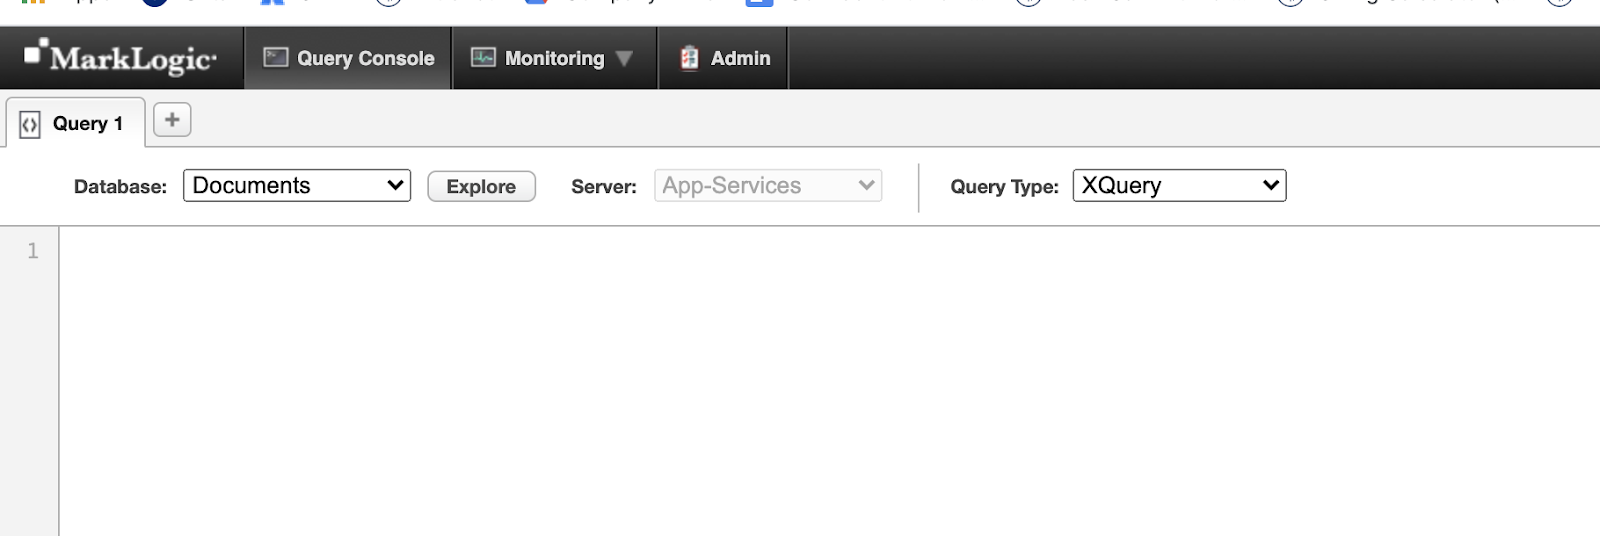
MarkLogic Query Console running on AWS
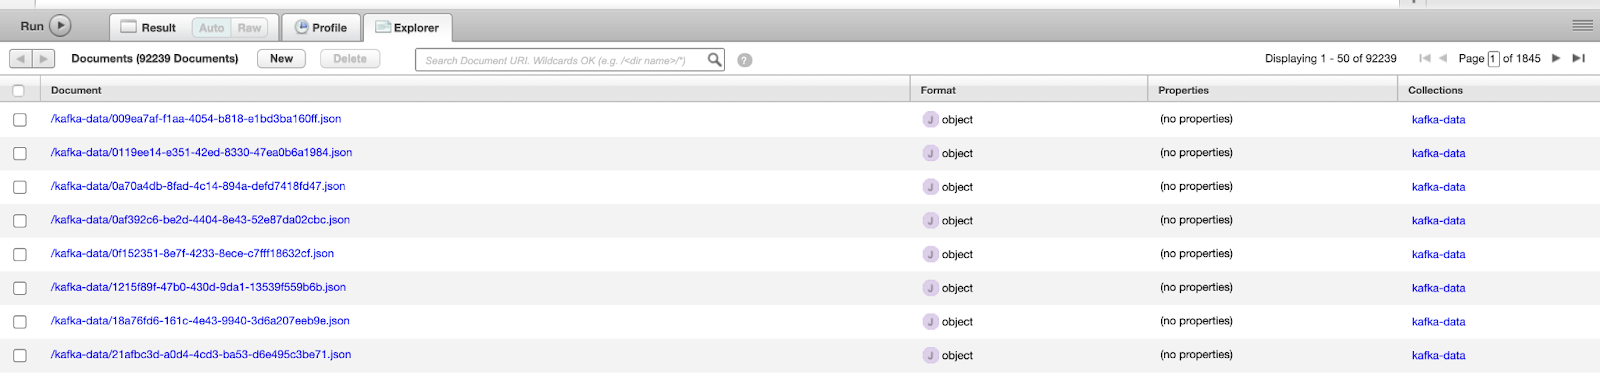
MarkLogic database populated by the Kafka data from Confluent Cloud
Conclusion
As organizations continue to enrich their ecosystem with disparate datastores, Confluent will help set their data in motion by enabling such end-to-end data pipelines consisting of both relational and NoSQL databases in a hassle-free approach. Confluent is proud to offer Apache Kafka Connect via Confluent Cloud powered by Confluent for Kubernetes as a unified hybrid solution.
Ist dieser Blog-Beitrag interessant? Jetzt teilen
Confluent-Blog abonnieren


Real-Time Hyper-Personalization in 2026: Architecture Guide
Batch CDPs can't capture user intent as it forms. By the time a nightly sync runs, the moment is gone. This guide covers the streaming architecture behind real-time personalization, from sub-100ms ad bidding to cross-channel orchestration, with recommendation patterns built on Kafka and Flink.
How to Eliminate Training-Serving Skew With a Unified Real-Time Streaming ML Pipeline (2026 Guide)
Separate batch and streaming pipelines for ML features cause training-serving skew. DoorDash measured a 35.7% feature mismatch in their dual setup. This guide covers a unified kappa architecture using Flink to compute features once for both training and serving, plus a 2026 tooling comparison.