Neu in Confluent Cloud: Daten & Pipelines für KI-fähiges Streaming zugänglich machen | Mehr erfahren
Declarative Connectors with Confluent for Kubernetes
Apache Kafka® has a rich ecosystem of hundreds of connectors to get data in and out of Kafka. You probably need multiple connectors in your architecture to support data in motion across your infrastructures. So how can you manage this effort in a consistent, infra-as-code, automated manner?
This blog post leverages Confluent for Kubernetes (CFK), a cloud-native control plane that enables a complete declarative experience to deploy and self-manage Confluent Platform in a private Kubernetes-based infrastructure. It uses an infrastructure-as-code approach to manage Confluent Platform components as well as application resources like topics, schemas, and, with the CFK 2.1 updated, connectors.
We’ll demonstrate how to declaratively manage connectors with CFK and digs into some of the Kubernetes API design patterns used.
What are connectors?
Connectors are used by Kafka Connect to stream data between Kafka and other external systems. There are two aspects to a connector:
- Connector plugin: A connector plugin is the binary or jar that implements all the classes or abstractions of the connector, which is installed in Kafka Connect worker. Kafka Connect is a powerful and pluggable data integration framework. You can develop your own custom connector plugins or get the connector plugins from Confluent Hub.
- Connector instance: A connector instance is a logical job that is responsible for managing the copying of data between Kafka and other data systems. After the connector plugin is installed, you need to create or manage the corresponding connector instance via Kafka Connect Rest API to perform the actual job of streaming data.
To differentiate between the two, this blog uses “connector plugin” for the former and “connector” for the latter.
In order to use connectors, the connector plugin needs to be made available to and deployed on Kafka Connect workers. In the past, this has been left to the end user to do:
- First, you needed to add the plugin to the Confluent Kafka Connect image—often by extending the Connect Docker image with the plugin jars.
- Then you needed to send connector configurations and start the connector via a script that would invoke the Connect REST API.
This is not the declarative way, and we’re excited to introduce our Kubernetes-native way to manage the lifecycle of connectors and build an automatic and reliable solution to install connector plugins in Kafka Connect.
Our aim is to help you:
- Achieve a one-step, fully automated deployment and management experience for connectors
- Reduce manual and error-prone operations
- Unblock integration with the GitOps model
This blog focuses on answering these two questions:
- How does CFK manage connectors declaratively in Kubernetes?
- How does CFK automate the installation of connector plugins?
Manage connectors declaratively in Kubernetes
CFK provides a declarative API to manage connectors by extending Kubernetes API as a Connector CustomResourceDefinition (CRD), which allows you to define the high-level desired state of a connector as a Custom Resource (CR). You can provision, configure, update, delete, conduct management of tasks, or observe the current state of the connector easily through interactions with the connector CR YAML file. Rather than make REST API calls manually, CFK helps take care of all the low-level details management.
Define desired state for a connector
The following is an example CR of S3 source connector.
kind: Connector
metadata:
  name: connector
spec:
  name: connector
  class: "io.confluent.connect.s3.source.S3SourceConnector"
  taskMax: 3
  configs:
    topics.dir: "quickstart"
    value.converter: "org.apache.kafka.connect.json.JsonConverter"
    mode: "GENERIC"
    format.class: "io.confluent.connect.s3.format.json.JsonFormat"
    topic.regex.list: "quick-start-topic:.*"
    s3.bucket.name: "demo-bucket"
    s3.region: "us-west-2"
    value.converter.schemas.enable: "false"
    aws.access.key.id:   "${file:/mnt/secrets/aws-credential/aws.txt:aws_access_key_id}"
    aws.secret.access.key: "${file:/mnt/secrets/aws-credential/aws.txt:aws_secret_access_key}
   restartPolicy:
     type: OnFailure
The above connector CR YAML file defines the desired class name and configurations of the connector. If using Kubernetes native command tool kubectl, you can easily create or update the connector with kubectl apply -f connector.yaml, or delete it with kubectl delete -f connector.yaml. The following illustrates the workflow:
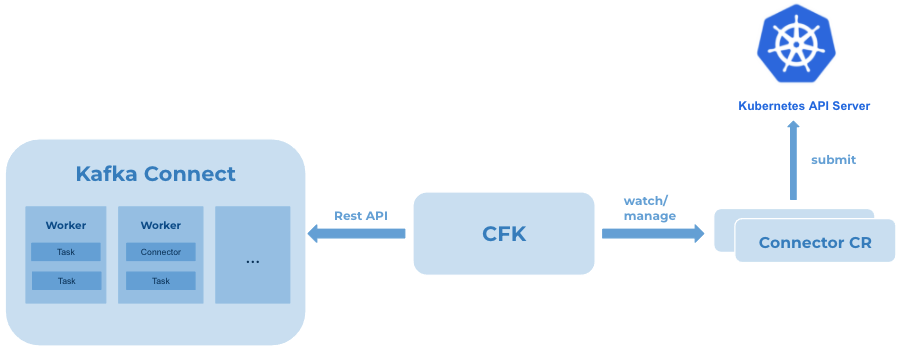
After the specified connector CR is submitted to Kubernetes API server, for example using kubectl, the connector controller of CFK keeps watch and makes REST API calls internally to Kafka Connect to ensure the connector achieves the desired state. With any updates on the CR, CFK gets notified and automates the operations.
View granular status
Connectors run on Kafka Connect workers. To have the latest status reflected on connector CR, CFK reconciles every few minutes, checks with Kafka Connect, and updates the CR status with the latest observed status of the connector and its tasks. To view the status, you can use kubectl get connector -n <your namespace>, or use kubectl get connector -n <your namespace> -o yaml to view all the details.
The above output shows the status of the connector and its tasks. If there were any failures, the status shows the detailed information for debugging or troubleshooting, for example, failed tasks, error messages, workerId, the connector or task running, etc.
Automate recovery
With the declarative connector Kubernetes API, you can manage the lifecycle of connectors efficiently and effortlessly. If the connector is in FAILED state for any reason CFK has an auto-healing strategy.
CFK restarts the connector automatically if the connector fails. You can also configure the policy to restart failed tasks. If the restart policy is OnFailure, CFK will restart the failed tasks automatically until it reaches the max retry times specified in the connector CR. This helps service healing, especially for some scenarios when the connector or task requires a manual restart to recover. Even though it can be done by making a REST API call, it won’t be a good experience if you cannot access Kafka Connect externally or the REST API requires authentication or TLS certificates to connect. It impacts the efficiency to recover the connector.
Furthermore, during troubleshooting, it may be necessary to trigger one restart, pause, or resume operation on the connector or task. You can add an annotation in the connector CR to achieve that, for example, kubectl annotate connector <your connector name> platform.confluent.io/restart-connector="true". This helps to improve troubleshooting efficiency.
Complete security
CFK allows you to provide the connector configurations as key-value pairs in connector CR. However, there are two concerns:
- How to prevent sensitive data (e.g., username, password) from appearing in cleartext in the YAML file?
- How to provide the required TLS certificates to communicate with the other data system?
ConfigProvider class interface, supported by Kafka Connect, allows you to use variables in their connector configurations, for example, the configurations: aws.access.key.id and aws.secret.access.key in the connector CR example. Kafka Connect helps resolve the variables dynamically when the connector starts. However, how does this aws.txt get injected into the Kafka Connect pods?
CFK manages Kafka Connect through Connect CustomResourceDefinition(CRD). It supports the capability of mounting secrets into Kafka Connect pods. A secret is a Kubernetes object containing sensitive data. It can be used as files in a pod. When the secret name is specified in the connect CR spec, the data of the secret is injected into the Kafka Connect pods, and can be used by connectors.
  mountedSecrets:
   - secretRef: <your-connector-credential-secret-name>
Similarly, some connectors require specific certificates to communicate with the external data systems, which are not present in Kafka Connect workers. As shown in the connect CR spec below, your required certificates can be mounted into pods automatically. You can view the certificate file paths in connect CR status and use them for connectors. This helps reduce the burden to mount those by yourself.
spec:
  connectorTLSCerts:
   - secretRef: <your-connector-tls-secret-name>
Automate connector plugins installation with CFK
With declaratively managed connector instances, adding connector plugins to Kafka Connect is still another challenge for customers. It requires disjointed efforts to prebuild an image by extending the Kafka Connect base image with connector plugins. This results in some of the following inconveniences for different customers:
- It blocks customers who don’t have a private registry
- If the extended image size becomes large, it takes time to download, and may result in failures during deployment
- Customers have to build the image again for adding or upgrading plugins
- It also breaks the continuous pipeline deployment experience, like GitOps
That’s why a reliable and fully CFK-operated solution to install connector plugins into Kafka Connect is in high demand.
How does it work?
CFK enables the capability to use init container to download and install connector plugins. Init container is a specialized container that runs before app containers in a pod. It can contain setup scripts which are not present in an app image and always runs to completion. This means init container can complete the plugins installation before starting the Kafka Connect server.
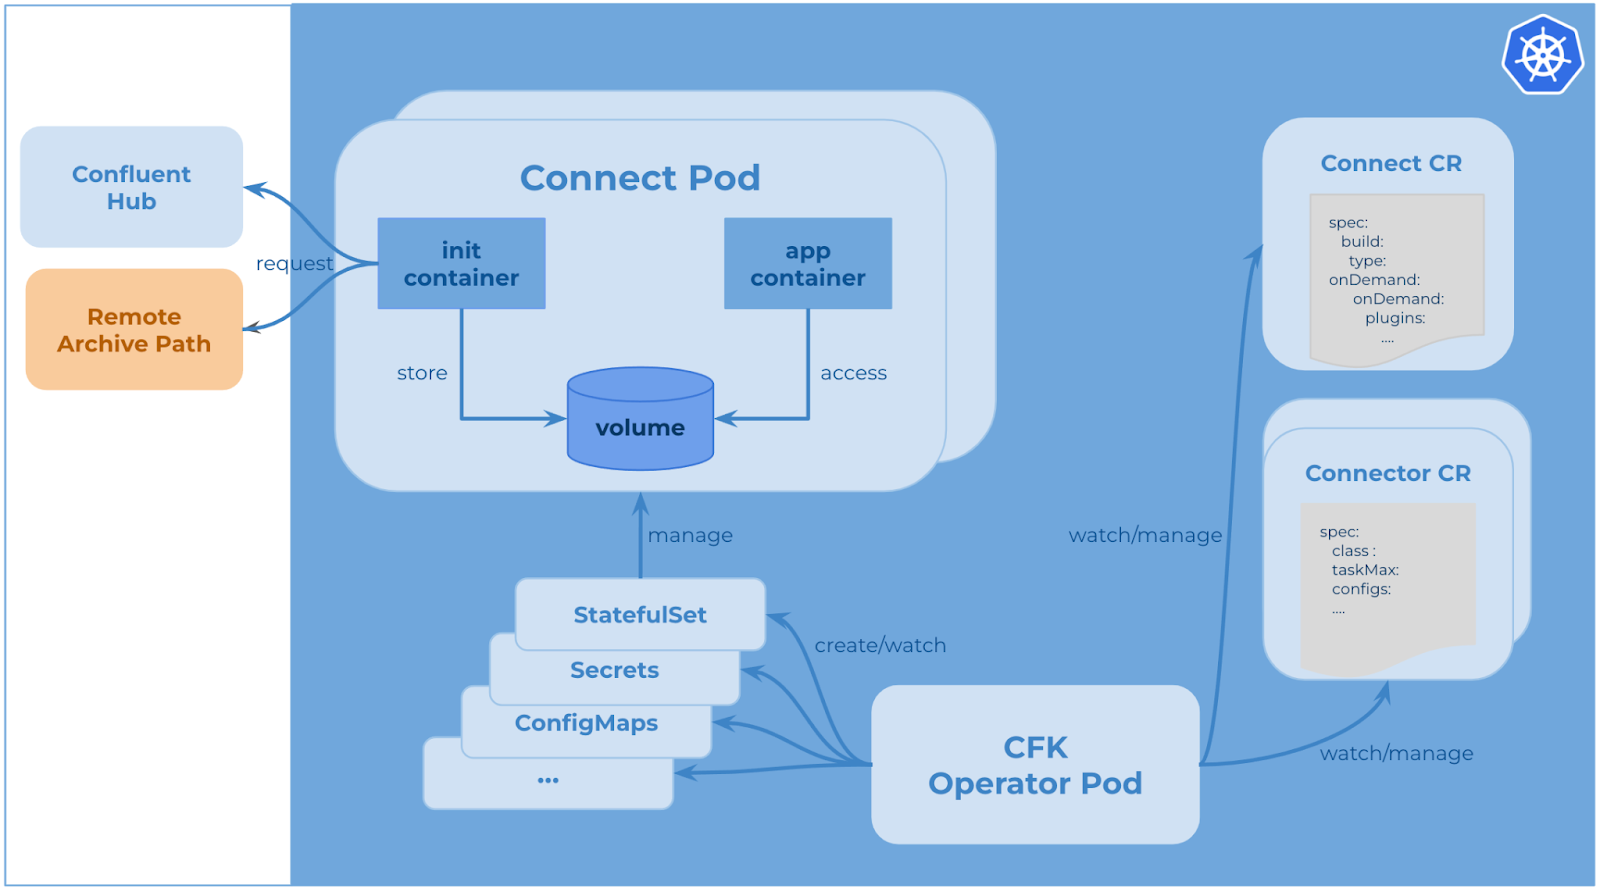
CFK manages Kafka Connect as connect CRD in Kubernetes. As a result, CFK allows users to specify the installation information in the connect CR YAML file. After connect CR is submitted successfully to the Kubernetes API server, CFK watches it and creates resources like StatefulSet, ConfigMaps, etc. When the Connect pod starts, the init container runs first. It reaches out to Confluent Hub or any other remote archive path, downloads the requested connector plugins, stores them in node volume, then installs them successfully using Confluent Hub Client.
Here is an example of a declarative Connect spec to install connector plugins from Confluent Hub.
kind: Connect
metadata:
 name: connect
spec:
 replicas: 2
 image:
   application: confluentinc/cp-server-connect:7.0.1
   init: confluentinc/confluent-init-container:2.2.0-1
 build:
   type: onDemand
   onDemand:
     plugins:
       locationType: confluentHub
       confluentHub:
         - name: kafka-connect-s3-source
           owner: confluentinc
           version: 2.0.1
       storageLimit: 4G
The build type onDemand in the above example means the requested connector plugins will be installed by CFK. The locationType confluentHub means the list of plugins it is getting from Confluent Hub. CFK also provides another option to get plugins from the remote archive path. You can develop your own connector plugin, put it in a custom artifact location, and configure the connect CR with the URL, as shown below. To ensure downloaded artifacts are secure and reliable, a sha512 checksum is mandatory for each plugin.
 build:
   type: onDemand
   onDemand:
     plugins:
       locationType: url
       url:
         - name: kafka-connect-s3-source
           archivePath: https://example.com/confluentinc-kafka-connect-s3-source-2.0.1.zip
           checksum: f2e6588d16f0dfff44f306bf4854cdf85fa38cd7f362dfd2c2e50e9e07f5bedaf0c60bd98b2562d09cd868c161ab81511be44732bc2ca83556baf7b61d0d50b0
     storageLimit: 4G
From the above examples, there is a configuration called storageLimit. It is used to define the max amount of volume for storing plugins. Kubernetes supports several types of volumes like persistent volume, ephemeral volume, etc. In this solution, we used Node ephemeral volume emptyDir for plugin storage.
Why did we choose emptyDir? emptyDir is a volume type that is first created when a pod is assigned to a node and has the same lifetime as a pod. A container that crashes will not result in the pod leaving the node, so the data in emptyDir is safe across container crashes. Unlike persistent volume, this kind of volume is not persistent. It won’t leak files because Kubernetes destroys the volume when a pod is removed from a node. And it doesn’t depend on volume availability, which is one of the biggest benefits. It helps keep Kafka Connect stateless. Another advantage is emptyDir volume is stored on whatever medium that backs the node. It does not require extra costs, or any extra setup for volume. The declarative Connect provides the flexibility for you to define the storage limit for plugins.
With connect CR, you can effortlessly provision Kafka Connect with connector plugins through a one-step operation, for example, running the command kubectl apply -f connect.yaml. Moreover, it eases the process to add more plugins or upgrade plugin versions. After Kafka Connect is up, installed connector plugins are displayed in the status of Kafka Connect CR.
See it in action
This demo installs the S3 source connector plugin in Kafka Connect and creates an S3 source connector instance to copy the data from S3 to Kafka.

Summary
Declarative connectors with CFK provides a complete Kubernetes-native pattern of managing connectors without any disjointed efforts. With desired state defined in a single spec, CFK automates the rest for you. This unblocks the GitOps model to deploy Kafka Connect and connectors. Check out the resources below to learn more about CFK!
Ist dieser Blog-Beitrag interessant? Jetzt teilen
Confluent-Blog abonnieren


Customer Intelligence Hub: A Single Pane of Glass for Customer Insight and Action
Customer Intelligence Hub unifies customer signals into a real-time, AI-powered view that helps GTM teams prioritize risk, identify opportunity, and act faster with contextual insights.