Nouveau dans Confluent Cloud : rendre les données et les pipelines accessibles pour un streaming prêt pour l’IA | En savoir plus
Securing Your Logs in Confluent Cloud with HashiCorp Vault
Logging is an important component of managing service availability, security, and customer experience. It allows Site Reliability Engineers (SREs), developers, security teams, and infrastructure teams to gain insights to how their services are being consumed and address any issues before they result in service outages or security incidents. In many cases, logs contain sensitive information that needs to be protected.
For example, consider the scenario where the applications team and security operations team require access to the same set of logs, however, the teams must not be able to see specific fields in the log and the security requirement is that they must be masked or encrypted when presented back to the applications team. The ability to perform field-level encryption of the log data is difficult to achieve, it requires the ability to extract, transform, and load (ETL) the data before it is presented to the end user.
Now, you might be thinking, ETL? Do I need to build a data pipeline? What data formats do I need to use? What encryption libraries do I use? How do I protect the encryption keys? How do I scale the infrastructure to match increased demand in log ingestion and processing? Sounds complex, but it doesn’t have to be. This tutorial walks you through how to build a secure data pipeline with Confluent Cloud and HashiCorp Vault.
Requirements
This blog addresses the following requirements:
- Ability to scale infrastructure to support ingestion, encryption, and loading data to targets of choice.
- Keep a standard workflow regardless of where logs are collected from: on premises, cloud, or multicloud.
- Provide choice of encryption methods: masking, symmetric, asymmetric, format preserving encryption (FPE), tokenization.
- Secure usage of all encryption keys with the ability to monitor their usage.
- Provide long-term archive of logs.
To expand specifically on the choice of encryptions, below is an example of data encryption requirements for a JSON log input and expected encrypted output:
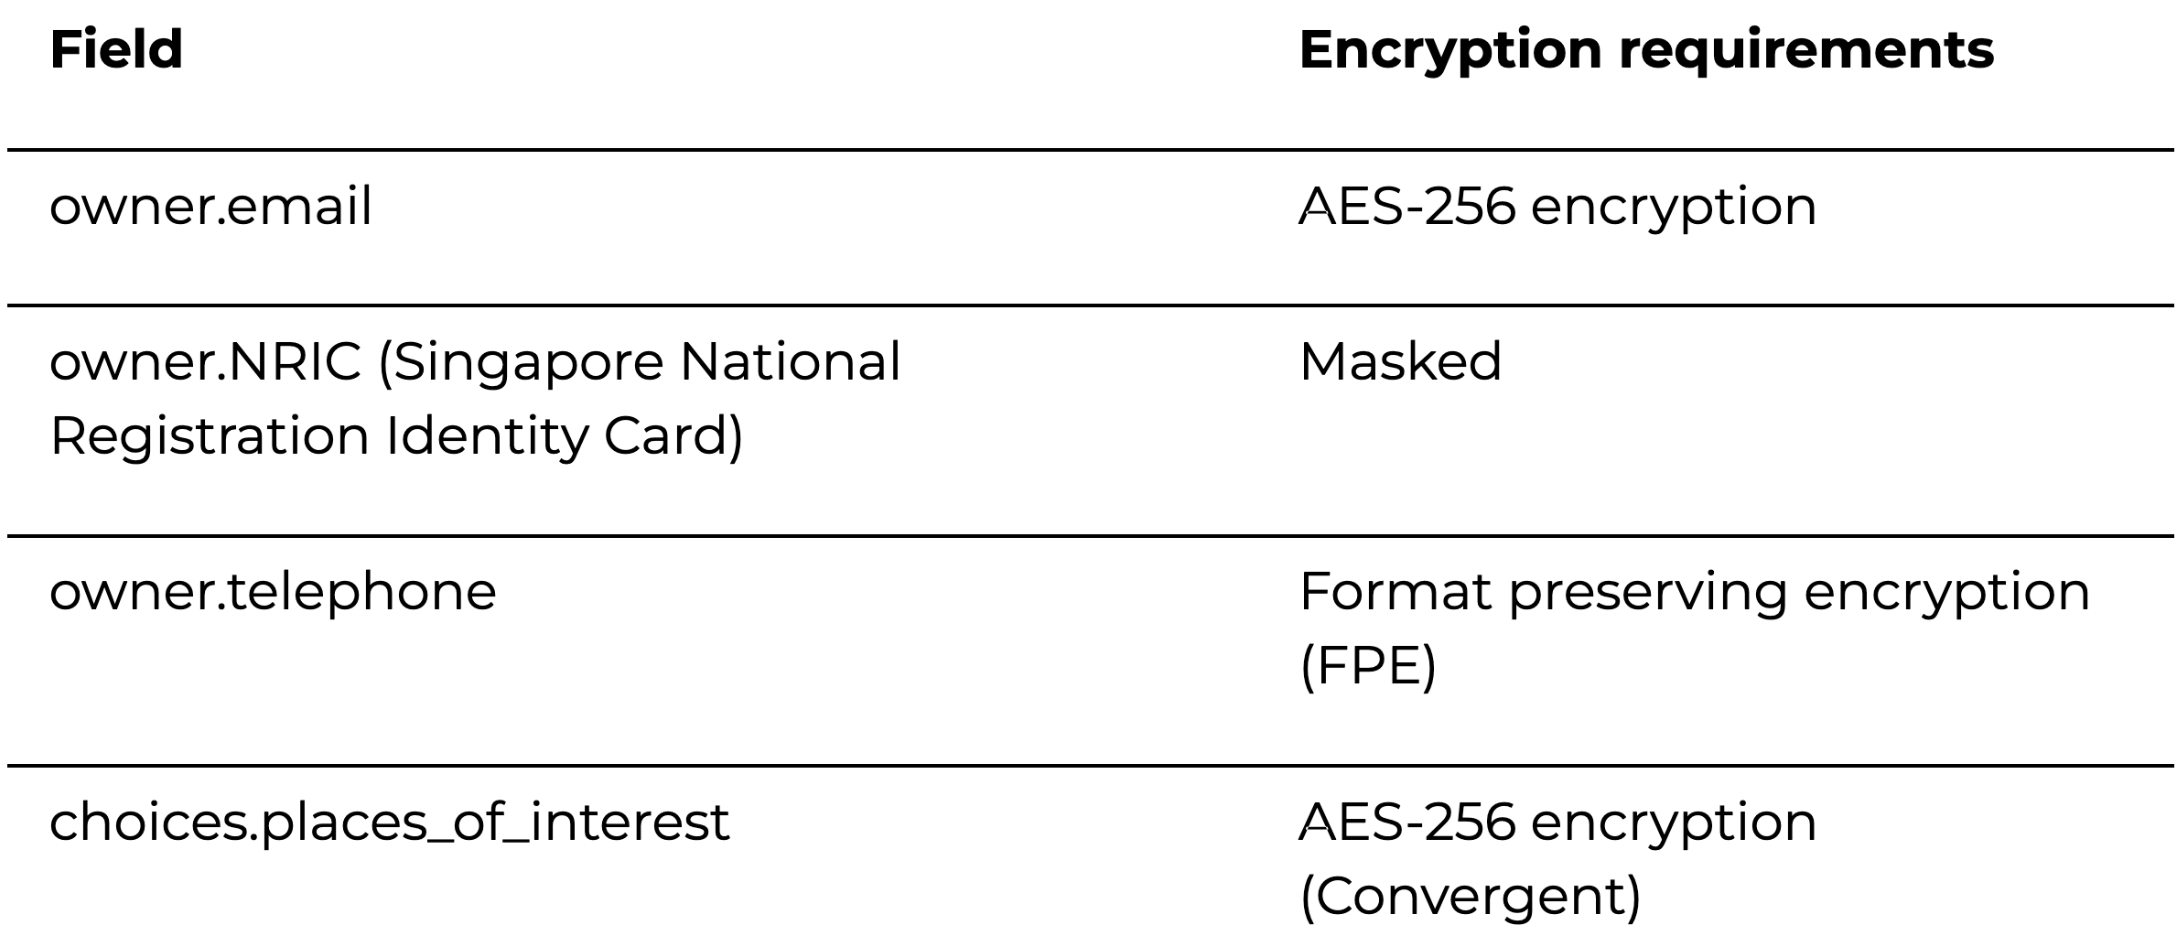
Below is an example of what the data looks like before encryption (unprotected data):
{
 "uid": "f579df0f-9634-40a4-806c-1137802aae45",
 "name": "instrument",
 "version": "8.4.4-alpha.9",
 "timestamp": "2011-09-06T21:25:30Z",
 "owner": {
   "full_name": "Vania Hensley",
   "email": "scheduler2054@test.com",
   "age": 36,
   "NRIC": "X2081256A",
   "telephone": "+65-1993-3273",
   "postal_code": "505223",
   "username": "saddlers_1907"
 },
 "connection_details": {
   "ip_address": "103.192.250.105:62962"
 },
 "choices": {
   "places_of_interest": "stadium"
 }
}
After encryption (protected data):
{
   "uid": "f579df0f-9634-40a4-806c-1137802aae45",
   "name": "instrument",
   "version": "8.4.4-alpha.9",
   "timestamp": "2011-09-06T21:25:30Z",
   "owner": {
     "full_name": "Vania Hensley",
     "email": "vault:v1:qCvzt+YIDovnpR++nXozEgP/CVrYf0rf4Ob0T+A6kkqwcpHBXNizSrPjhiC0GvqR",  <<---
     "age": 36,
     "NRIC": "XXXXXXXA",   <<---
     "telephone": "+44-2274-8139",  <<---
     "postal_code": "505223",
     "username": "saddlers_1907"
   },
   "connection_details": {
     "ip_address": "103.192.250.105:62962"
   },
   "choices": {
     "places_of_interest": "vault:v1:jgeacoZpacwOq+qz8Y56Vmz81TVWDcpPn6azAbBJAWo=" <<-
   }
 }
Source code
You can follow along by cloning this GitHub repository.
Prerequisites
- Should have the following installed: Helm, HashiCorp Vault, AWS eksctl, kubectl.
- A Kubernetes environment.
- HashiCorp Vault Enterprise: To test out all the encryption features covered in this blog, you need a license key. You can sign up for a free trial.
- Confluent Cloud subscription: You can sign up for a free trial.
Architecture
This section walks through an example architecture that can achieve the requirements covered earlier.
Exploring various log aggregation and data streaming services, Confluent Cloud, a cloud-native Apache Kafka® service, is used in this specific architecture because it allows for easy provisioning of fully managed Kafka, providing ease of access, storage, and management of data streams. It also provides many data integration options.
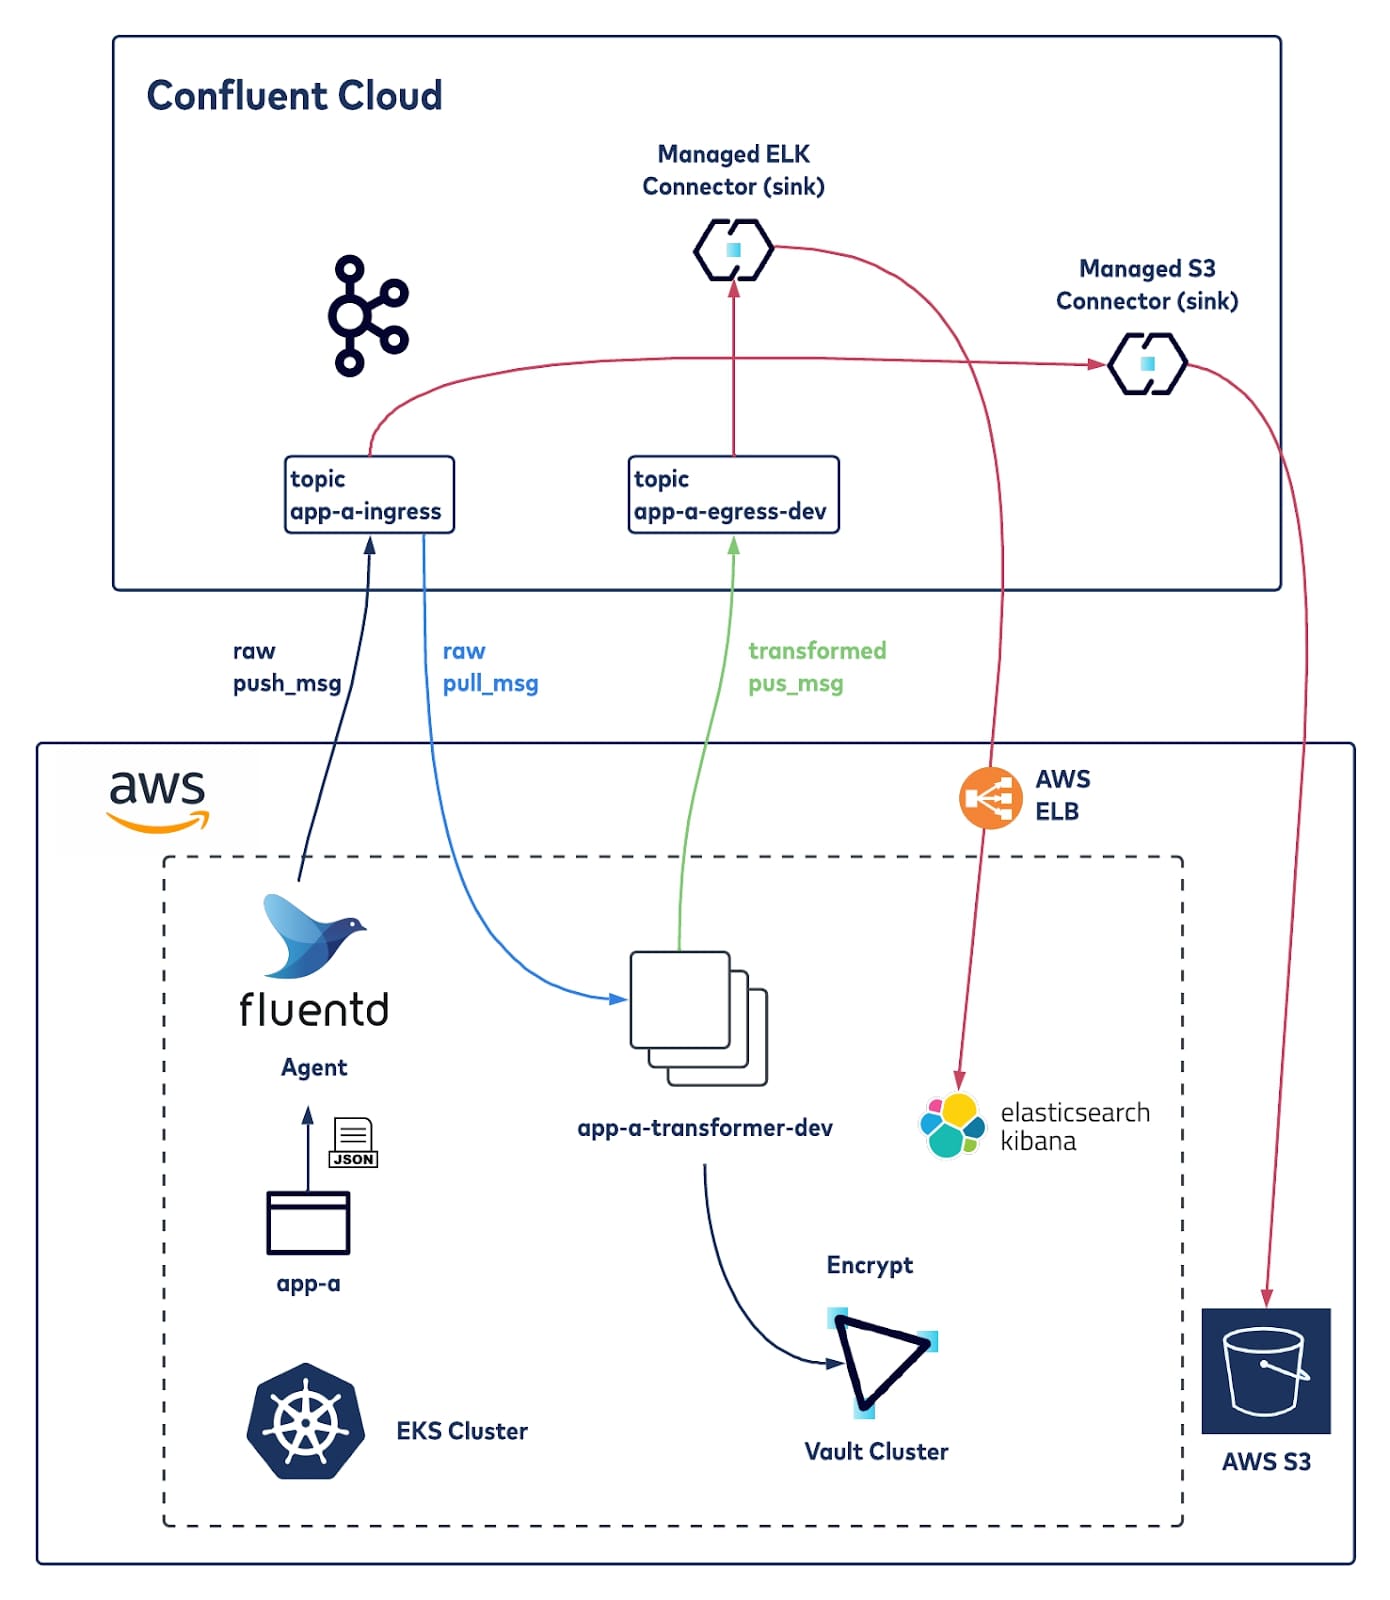
The following covers the components used in this architecture and how they come together. Please note that configurations here are only for demonstration, and not to be used in a production environment.
Application
The application (app-a) is a simple JSON data generator that dumps logs to a specific volume. It is written in Python.
A Fluentd sidecar is configured to ingest the application logs and ship them to Confluent Cloud via a Fluentd Kafka plugin. The Fluentd plugin must have PKI certificates generated to be able to connect successfully to the Confluent Cloud platform; the generation of the certificates is taken care of by HashiCorp Vault.
Confluent Cloud
One of the use cases supported by Confluent is log analytics and Confluent Cloud is a core component of this architecture, it accelerates the deployment without having to worry about standing up a Kafka cluster. Confluent Cloud will be set up with two topics:
- app-a-ingress: Kafka topic for ingesting and storing app-a logs
- app-a-egress-dev: Kafka topic for the storage of the encrypted logs. The topic name has -dev here to represent the topic for transformed logs for the developer team. A managed Confluent connector will be set up to push the encrypted log data to a logging system, Elasticsearch, which is used by the developer team.
Confluent Cloud supports many different types of connectors; this blog sets up two connector sinks, Elasticsearch, and AWS S3 sinks. There are many other options to send your data to, for a comprehensive list check out the Confluent Hub.
HashiCorp Vault Enterprise
HashiCorp Vault Enterprise is an identity-based secrets and encryption management system. A secret is anything that you want to tightly control access to, such as API encryption keys, passwords, or certificates. Vault provides encryption services that are gated by authentication and authorization methods.
For encryption, this tutorial utilizes various encryption methods of Vault Enterprise including transit, masking, and format preserving encryption (FPE). For detailed information on the encryption methods, have a look at the How to Choose a Data Protection Method blog.
Transformer
Transformer (app-a-transformer-dev) is a service responsible for encrypting the JSON log data, by calling to HashiCorp Vault APIs (using the hvac Python SDK). It is both a Kafka consumer and producer where encrypted JSON logs are written to another topic. The transformer is written in Python and utilizes the hvac Python Vault API client.
Elasticsearch/Kibana
ELK is widely used for analysis of logs and dashboards. Confluent Cloud will push the encrypted logs to Elasticsearch.
Putting it together
Set up Confluent Cloud
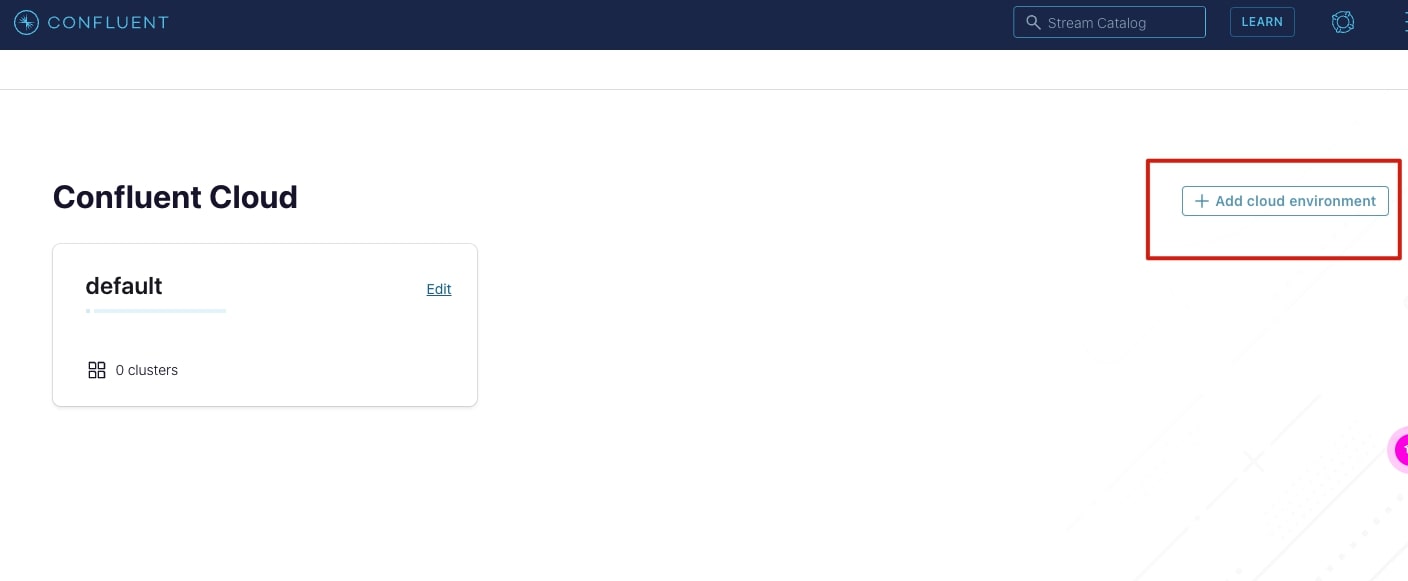
First, you need to sign up for a Confluent Cloud free trial.
Once logged in, you need to set up the following:
1. Add an environment and specify a name of your choosing.
2. Add a cluster into the environment (Basic type is selected here) and then select Begin configuration.
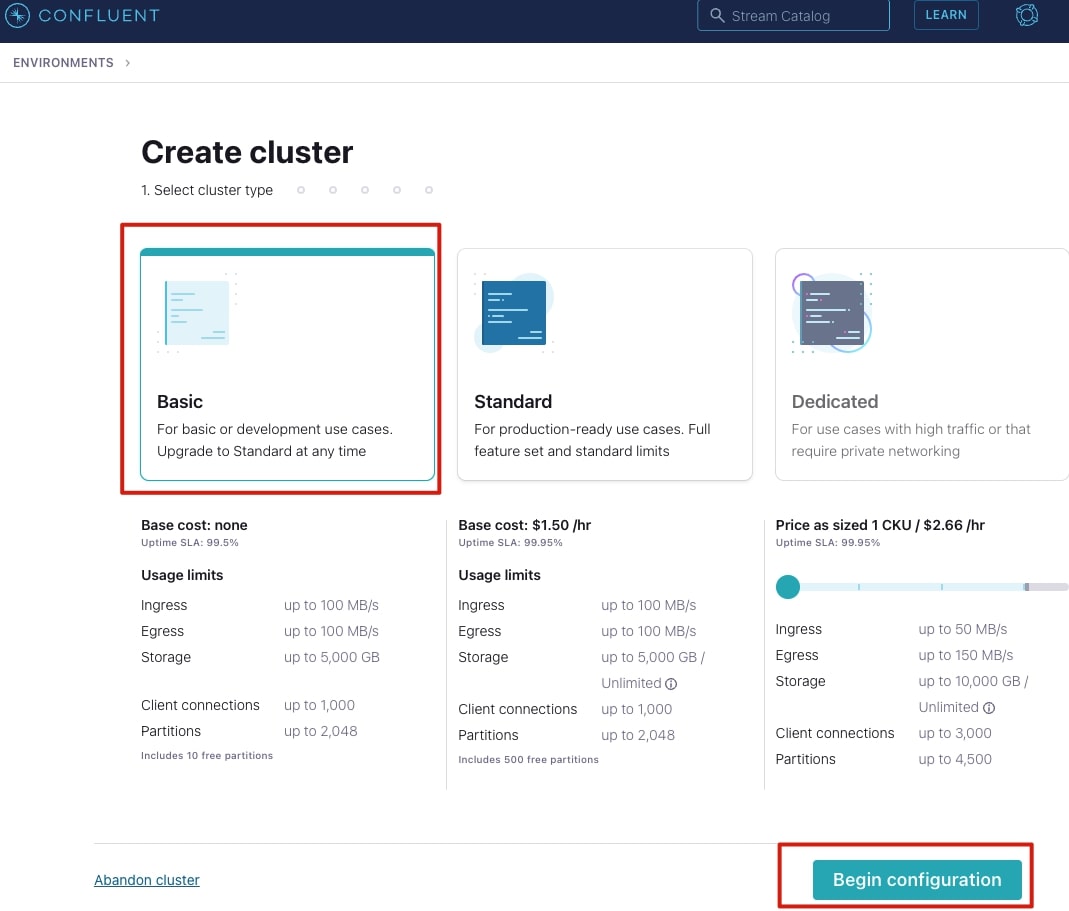
3. Choose a cloud provider to deploy the cluster to, this tutorial uses AWS ap-southeast-1 Singapore region, with a single zone.
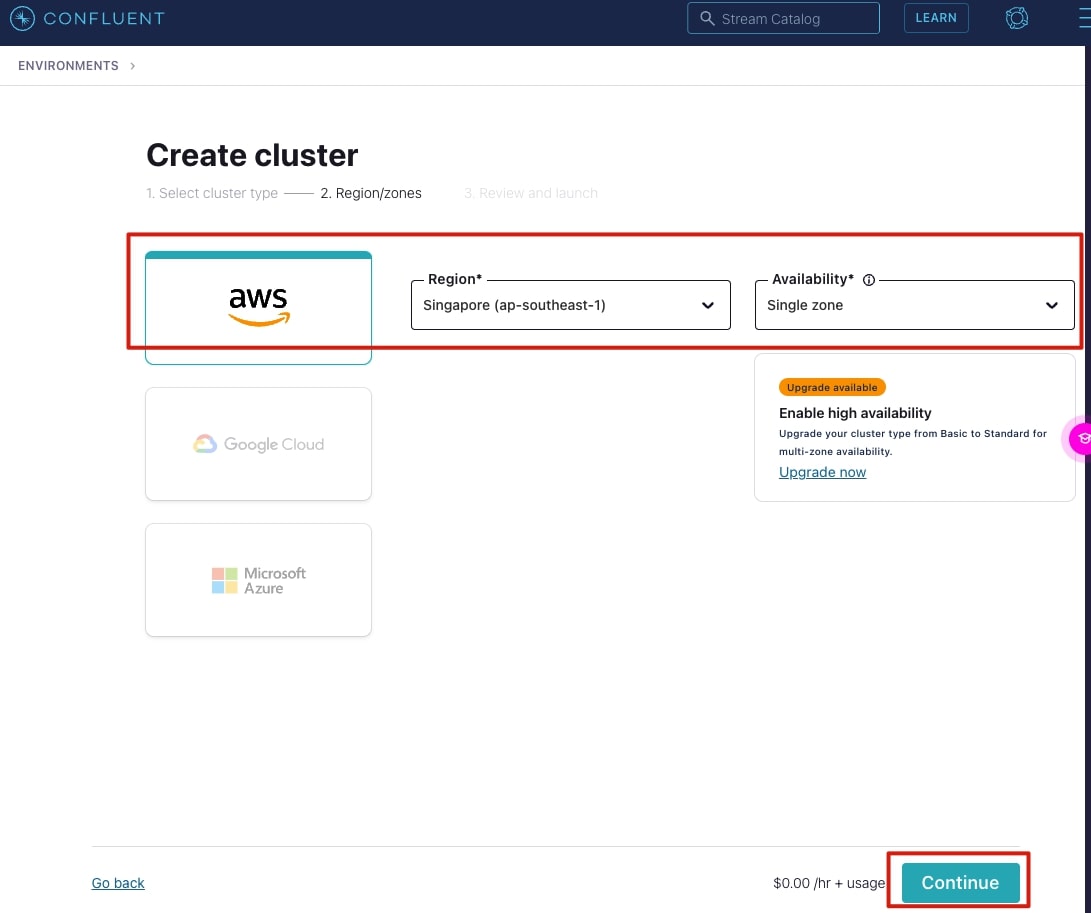
4. Give your cluster a name, then select Launch cluster.
In a short while, you will have a cluster up and running.
Configure topics
To configure the topics, select your cluster and add the topics as shown below; you can use the default settings presented for the topic: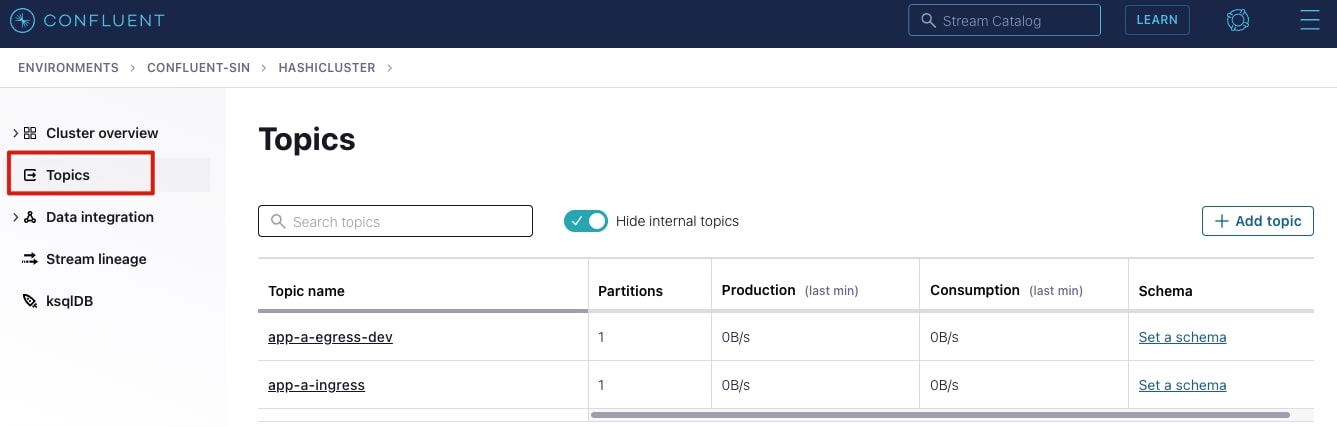
API Keys
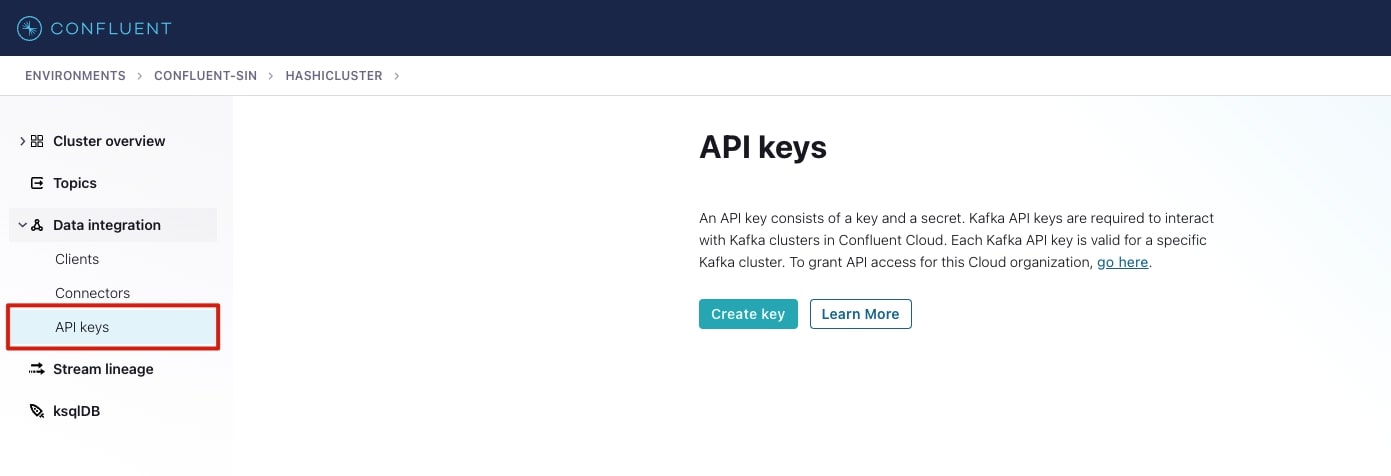
To publish to or consume data from a topic, authentication is required. Confluent Cloud provides the ability to generate API keys with role-based access control (RBAC) permissions that control which topics can be consumed to or published to.
This setup uses a Global Access API key. To set this up, go to Confluent Cloud management console:
- Select the data integration option on the menu (shown below).
- Select Create key.
- Select Global access.
- Download the API credentials, they will be used later (keep them safe!). They will be stored in the Vault.
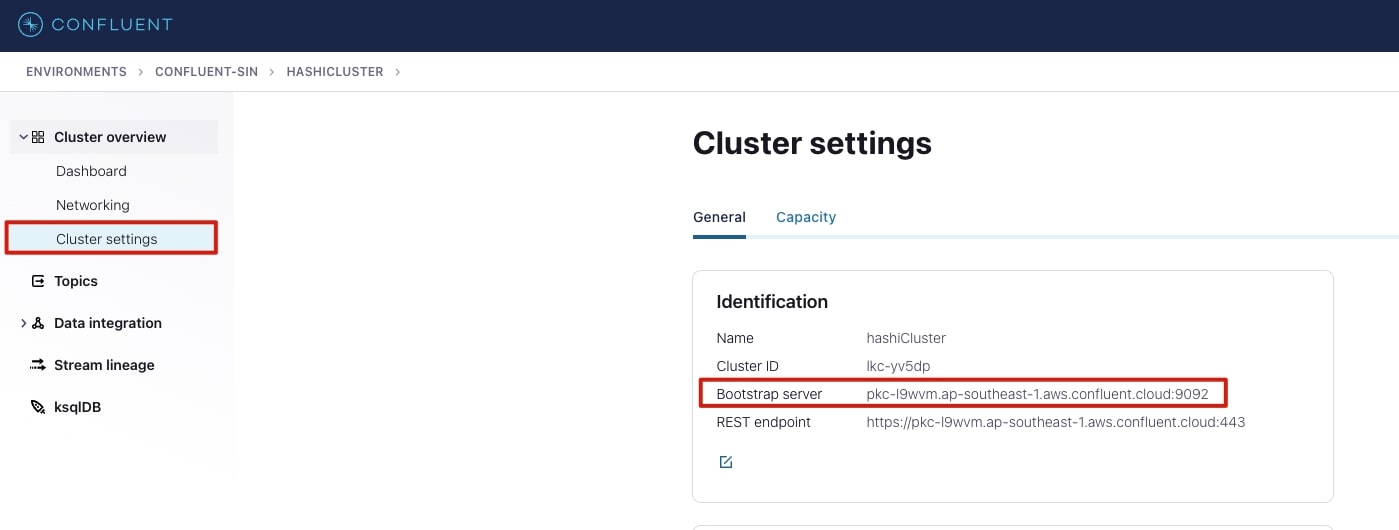
Bootstrap server details
You also need the bootstrap server details, this can be found in the cluster settings page as shown below. Keep record of this information because it will be used for the application and Transformer deployment configurations.
AWS EKS cluster
The eksctl command shown below creates a VPC and a managed AWS EKS cluster. Since this is a temporary environment and to keep costs down, I used spot instances:
eksctl create cluster --name cluster-1  --region ap-southeast-1 \
--nodegroup-name nodes --spot --instance-types=m5.large --nodes 3 \
--nodes-min 1 --nodes-max 3 --with-oidc --managed
Note: This step can take a while (20+ minutes), so you may want to get a cup of tea or coffee. You will see a similar message when the EKS cluster is ready:
EKS cluster "cluster-1" in "ap-southeast-1" region is ready
HashiCorp Vault Enterprise
Vault server
First you need to register for the HashiCorp Vault trial license and download the license key, copying the license key to a file: license.hclic. Once the vault license file is downloaded, you need to create a Kubernetes secret using the contents of the license file. For more information see the Vault documentation here.
To install Vault Enterprise using Helm, do the following:
helm repo add hashicorp https://helm.releases.hashicorp.com

kubectl create secret generic vault-ent-license \
  --from-file="license=license.hclic${secret}"

helm install vault hashicorp/vault  \
	--set "server.image.repository=hashicorp/vault-enterprise" \
	--set "server.image.tag=1.9.1-ent" \
	--set "server.enterpriseLicense.secretName=vault-ent-license" \
	--set "server.dev.enabled=true" \
	--set "server.dev.devRootToken=root" \
	--set "ui.enable=true"
This should deploy a Vault Enterprise instance in development mode with the root token set to “root” (please do not do this in a production environment!).
You should now see the Vault deployed:
kubectl get pods
NAME                                    READY   STATUS    RESTARTS   AGE
vault-0                                 1/1     Running   0          41m
vault-agent-injector-6c7fdc6b4d-wskmf   1/1     Running   0          41m
There are a few things you need to configure on Vault, including the Transit and Transform secret engines and Kubernetes authentication methods. Connect to the Vault container and confirm you can access it:
#expose vault externally to the Kubernetes cluster using port-forwarding
kubectl port-forward vault-0 8200:8200
From another terminal window:
export VAULT_ADDR=http://localhost:8200
export VAULT_TOKEN=root

vault status
Key             Value
---             -----
Seal Type       shamir
Initialized     true
Sealed          false
Total Shares    1
Threshold       1
Version         1.9.1+ent
Storage Type    inmem
Cluster Name    vault-cluster-a5b35278
Cluster ID      50bbe23a-1648-004f-a523-6fe8b8a9bb38
HA Enabled      false
You should be able to see the Vault UI by navigating in your browser to http://locahost:8200.
KV secret engine
The application and transformers will require access to the Confluent Cloud API keys and the bootstrap server details you recorded in the API keys and Bootstrap server details steps above. As part of InfoSec practices, avoid hardcoding credentials. Instead, store them directly in the Vault:
# Mount the kv secret engine

vault secrets enable -version=2 kv

# Store Confluent Cloud API keys for the Application and Transformer

vault kv put kv/confluent-cloud client_id=ClientId \
	client_secret=Secret \
	connection_string=pkc-l9mvm.ap-southeast-1.aws.confluent.cloud:9092 \
	convergent_context_id="YWJjMTIz"

# Store configurations for json values to be encrypted and encryption method to apply. These will be fetched by the Transformer.

vault kv put kv/app-a/config - << EOF
{
  "keys_of_interest":[
	{"key": "owner.email", "method": "aes"},
	{"key": "owner.NRIC", "method": "transform", "transformation":"sg-nric-mask"},
	{"key": "owner.telephone", "method": "transform", "transformation":"sg-phone-fpe"},
  	{"key": "choices.places_of_interest", "method": "aes-converge"}
    ],
  "transform_mount":"transform",
  "transform_role_name":"sg-transform",
  "transit_mount":"transit",
  "transit_key_name":"transit",
  "convergent_key_name":"transit-converge"
}
EOF
PKI Secret Engine
The PKI secrets engine needs to be set up to provide X.509 certificates for the application, specifically the Fluentd sidecar; the Kafka plugin requires the certificates to make connection to Confluent Cloud.
To set it up:
# Enable secret engine

vault secrets enable pki

# Configure the CA Certificate and Private Key

vault write pki/root/generate/internal \
    common_name=service.internal \
    ttl=8760h

# Create PKI Role

vault write pki/roles/app \
    allowed_domains=service.internal \
    allow_subdomains=true \
    max_ttl=72h
Transit secrets engine
This section walks through the setup of the Vault Transit secrets engine. The requirements specify the need to encrypt the owner.email and choices.places_of_interest with the AES encryption method. Below are the Vault CLI commands to set up the secret engine:
# Enable Transit Secret Engine

vault secrets enable transit

# Create Transit AES256 Encryption key

vault write -f transit/keys/transit type=aes256-gcm96

# Create Transit AES256 Encryption Key (Convergent Encryption)

vault write -f transit/keys/transit-convergent \
convergent_encryption=true derived=true type=aes256-gcm96
This will mount the Transit secrets engine and configure two AES-256 encryption keys and will be used by the transformer to encrypt the required fields in the logs.
Transform secret engine
The Transform secrets engine is a Vault Enterprise feature that allows for additional encryption capabilities. If you are testing out this setup with Vault OSS or HCP, these configurations will not work, so they can be left out.
To configure the Transform secrets engine, first mount the Transform secrets engine:
# Enable Transform Secret Engine
vault secrets enable transform
NRIC transform configuration
Singaporean security requirements dictate that NRIC (National Registration Identity Card) details must be masked. This template configuration specifies the regex pattern for the NRIC, while the transformation configuration specifies the type of transform (masking or format preserving encryption) to be done.
# Create template for NRIC pattern

vault write transform/template/sg-nric \
  type=regex \
  pattern='[A-Z]{1}(\d{7})[A-Z]{1}' \
  alphabet=builtin/numeric

# create a transformation for NRIC

vault write transform/transformation/sg-nric-mask \
  type=masking \
  masking_character='*' \
  template=sg-nric \
  tweak_source=internal \
  allowed_roles=sg-transform
Telephone transform configuration
Security requirements also dictate that phone numbers must be encrypted with format preserving encryption (FPE).
# Create template for Telephone pattern
vault write transform/template/sg-phone \ type=regex \ pattern='[+](\d{2})-(\d{4})-(\d{4})' \ alphabet=builtin/numeric
# create a transformation for Telephonevault write transform/transformation/sg-phone-fpe
type=fpe
template=sg-phone
tweak_source=internal
allowed_roles=sg-transform
Transform role
A transform role is configured to allow access to the two transformations (sg-nric-mask and sg-phone-fpe) created earlier.
vault write transform/role/sg-transform \
transformations=sg-nric-mask,sg-phone-fpe
Kubernetes auth method
Since the application and the transformer will be deployed on Kubernetes and require access to HashiCorp Vault, the Kubernetes authentication method is an effective way to enable this. To configure:
#enable kubernetes auth method vault auth enable kubernetes
# Need to get a few details from the Kubernetes cluster to complete the Vault configuration.VAULT_HELM_SECRET_NAME=$(kubectl get secrets --output=json | jq -r '.items[].metadata | select(.name|startswith("vault-token-")).name')
TOKEN_REVIEW_JWT=$(kubectl get secret $VAULT_HELM_SECRET_NAME --output='go-template={{ .data.token }}' | base64 --decode)
KUBE_CA_CERT=$(kubectl config view --raw --minify --flatten --output='jsonpath={.clusters[].cluster.certificate-authority-data}' | base64 --decode)
KUBE_HOST=$(kubectl get services --field-selector metadata.name=kubernetes -o jsonpath='{.items[].spec.clusterIP}')
vault write auth/kubernetes/config
kubernetes_host="https://$KUBE_HOST"
token_reviewer_jwt=$TOKEN_REVIEW_JWT
kubernetes_ca_cert="$KUBE_CA_CERT"
disable_iss_validation=true
Kubernetes auth method roles
These roles will be used by the application and transformers to authenticate to Vault.
# Application role

vault write auth/kubernetes/role/app \
        bound_service_account_names=app \
        bound_service_account_namespaces=default \
        policies=app-a-policy \
        ttl=24h

# Transformer role

vault write auth/kubernetes/role/transform \
        bound_service_account_names=transform \
        bound_service_account_namespaces=default \
        policies=transformer-policy \
        ttl=24h
Configure vault policies
The application will require access to the secrets configured earlier in the KV secret engine section. To allow this, Vault policies need to be configured:
vault policy write app-a-policy - <<EOF

path "kv/data/confluent-cloud" {
capabilities = ["read"]
}

path "pki/issue/app" {
capabilities = ["update"]
}

EOF<
Transformer will require access to the Transit and Transform secrets engines for encryption.
vault policy write transformer-policy - <<EOFpath "/transit/encrypt/transit-converge" {
capabilities = ["update"]
}path "transit/encrypt/transit" {
capabilities = ["update"]
}path "kv/data/confluent-cloud" {
capabilities = ["read"]
}path "kv/data/app-a/config" {
capabilities = ["read"]
}path "transform/encode/sg-transform" { capabilities = ["update"] }
EOF
Transformer
Configurations
The Transformer will retrieve certain configurations stored in Vault as per the steps in the KV secret engine, specifically in the kv/app-a/config and kv/confluent-cloud paths. Here is a run down of the configurations:
| Configuration | parameters | description |
| client_id | string | Confluent Cloud global API client ID set up in API keys |
| client_secret | string | Confluent Cloud global API client secret set up in API keys |
| connection_string | string | Confluent Cloud Bootstrap server found in Bootstrap server details |
| keys_of_interest | key: | The JSON key path (in . notation) |
| – | method | Encryption method options to use: aes, aes-converge, transform (if using transform, the transformation name also needs to be specified) |
| – | transformation | Specifies the name of the transformation configuration (masking, FPE, tokenization); these transformations were created in steps NRIC transform configuration and Telephone transform configuration |
| transform_mount | string | Transform secret engine path, configured in Transform secret engine, default is transform |
| transform_role_name | string | Transform role that has permissions to the transformations configured in NRIC transform configuration and Telephone transform configuration |
| transit_mount | string | Transit secrets engine path, configured in Transit secrets engine |
| transit_key_name | string | Name of Transit encryption key |
| convergent_key_name | string | Name of Transit encryption key set with derived as true. Convergent encryption requires a context which must be provided. Encryption operations yield the same ciphertext when using this key. |
| convergent_context_id |
string(base64-encoded)Context used for convergent encryption
Deployment
To build and deploy the Transformer, run this command (from vault-confluent-data-encryption git repo directory):
kubectl apply -f ./deploy/transform-deploy.ym
The annotations in the deployment will configure a Vault Agent sidecar (listening on port 8200) and authenticate using the Kubernetes authentication method. Since agent-cache-enable and agent-cache-use-auto-auth-token are set to true, this will allow the Transformer to request secrets using the Vault Agent on http://localhost:8200 using the supplied token to the Vault Agent.
---
apiVersion: apps/v1
kind: Deployment
metadata:
 name: transform
spec:
 selector:
   matchLabels:
     app: transform
 template:
   metadata:
     labels:
       app: transform
     annotations:
       vault.hashicorp.com/agent-inject: "true"
       vault.hashicorp.com/role: "transform"
       vault.hashicorp.com/agent-cache-enable: "true"
       vault.hashicorp.com/agent-cache-use-auto-auth-token: "true"

   spec:
     serviceAccountName: transform
     containers:
     - name: transform
       env:
       - name: KAFKA_GROUP
         value: 'app-a-group'
       - name: INGRESS_TOPIC
         value: 'app-a-ingress'
       - name: EGRESS_TOPIC
         value: 'app-a-egress-dev'
       - name: SECRETS_PATH
         value: 'kv/data/confluent-cloud'
       - name: CONFIGS_PATH
         value: 'kv/data/app-a/config'
       - name: VAULT_ADDR
         value: 'http://localhost:8200'
       - name: VAULT_TOKEN
         value: ''
       - name: LOGLEVEL
         value: 'DEBUG'
       image: moayadi/vault-confluentcloud-demo:transform-latest
       imagePullPolicy: Always
       resources:
         limits:
           memory: "128Mi"
           cpu: "500m"
       ports:
       - containerPort: 8080
---
kind: Service
apiVersion: v1
metadata:
name:  transform
spec:
selector:
app:  transform
type:  ClusterIP
ports:
- name: tcp port: 8080 targetPort: 8080
apiVersion: v1 kind: ServiceAccount metadata: name: transform
Once the Transformer is deployed, it will subscribe to the Confluent Cloud app-a-ingress topic and monitor for incoming logs. Logs are processed and are then published to the app-a-egress-dev topic.
Elasticsearch and Kibana
The encrypted logs will be sent to Elasticsearch and viewed in Kibana. This section covers a setup with ECK (Elastic Cloud on Kubernetes) as per quickstart instructions.
Some modifications were made to the deployment, including exposing Elasticsearch to the internet with a LoadBalancer.
To install, run the following:
kubectl create -f https://download.elastic.co/downloads/eck/1.9.1/crds.yaml kubectl apply -f https://download.elastic.co/downloads/eck/1.9.1/operator.yamlkubectl apply -f ./deploy/elk-deploy.yml
Once deployed and Elasticsearch is up and running, you need to capture a few configurations for the Confluent Cloud connector in the next section, such as the credentials for Elasticsearch. The default username is elastic, to get the password:
PASSWORD=$(kubectl get secret quickstart-es-elastic-user -o go-template='{{.data.elastic | base64decode}}')
You also need the load balancer details (EXTERNAL-IP):
kubectl get svc
NAME                       TYPE           CLUSTER-IP       EXTERNAL-IP                                                                   PORT(S)             AGE
kubernetes                 ClusterIP      10.100.0.1       <none>
quickstart-es-default      ClusterIP      None             <none>                                                                        9200/TCP            13h
quickstart-es-http         LoadBalancer   10.100.134.61    a5db09d337eca490f82cf7a6ea17adf8-668057098.ap-southeast-1.elb.amazonaws.com   9200:31983/TCP      13h
quickstart-es-transport    ClusterIP      None             <none>                                                                        9300/TCP            13h
quickstart-kb-http         ClusterIP      10.100.157.8     <none>                                                                        5601/TCP            13h
transform                  ClusterIP      10.100.253.55    <none>                                                                        8080/TCP            50d
vault                      ClusterIP      10.100.255.143   <none>                                                                        8200/TCP,8201/TCP   9d
vault-agent-injector-svc   ClusterIP      10.100.49.129    <none>                                                                        443/TCP             9d
vault-internal             ClusterIP      None             <none>                                                                        8200/TCP,8201/TCP   9d
Confluent Cloud connectors
Confluent Cloud connectors provide fully managed connectivity to multiple data sources and sinks. In this case, you will set up two connectors:
Elasticsearch Service Sink connector
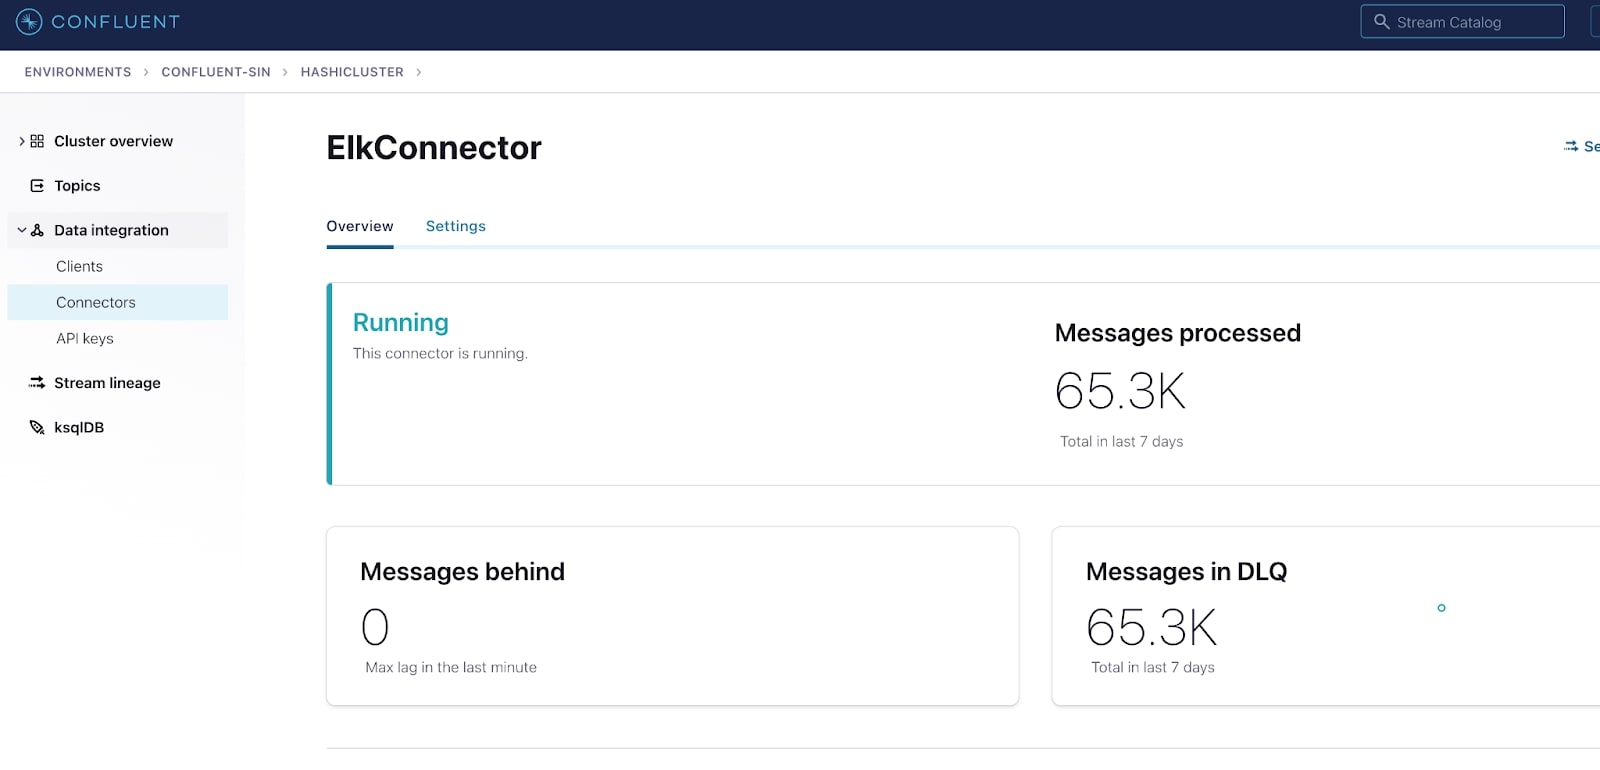
This connector will subscribe to the app-a-egress-dev topic (containing the encrypted JSON logs) and publish all messages to an instance of Elasticsearch, to be viewed in Kibana.
In the Confluent Cloud portal, select your cluster created in Set up Confluent Cloud steps. To set up the connector:
1. Select Connectors under the Data integration menu.
2. In the filters, search for Elasticsearch and select Elasticsearch Service Sink.

3. Complete the following fields, then select Next.
| Setting | Value |
| topics | app-a-engress-dev |
| Name | ElasticsearchSink |
| Input messages | JSON |
| Kafka Cluster Authentication mode | KAFKA_API_KEY |
| Kafka API Key | Same key created in step API keys |
| Kafka API Secret | Same secret created in step API keys |
| Connection URI | http://<<loadbalancer_address>>:9200 |
| Connection user | elastic |
| Connection password | elastic password retrieved in step Elasticsearch and Kibana |
| Key ignore | true |
| Scheme ignore | true |
| Number of tasks for this connector | 1 |
| Data Stream Type | logs |
| Data Stream Dataset | logs |
If there are no errors with the configuration, you should now have an operational connector:
AWS S3 Sink connector
This connector subscribes to the app-a-ingress topic (containing the raw logs) and publishes all messages to a designated S3 bucket for long-term archive of the logs.
Before setting up this connector, you need to create an AWS IAM user with programmatic access configured with IAM permissions to access the target S3 bucket.
To set up the AWS S3 connector:
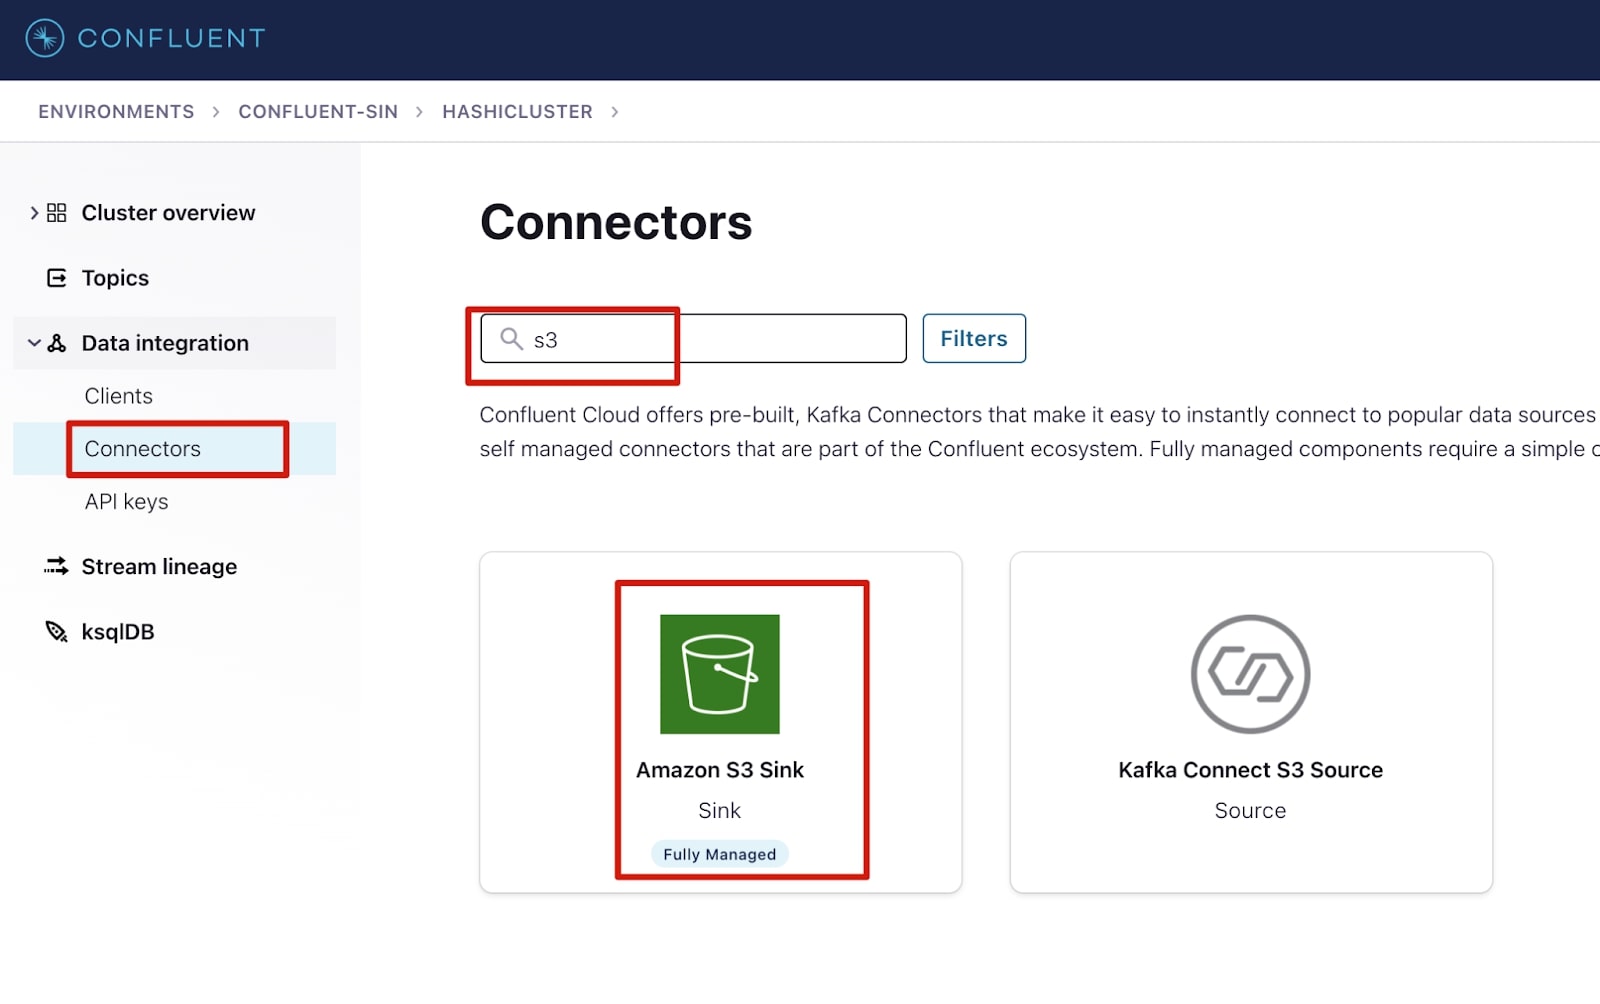
1. Select Connectors under the Data integration menu.
2. Select Add connector.
3. In the filters, search for S3 and select Amazon S3 Sink connector.
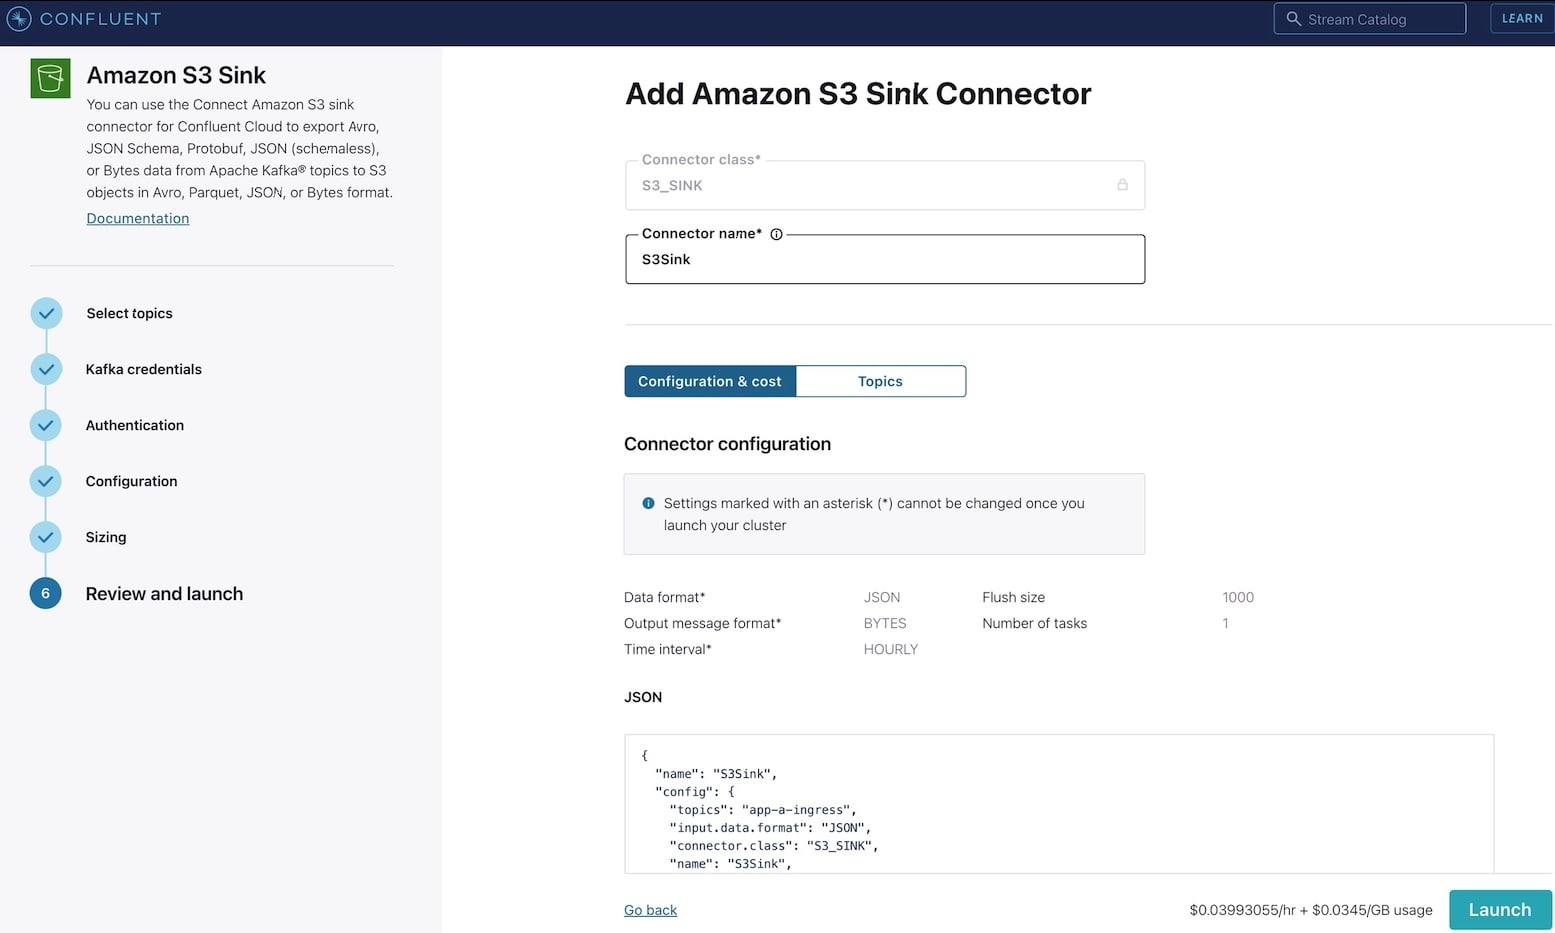
4. Select the app-a-ingress topic then click Continue.
5. Select Use an existing API key option and enter API key details created in step API keys, then select Continue.
6. For the Amazon S3 credentials, enter Key ID and Secret Access Key. Also specify the bucket name. Select Continue.
7. For Input Kafka record Value format, select JSON.
8. For Output message format, select JSON.
9. Time interval should be set to HOURLY.
10. Flush size set to 1000.
11. For Connector sizing, Tasks, select 1. Select Continue.
12. Update the name of the sink and select Launch.
Application and Fluentd
The application deployment consists of two components:
- The application (app-a) itself which is a JSON data generator using the Mimesis data generator. It appends the generated JSON records to /fluentd/log/user.log.
- A Fluentd sidecar with the fluent-plugin-kafka installed. It will track changes in the /fluentd/log/user.log and upload the JSON records to the app-a-ingress topic in Confluent Cloud.
The Fluentd sidecar requires a few configurations to work, including a few secrets:
- X.509 certificates for the fluent-plugin-kafka, the certificates are required by the plugin to connect to the Confluent Cloud cluster broker.
- Confluent Cloud API credentials for the fluent-plugin-kafka plugin to authenticate as a producer and push the logs to the app-a-ingress topic.
These secrets will be provided by Vault, and these configurations will be passed as part of the deployment file.
The deployment file is below and makes use of Vault Agent Sidecar Annotations to retrieve the required secrets and render the Fluentd configuration file.
---
apiVersion: apps/v1
kind: Deployment
metadata:
 name: app
spec:
 selector:
   matchLabels:
     app: app
 template:
   metadata:
     labels:
       app: app
     annotations:
       vault.hashicorp.com/agent-inject: "true"
       vault.hashicorp.com/role: "app"
       vault.hashicorp.com/agent-cache-enable: "true"
       vault.hashicorp.com/agent-cache-use-auto-auth-token: "true"

       vault.hashicorp.com/agent-inject-secret-ca.pem: ""
       vault.hashicorp.com/secret-volume-path-ca.pem: "/fluentd/cert"
       vault.hashicorp.com/agent-inject-template-ca.pem: |
         {{- with secret "pki/issue/app" "common_name=app-a.service.internal" -}}
         {{ .Data.issuing_ca }}
         {{- end }}

       vault.hashicorp.com/agent-inject-secret-key.pem: ""
       vault.hashicorp.com/secret-volume-path-key.pem: "/fluentd/cert"
       vault.hashicorp.com/agent-inject-template-key.pem: |
         {{- with secret "pki/issue/app" "common_name=app-a.service.internal" -}}
         {{ .Data.private_key }}
         {{- end }}

       vault.hashicorp.com/agent-inject-secret-cert.pem: ""
       vault.hashicorp.com/secret-volume-path-cert.pem: "/fluentd/cert"
       vault.hashicorp.com/agent-inject-template-cert.pem: |
         {{- with secret "pki/issue/app" "common_name=app-a.service.internal" -}}
         {{ .Data.certificate }}
         {{- end }}

       vault.hashicorp.com/agent-inject-secret-fluent.conf: ""
       vault.hashicorp.com/secret-volume-path-fluent.conf: "/fluentd/etc"
       vault.hashicorp.com/agent-inject-template-fluent.conf: |
           <system>
            log_level debug
           </system>

         # TCP input
         <source>
           @type forward
           port 24224
         </source>

         <source>
           @type tail
           path /fluentd/log/user.log
           pos_file /fluentd/log/user.pos
           @log_level debug
           tag user.log
           <parse>
             @type json
           </parse>
         </source>

         <match user.log>
           @type kafka2
             # list of seed brokers
             brokers {{- with secret "kv/data/confluent-cloud" }} {{ .Data.data.connection_string }}{{- end }}
             use_event_time true

             # buffer settings
             <buffer ingress>
               @type file
               path /fluentd/td/log
               flush_interval 1s
             </buffer>

             # data type settings
             <format>
               @type json
             </format>

             # topic settings
             topic_key app-a-ingress
             default_topic app-a-ingress

             # producer settings
             required_acks -1
             compression_codec gzip
             ssl_ca_cert '/fluentd/cert/ca.pem'
             ssl_client_cert '/fluentd/cert/cert.pem'
             ssl_client_cert_key '/fluentd/cert/key.pem'
             sasl_over_ssl true
             ssl_ca_certs_from_system true
             username {{- with secret "kv/data/confluent-cloud" }} {{ .Data.data.client_id }}{{- end }}
             password {{- with secret "kv/data/confluent-cloud" }} {{ .Data.data.client_secret }}{{- end }}
          </match>
   spec:
     serviceAccountName: app
     containers:
     - name: app
       env:
       - name: NUM_OF_RUNS
         value: '10'
       - name: PATH_TO_LOG
         value: '/fluentd/log/user.log'
       image: moayadi/vault-confluentcloud-demo:app-latest
       imagePullPolicy: Always
       resources:
         limits:
           memory: "128Mi"
           cpu: "500m"
       ports:
       - containerPort: 8080
       volumeMounts:
       - name:  app-log
         mountPath:  /fluentd/log

     - name: fluentd
       image: moayadi/vault-confluentcloud-demo:fluentd-latest
       imagePullPolicy: Always
       resources:
         limits:
           memory: "128Mi"
           cpu: "500m"
       ports:
       - containerPort: 24224
       volumeMounts:
       - name:  app-log
         mountPath:  /fluentd/log

     volumes:
     - name: app-log
       emptyDir: {}
---

kind: Service
apiVersion: v1
metadata:
 name:  app
spec:
 selector:
   app:  app
 type:  ClusterIP
 ports:
 - name:  tcp
   port:  8080
   targetPort:  8080

---
apiVersion: v1
kind: ServiceAccount
metadata:
 name:  app
To deploy the application:
kubectl apply -f ./deploy/app-deploy.yml
Once the application is deployed, it will begin to generate fake JSON data and append to the /fluentd/log/user.json file.
View logs
View logs in Confluent Cloud
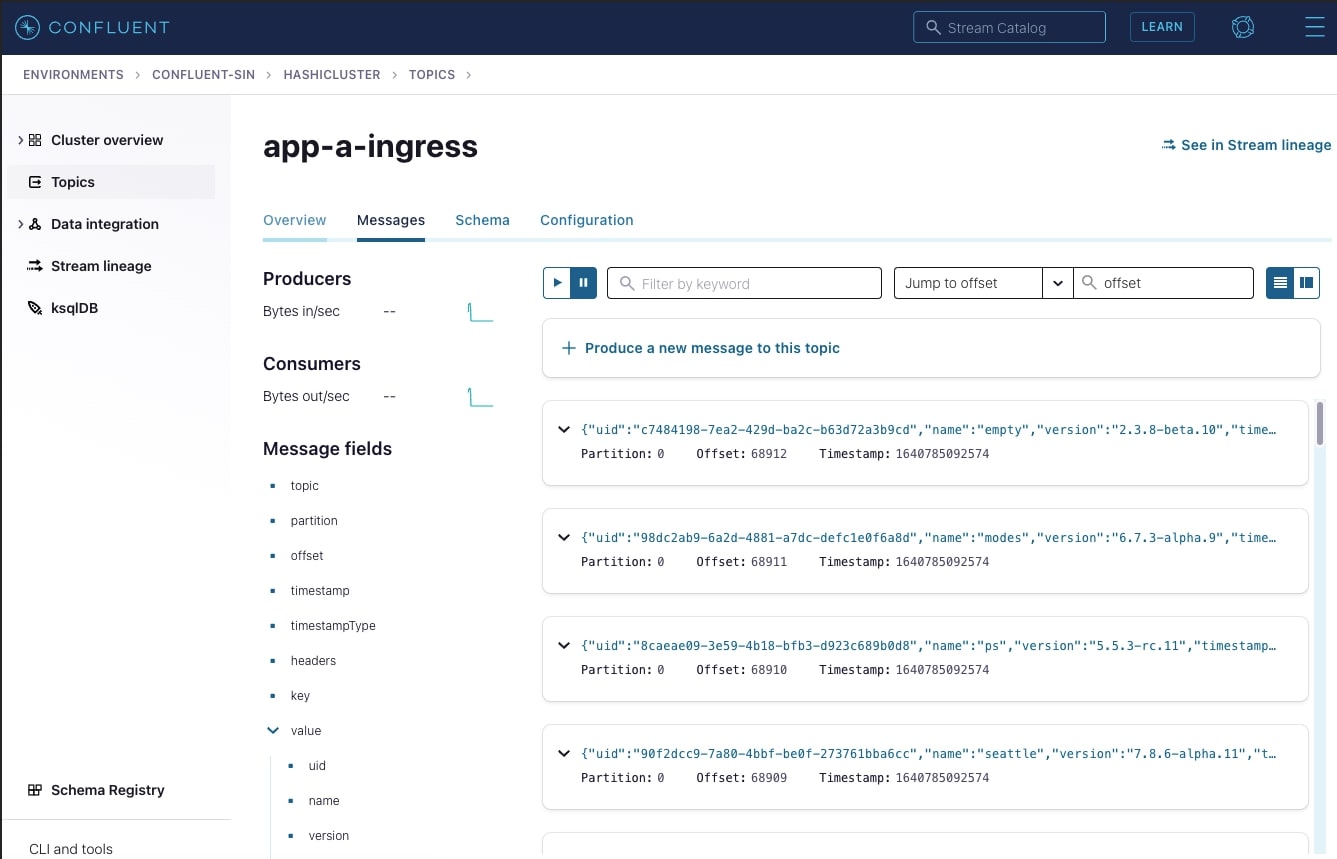
It is possible to see the messages being published in the Confluent Cloud topic. To view them from the Confluent Cloud portal, select the topic name you wish to view as shown below.
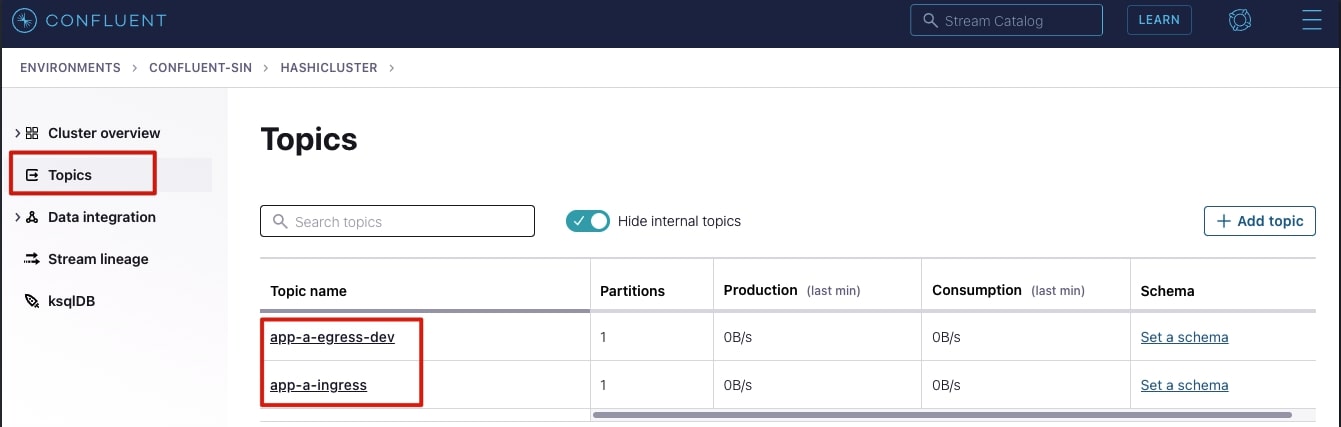
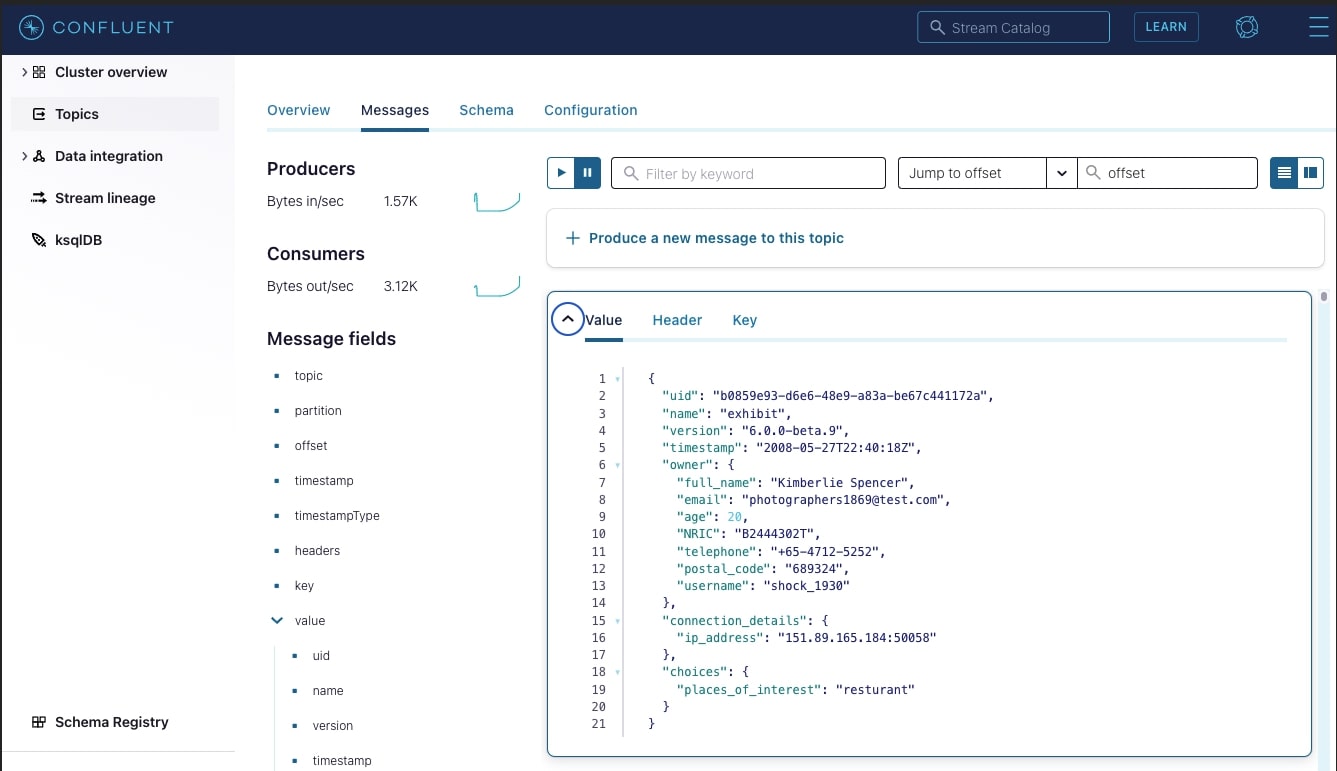
In the app-a-ingress topic, you should see a live stream of JSON logs being pushed by app-a Fluentd sidecar. Below is an example:
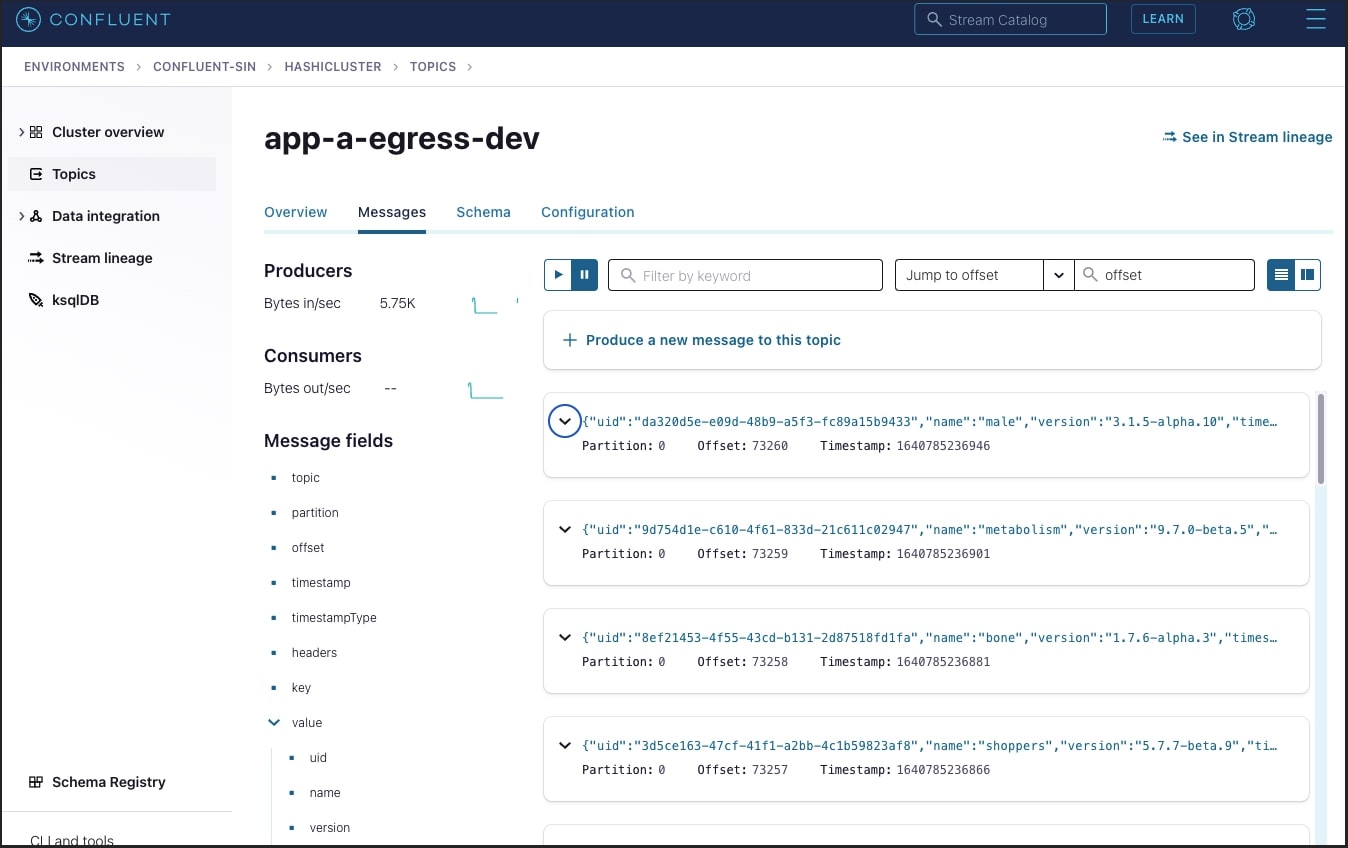
In the app-a-egress-dev topic you should see a live stream of encrypted JSON logs being pushed by the Transformer. Below is an example:
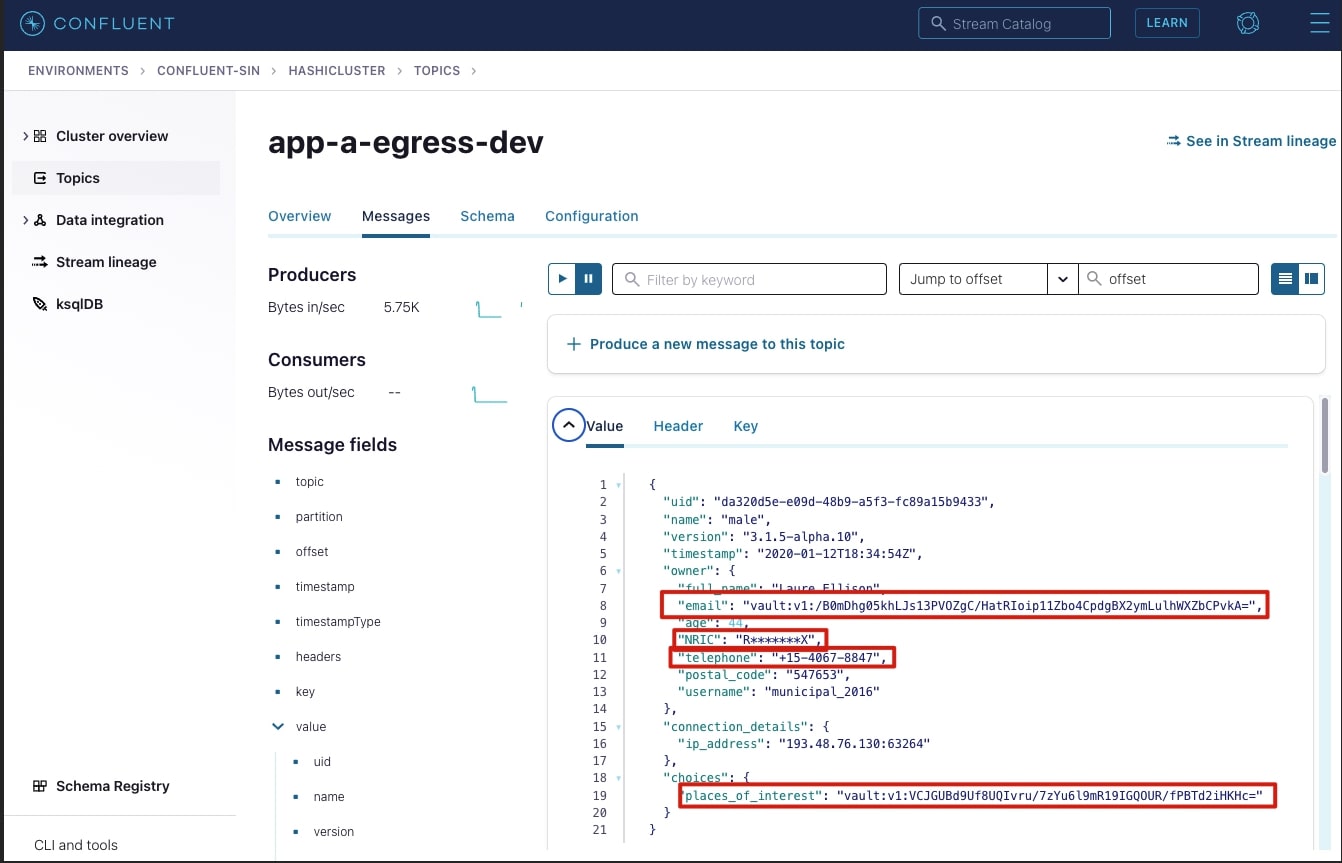
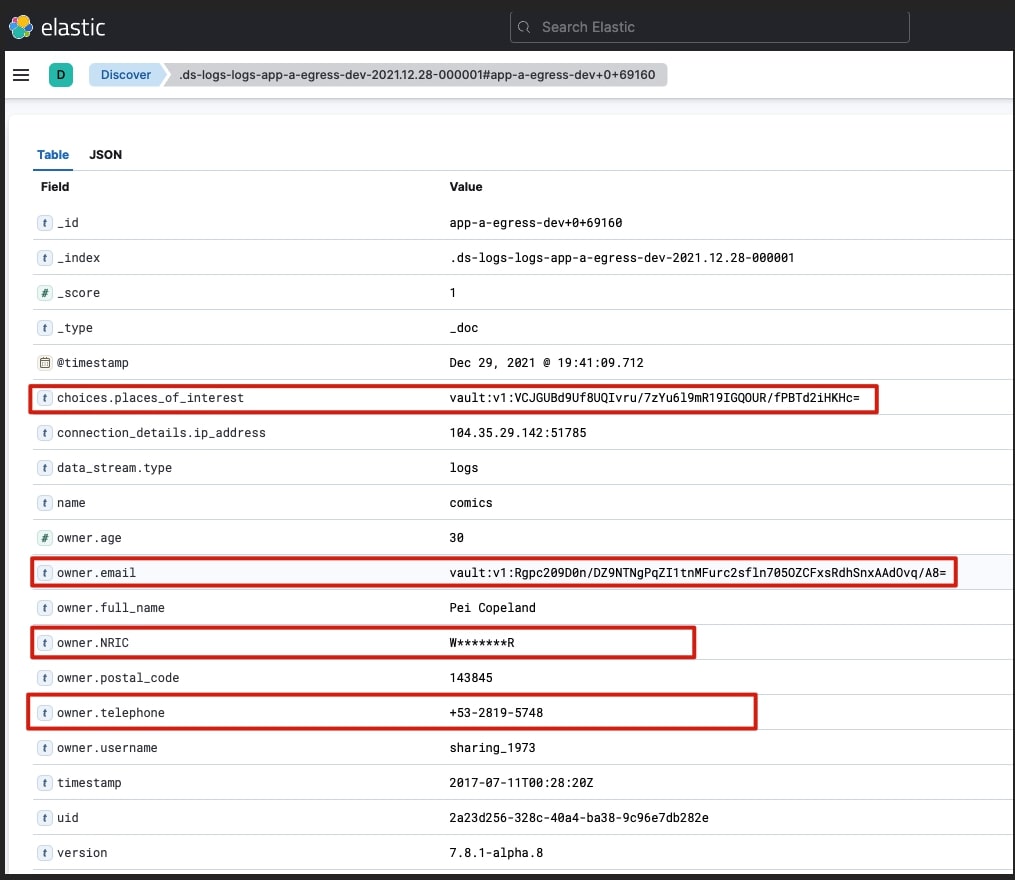
The highlighted fields were encrypted successfully, the email and places_of_interest fields were encrypted with Vault Transit secrets engine. The secret engine appends the ciphertext with vault:v1 indicating that it was encrypted by Vault, using version 1 of the encryption key. This is important as Vault Transit secrets engine can also perform key rotation; tracking which version of the key was used to encrypt is necessary to be able to decrypt the data.
View logs in Kibana
The final destination for the encrypted logs will be Elasticsearch where the Applications team can view their logs, with the required encrypted fields.
To view the logs in Kibana, set up a port-forward to access the Kibana service deployed:
kubectl port-forward  service/quickstart-kb-http 5601:5601

Forwarding from 127.0.0.1:5601 -> 5601
Forwarding from [::1]:5601 -> 5601
You can now navigate to https://localhost:5601 from your browser. To login, use the elastic username and password retrieved earlier in Elasticsearch and Kibana section.
You need to create an index pattern that matches the logs-app-a-egress-dev data stream. The logs can then be viewed:

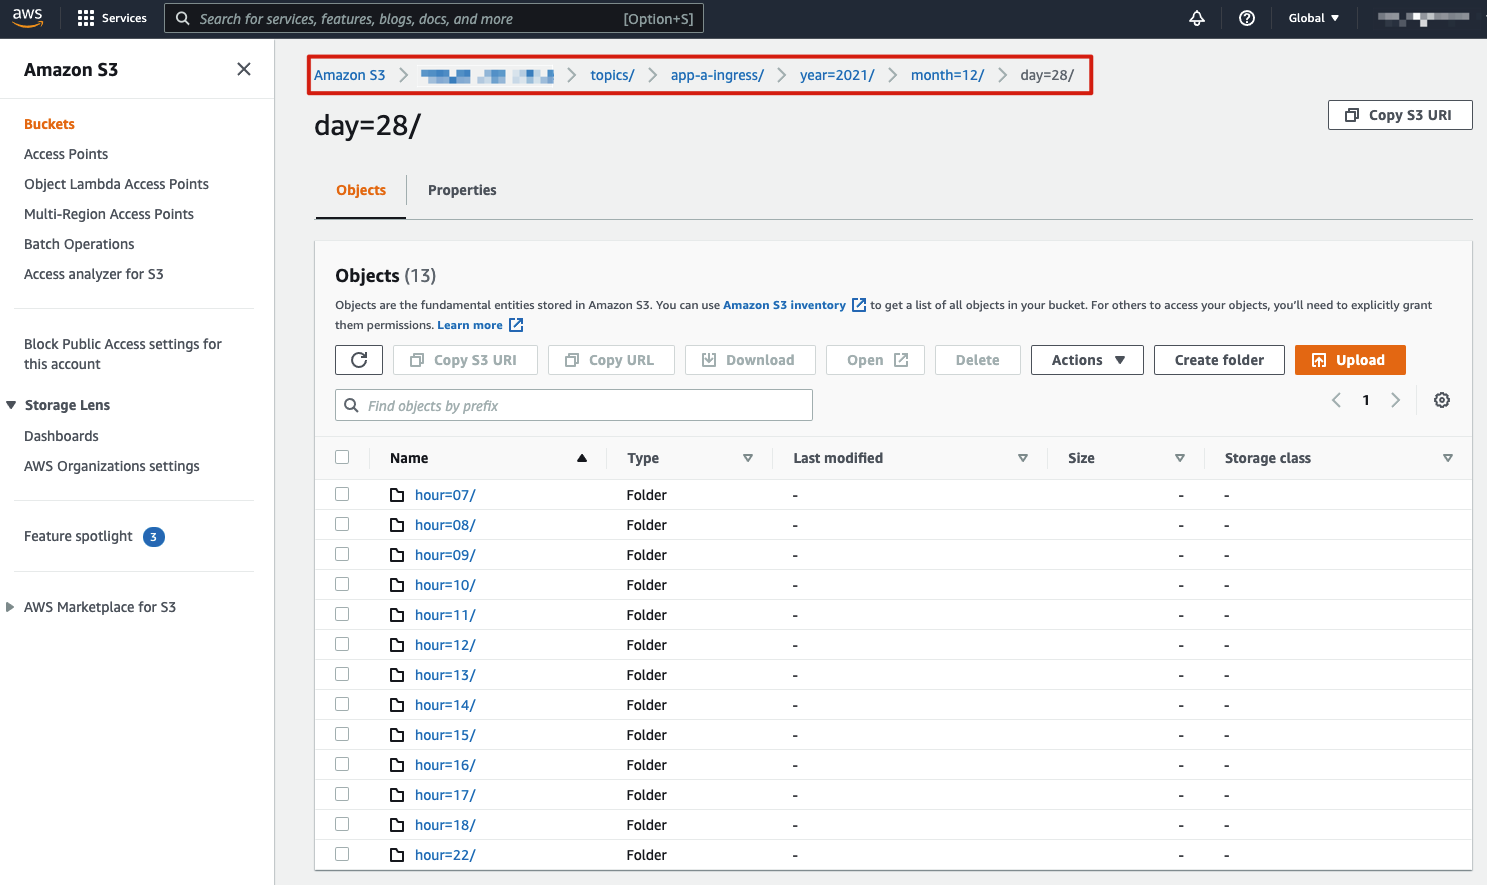
View logs in the S3 bucket
AWS S3 service is a great place to store such data, it allows for ease of administration of data lifecycle and retention policies and has many security controls to protect access to the data (beyond the scope of this blog).
The AWS S3 Sink connector pushes the original logs into the designated S3 bucket. Below is an example of how the data is stored in the S3 bucket, per the configurations covered earlier:
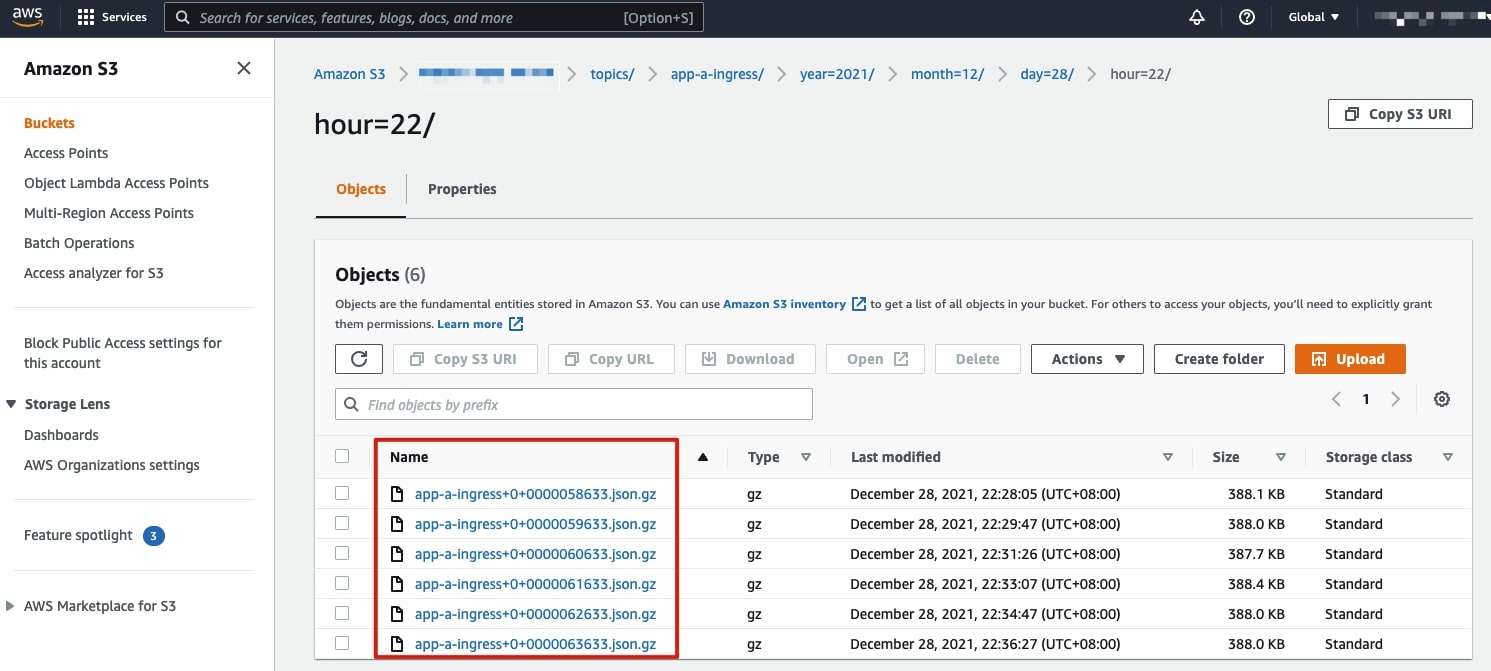
The sink connector allows for granular configurations such as how many messages are to be stored in each archive file, object names, etc.
Architecture considerations
Below are some important considerations related to this architecture
- The Vault configuration is in development mode and should not be used in production; TLS was not enabled on the Vault API. TLS listener should be configured in Vault.
- The Transformer optimizes encryption requests to HashiCorp Vault in batches using batch_input, which improves the encryption performance significantly.
- HashiCorp Vault Enterprise can be horizontally scaled by adding more nodes, allowing for scaling of encryption/decryption operations.
- Confluent Cloud API keys should be configured to provide least privilege access to resources such as topics. Please see Confluent Cloud API best practices for more details.
- Confluent Cloud has a number of networking options including different private networking options.
Additional resources
HashiCorp Vault Enterprise and Confluent Cloud can work together to address various data protection requirements. This use case is not limited to just logs, but any data that is managed within Kafka/Confluent Cloud. Vault Enterprise can be deployed across any cloud and on premises, allowing it to stay near your data, minimizing latency and improving performance.
To learn more about Confluent Cloud and HashiCorp Vault, here are a few useful resources:
- Vault Transit Secret Engine
- Vault Transform Secret Engine
- Vault and Kubernetes
- Confluent Cloud Getting Started
If you’d like to get started with a free trial of Confluent Cloud, use the code CL60BLOG to get an additional $60 of free usage.*
Avez-vous aimé cet article de blog ? Partagez-le !
Abonnez-vous au blog Confluent


Customer Intelligence Hub: A Single Pane of Glass for Customer Insight and Action
Customer Intelligence Hub unifies customer signals into a real-time, AI-powered view that helps GTM teams prioritize risk, identify opportunity, and act faster with contextual insights.