Apache Kafka®️ 비용 절감 방법 및 최적의 비용 설계 안내 웨비나 | 자세히 알아보려면 지금 등록하세요
Deploying Self-Managed Connectors on EKS Fargate
The choice of how to get your data in and out of your Apache Kafka® clusters is one that merits thoughtful consideration. On one hand, you can choose to develop your own connectors using the Kafka Connect framework. There are use cases to develop a proprietary or purpose-built connector, however, this isn’t often recommended due to the lack of support. On top of that, it takes up to six months on average for an engineering team to develop one connector (and this assumes you really know your stuff).
On the other hand, you can leverage existing open source connectors already built by the community. In this scenario, you avoid months of development, however, it comes with a bit of a risk since open source connectors are unsupported. What would happen if something breaks? The choice between the two options is what motivated Confluent to offer an extensive portfolio of pre-built connectors, enabling you to modernize your entire data architecture even faster with enterprise-grade security, reliability, compatibility, and support.
This blog post explores a low operational overhead pattern to host Kafka Connect and Confluent connectors using AWS EKS Fargate and Conflent for Kubernetes along with Confluent Cloud.
Fully managed connectors vs. self-managed connectors
Confluent offers two types of connectors: fully managed and self-managed.
Fully managed connectors, available through Confluent Cloud, provide you with a “set it and forget it” experience. With a simple UI-based configuration, elastic scaling, and no infrastructure to manage, fully managed connectors make moving data in and out of Kafka an effortless task, giving you more time to focus on app development. For a full list of the available fully managed connectors, please visit Confluent Cloud documentation.
Self-managed connectors are used to get data in and out of your Kafka clusters if: you are using Confluent Platform, the connector you want to use is not yet offered in the full managed portfolio, your architecture requires flexible connectivity when using VPC peered/PrivateLink clusters, or when using Confluent Cloud with on-premises resources. These types of connectors offer the same degree of security and support as fully managed connectors; however, they require customers to actively monitor capacity and to automate scaling activities.
This post explores leveraging AWS to further abstract the operational burden of a self-managed connector when using Confluent Cloud to create a serverless experience.
A proposition: run your self-managed connector on EKS Fargate
AWS Fargate is a technology that provides on-demand, right-sized compute capacity for containers. With AWS Fargate, you don’t have to provision, configure, or scale groups of virtual machines on your own to run containers. You also don’t need to choose server types, decide when to scale your node groups, or optimize cluster packing.
In short, EKS Fargate allows you to run a self-managed connector in a serverless fashion.
To demonstrate the power of a self-managed connector on AWS’ serverless Kubernetes offering, we will walk through the following setup:
- Deploy Kafka Connect on an EKS Fargate cluster.
- Use Kafka Connect to specify that the S3 source connector should be loaded at runtime.
- Upload a test JSON file to be read by the S3 source connector and written to a topic in a Confluent Cloud cluster.
Most of the setup uses Confluent for Kubernetes (CFK), a cloud-native control plane for deploying and managing Confluent in your private cloud environment. This bundle contains Helm charts, templates, and scripts which will simplify deployment down to a few lines of commands.
Prerequisites
Before getting started, this walk-through requires the following:
- Confluent Cloud account (You will receive a $400 credit when you sign up for the first time)
- AWS account
- A Confluent Cloud cluster setup with access keys and SR access keys
- AWS CLI installed
- Kubectl installed
- Helm installed
- Eksctl installed
Create IAM execution role
According to AWS documentation, “The Amazon EKS pod execution role is required to run pods on AWS Fargate infrastructure. When your cluster creates pods on AWS Fargate infrastructure, the components running on the Fargate infrastructure need to make calls to AWS APIs on your behalf to do things like pull container images from Amazon ECR or route logs to other AWS services. The Amazon EKS pod execution role provides the IAM permissions to do this.” You will use this same role to grant the EKS pod permissions to your S3 bucket.
Navigate to IAM and create a new role.
Select EKS and scroll down further to select EKS – Fargate pod.
You will notice the “AmazonEKSFargatePodExecutionRolePolicy” is already attached and no other policy (at this time) can be attached. AWS normally allows you to attach multiple policies to a role during creation, but in this case, AWS does not allow for additional policies to be attached. However, you will be able to attach additional policies later in this process. For now, simply click through to the Review page where you will provide the role name and click Create Role.
After the role creation, you can now add more policies by searching for your newly created role and attaching policies. Since you will need access to read data from S3 and put it into your Confluent Cloud cluster, you need to add the AmazonS3ReadOnlyAccess policy to your EKS Fargate Pod role.
Note the name of this role so you can reference it during your cluster creation later.
Set up the EKS cluster
Save the YAML file in your local machine. This config file will be passed into the following command to specify EKS cluster settings on creation.
apiVersion: eksctl.io/v1alpha5 kind: ClusterConfigmetadata: name: connector-fargate region: <YOUR_AWS_REGION>
iam: withOIDC: true serviceAccounts:
- metadata: name: s3-reader namespace: confluent attachRoleARN: <role_you_created_for_EKS_Fargate>
fargateProfiles:
- name: fp-default
selectors:
- namespace: confluent
- namespace: kube-system
iam: creates a service account role with which the pod can interact with other AWS services. Notice the attached role is the role you created in the previous step.
fargateProfiles\: assigns what resources are deployed on to Fargate. In this case, all pods within the Confluent and kube-system namespaces are deployed to Fargate.
For more information, view the eksctl documentation.
Using the YAML file above and the following command, you will create an EKS cluster on Fargate (this will take a few minutes):
eksctl create cluster -f fargate.yaml
After the cluster has been created, configure kubectl to point to your cluster.
aws eks update-kubeconfig --region --name connector-fargate
Ensure that kubectl is using the correct connector.
kubectl config use-context connector-fargate
Set confluent\ as the default namespace to make commands easier. Alternatively, you can add -n confluent to all subsequent commands.
kubectl config set-context --current --namespace=confluent
Deploy operator pod
With kubectl now set to communicate with your EKS Fargate cluster, you can begin to configure the cluster. You will deploy an operator pod using the following Helm repo that contains Confluent for Kubernetes (CFK). The operator pod will be leveraged later to deploy the connector pod.
helm repo add confluentinc https://packages.confluent.io/helm
Install the operator from the newly added repo.
helm upgrade --install operator confluentinc/confluent-for-kubernetes -n confluent
Tip
You can track your pod deployment with the combined use of the following commands:
kubectl get events --sort-by='.metadata.creationTimestamp' kubectl get podskubectl logs -f <your_pod_name>
kubectl describe pod <your_pod_name>
Set up secrets
Create a new file named ccloud-credentials.txt.
username=<your_cluster_key>
password=<your_cluster_secret>
Create another new file named ccloud-sr-credentials.txt.
username=<your_cluster_schema_registry_key>
password=<your_cluster_schema_registry_key>
Referencing these new text files, you will create Kubernetes secrets that will allow your connector to talk to Confluent Cloud.
kubectl create secret generic ccloud-credentials --from-file=plain.txt=ccloud-credentials.txt
kubectl create secret generic ccloud-sr-credentials --from-file=basic.txt=ccloud-sr-credentials.txt
Deploy the connector pod
With the EKS cluster created, the operator pod deployed, and the necessary secrets generated, you are now ready to deploy the connector pod.
Create a new file named “s3.yaml” and paste the code below into it. This will be used to deploy an S3 connector pod. Be sure you update the Schema Registry URL and the bootstrap endpoint to match your cluster’s. Also, notice the references to the cluster secret and the Schema Registry secret you created earlier.
apiVersion: platform.confluent.io/v1beta1
kind: Connect
metadata:
 name: s3
spec:
 replicas: 1
 image:
   application: confluentinc/cp-server-connect:7.0.1
   init: confluentinc/confluent-init-container:2.2.0-1
 podTemplate:
   resources:
     requests:
       cpu: 1000m
       memory: 512Mi
   probe:
     liveness:
       periodSeconds: 10
       failureThreshold: 5
       timeoutSeconds: 30
       initialDelaySeconds: 100
     readiness:
       periodSeconds: 10
       failureThreshold: 5
       timeoutSeconds: 30
       initialDelaySeconds: 100
   podSecurityContext:
     fsGroup: 1000
     runAsUser: 1000
     runAsNonRoot: true
 build:
   type: onDemand
   onDemand:
     plugins:
       locationType: confluentHub
       confluentHub:
         - name: kafka-connect-s3-source
           owner: confluentinc
           version: 2.0.1
 dependencies:
   kafka:
     bootstrapEndpoint: <your_bootstrap_endpoint>
     authentication:
       type: plain
       jaasConfig:
         secretRef: ccloud-credentials
     tls:
       enabled: true
       ignoreTrustStoreConfig: true
   schemaRegistry:
     url: <your_schema_registry_url>
     authentication:
       type: basic
       basic:
         secretRef: ccloud-sr-credentials
Deploy the connector with the following:
kubectl apply -f ./s3.yaml
Once the pod is ready, open up a port to communicate with the pod via http.
kubectl port-forward s3-0 8083
Configure the connector
The final setup step is to configure the connector. In a separate terminal, issue the following command. This will set the S3 source connector to generic mode which simply means it can read any supported file type, as opposed to just data written by an S3 sink connector. For more information regarding available fields for configuration, visit the S3 connector documentation.
curl -X PUT \
-H "Content-Type: application/json" \
--data '{
    "connector.class" : "io.confluent.connect.s3.source.S3SourceConnector",
    "name" : "s3",
    "tasks.max" : "1",
    "value.converter" : "org.apache.kafka.connect.json.JsonConverter",
    "mode" : "GENERIC",
    "topics.dir" : "quickstart", <-- Folder within S3 bucket.
    "topic.regex.list" : "quick-start-topic2:.*", <-- “Destination topic”:”regular_expression”. In this example, the * means to read all files”
    "format.class" : "io.confluent.connect.s3.format.json.JsonFormat",
    "s3.bucket.name" :<your_bucket_name>,
    "value.converter.schemas.enable" : "false",
    "s3.region" : "us-east-2",
    "aws.access.key.id" : <your_access_key_id>,
    "aws.secret.access.key": <your_access_key_id>
}' \
http://localhost:8083/connectors/s3/config | jq .
Note
aws.access.key.id: It is recommended to rely on the service account role to provide access to services such as S3. This code is just showing another method of providing such access, provided you have appropriately scoped keys to have the least privilege possible.
s3.region: While the S3 service is a global service, you still must specify where the S3 bucket is created. Visit the AWS CLI docmentation for S3 for more information.
If everything worked out fine, you should be able to issue the following command and receive a similar response:
curl http://localhost:8083/connectors/s3/status | jq
{
  "name": "s3",
  "connector": {
    "state": "RUNNING",
    "worker_id": "s3-0.s3.confluent.svc.cluster.local:8083"
  },
  "tasks": [
    {
      "id": 0,
      "state": "RUNNING",
      "worker_id": "s3-0.s3.confluent.svc.cluster.local:8083"
    }
  ],
  "type": "source"
}
Upload a test file
Navigate to the S3 bucket from which your S3 source connector is reading and upload a valid JSON file. A sample is provided below.
{
  “f3”: “3”
}
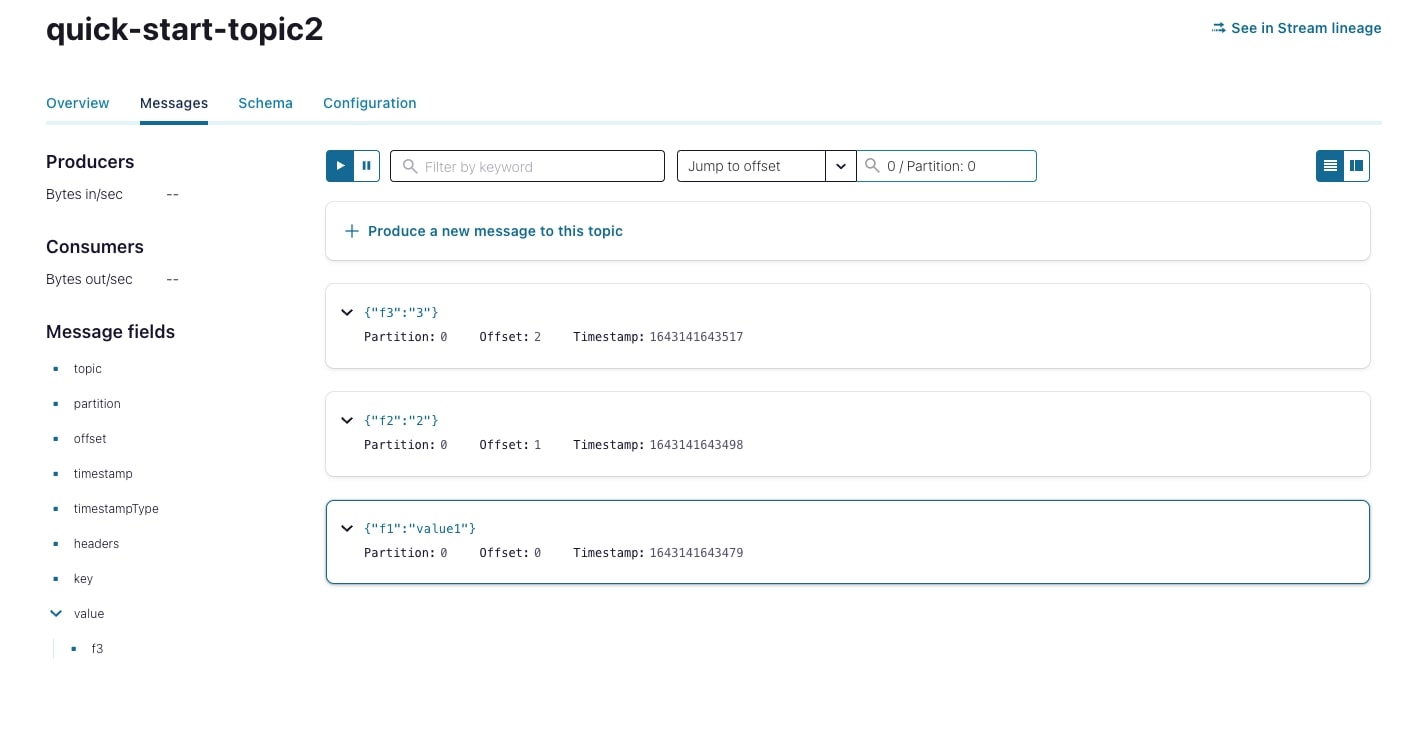
View the test file
Navigate your cluster in confluent.cloud and click on the Topics section. Since the S3 connector will not auto-create a topic, you must create the topic specified in the configuration file you provided the connector (see Configure the connector section above). In the provided example, we set the destination topic to quick-start-topic2. Once the topic is created, you will see the data flow into the topic.
Conclusion
Combining EKS Fargate’s elasticity with Confluent’s pre-built connectors gives you flexibility and minimal operational overhead when choosing to self-host connectors along with your Confluent Cloud cluster. Since similar steps can be used to also implement a sink connector, this means you now have a scalable method that not only moves your data into your Kafka cluster but also moves your data out of your cluster. Give all of this a try by signing up for Confluent Cloud and you will receive $400 of free usage to further explore how Confluent can help you get your data in motion.
이 블로그 게시물이 마음에 드셨나요? 지금 공유해 주세요.
Confluent 블로그 구독


Customer Intelligence Hub: A Single Pane of Glass for Customer Insight and Action
Customer Intelligence Hub unifies customer signals into a real-time, AI-powered view that helps GTM teams prioritize risk, identify opportunity, and act faster with contextual insights.