Nouveau dans Confluent Cloud : rendre les données et les pipelines accessibles pour un streaming prêt pour l’IA | En savoir plus
Apache Kafka at Home: A Houseplant Alerting System with ksqlDB
Back in 2020, so many folks picked up pandemic hobbies—things they could throw themselves into at full force while they were restricted by lockdowns. I chose houseplants.
Prior to the pandemic, I already had what amounted to a small nursery in my house. Honestly, even then, it was a lot of work to take care of every plant each day. Seeing which of them needed to be watered, making sure they all got the right amount of sunlight, talking to them… #justHouseplantThings.

Having more time at home meant that I could invest more in my plants. And I did—my time, effort, and money. There are a few dozen houseplants in my home; they all have names, personalities (at least I think so), and some even have googly eyes. This, of course, was fine while I was at home all day, but, as life slowly went back to normal, I found myself in a difficult position: I no longer had all the time in the world to keep track of my plants. I needed a solution. There had to be a better way to monitor my plants than to check them manually each day.
Enter Apache Kafka®. Well, really, enter my desire to pick up yet another hobby: hardware projects.
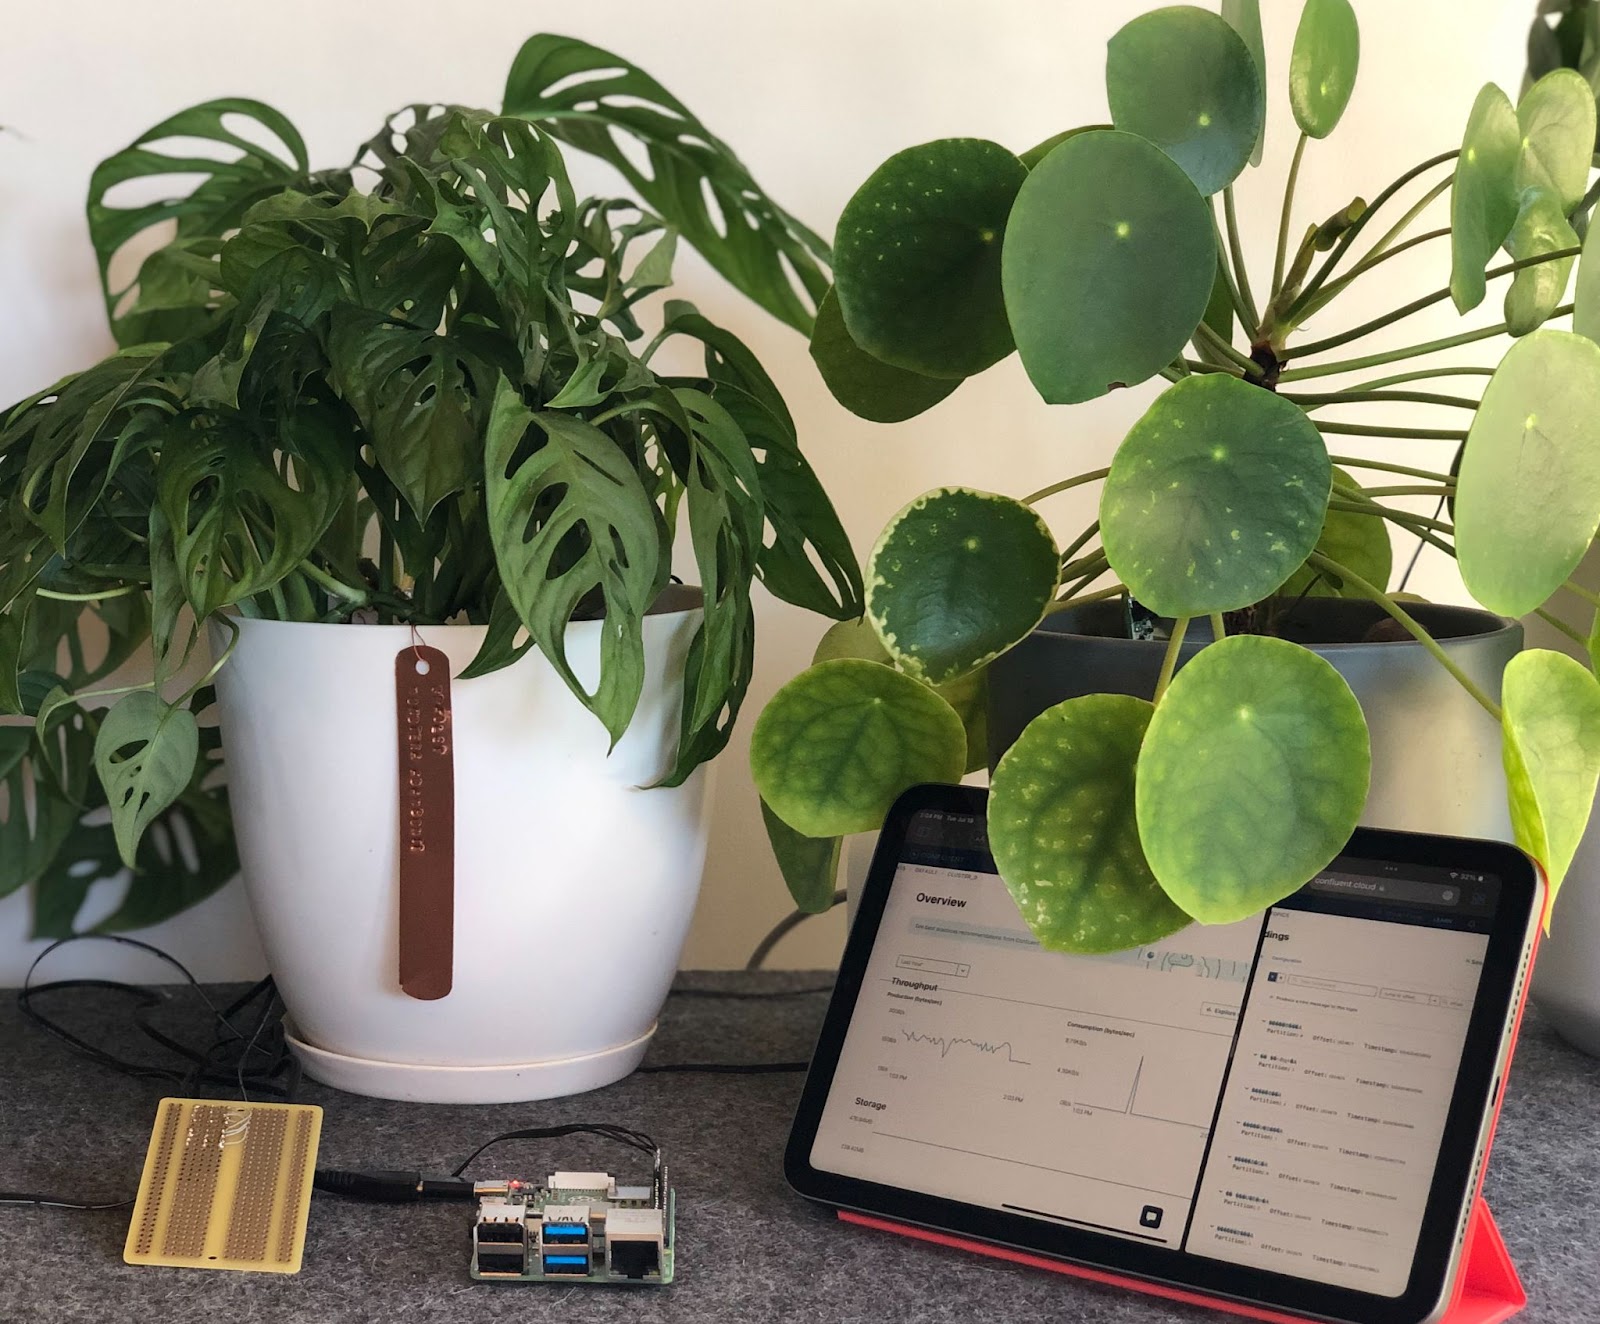
I’ve always wanted an excuse to build out a project using a Raspberry Pi, and I knew that this was my chance. I would build a system that could monitor my plants to alert me only when they needed attention and not a moment later. And I would use Kafka as the backbone.
This actually turned out to be a very useful project. It solved a very real problem that I had and gave me a chance to combine my houseplant obsession with my itching desire to finally use Kafka at home. All of this was wrapped up neatly in an easy and accessible hardware project that anyone could implement on their own.
If you’re like me and you have a houseplant problem that can only be solved by automating your home, or even if you’re not at all like me but you still want a cool project to delve into, this blog post is for you.
Let’s roll up our sleeves and get our hands dirty!
Planting the seeds
First, I sat down to figure out what I wanted to achieve from this project. For the first phase of the system, being able to monitor my plants’ moisture levels and alert on them would be very helpful—after all, the most time-consuming part of caring for my plants was deciding which needed to be cared for. If this system could handle that decision-making process, I’d save a ton of time!
At a high level, this is the basic system I envisioned:
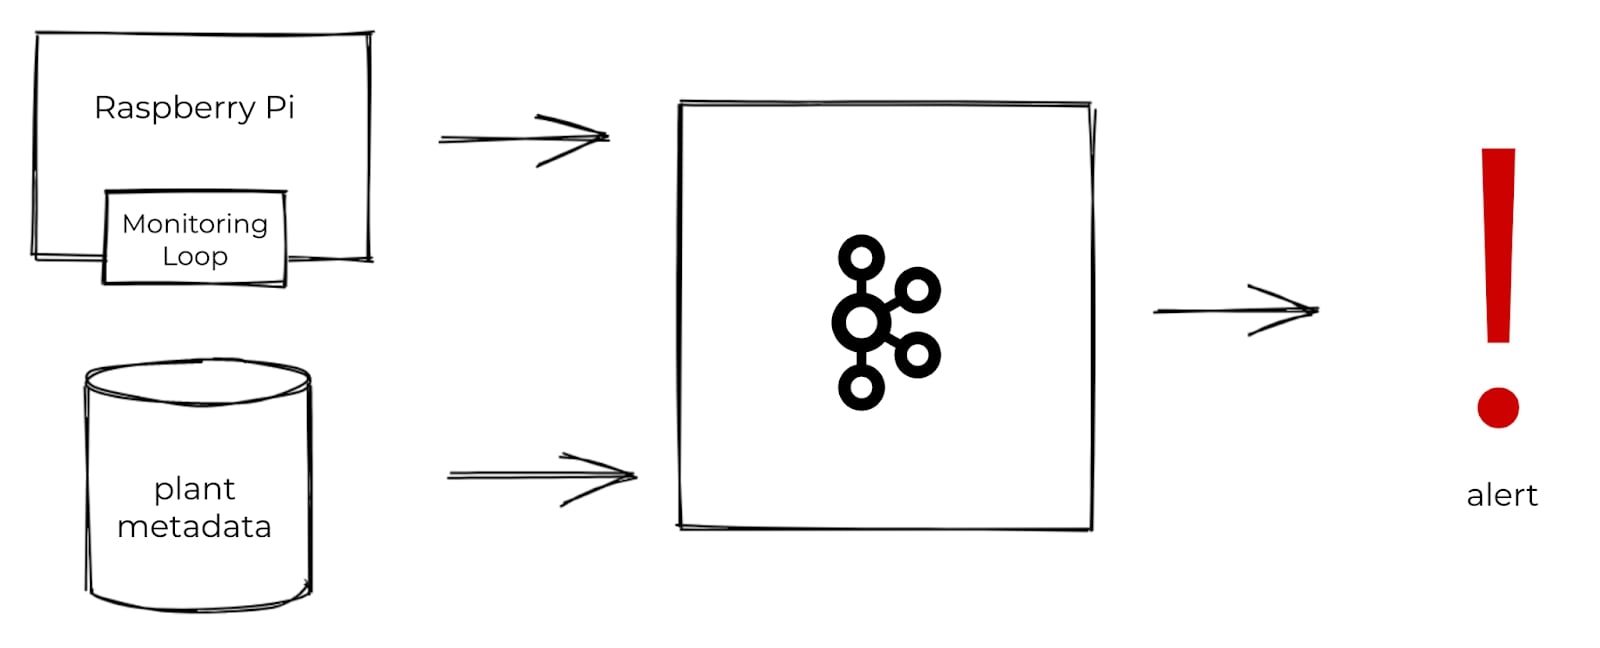
I’d place some moisture sensors in the soil and hook these up to a Raspberry Pi; I could then regularly take moisture readings and toss those into Kafka. In addition to moisture readings, I also needed some metadata for each plant in order to decide which plants need to be watered. I’d produce the metadata into Kafka, as well. With both datasets in Kafka, I could then use stream processing to combine and enrich the datasets with one another and compute which plants need to be watered. From there, I could trigger an alert.
With a set of basic requirements established, I dove into the hardware and assembly phase.
Taking stalk of things
Like many self-respecting engineers, I kicked off the hardware stage with a ton of Googling. I knew that all of the pieces existed to make this project a success, but, as this was my first time working with physical components, I wanted to make sure I knew exactly what I was getting myself into.
The main goal of the monitoring system was to tell me when plants had to be watered, so obviously, I needed some sort of moisture sensor. I learned that soil moisture sensors come in a variety of shapes and sizes, are available as analog or digital components, and differ in the manner in which they measure moisture. In the end, I settled on these I2C capacitive sensors. They seemed to be a great option for someone just starting out with hardware: as capacitive sensors, they’d last longer than resistive-based ones, they required no analog-to-digital conversion, and they were more or less plug-and-play. Plus, they offered temperature measurements for free.
Deciding on sensors was the biggest part of my physical setup. All that remained to be done in the way of hardware was to get a hold of a Raspberry Pi and a few pieces of equipment. Then I was free to start building the system.
I used the following components:
- Raspberry Pi 4 Model B
- Half-sized Breadboard PCB
- Capacitive Soil Moisture Sensors
- JST Pitch Connector Kit
- 4 strand ribbon wire
- Crimpers, wire strippers, solder, soldering iron (all of which I conveniently found in my garage)

From the soil up…
Although I wanted this project to be easy and beginner-friendly, I also wanted to challenge myself to do as much of the wiring and soldering as possible. To honor those who came before me, I embarked on this assembly journey with some wires, a crimper, and a dream. The first step was to prepare enough ribbon wire to connect four sensors to the breadboard and also to connect the breadboard to my Raspberry Pi. To allow for spacing between components in the setup, I prepped 24” lengths. Each wire had to be stripped, crimped, and plugged into either a JST connector (for the wires connecting the sensors to the breadboard) or a female socket (to connect to the Raspberry Pi itself). But, of course, if you’re looking to save time, effort, and tears, I’d recommend that you not crimp your own wires and instead purchase prepared wires ahead of time.
Given the number of houseplants I own, four may appear to be an arbitrarily low number of sensors to use in my monitoring set up. As stated earlier, since these sensors are I2C devices, any information they communicate will be sent using a unique address. That said, the soil moisture sensors that I purchased are all shipped with the same default address, which is problematic for setups like this where you want to use multiple of the same device.
There are two main ways to get around this. The first option depends on the device itself. My particular sensor had two I2C address jumpers on the rear, and soldering any combination of these meant that I could change the I2C address to range from 0x36 and 0x39. In total, I could have four unique addresses, hence the four sensors I use in the final setup. If the devices lack a physical means for changing addresses, the second option is to reroute information and set up proxy addresses using a multiplex. Given that I’m new to hardware, I felt that was outside of the scope of this particular project.
Having prepped the wires for connecting the sensors to the Raspberry Pi, I confirmed that everything was set up correctly by using a test Python script to collect readings from a single sensor. For added reassurance, I tested the remaining three sensors in the same way. And it was during this stage that I learned firsthand how crossed wires affect electronics components… and just how difficult these issues are to debug.
With the wiring finally in working order, I could connect all of the sensors to the Raspberry Pi. All sensors needed to be connected to the same pins (GND, 3V3, SDA, and SCL) on the Raspberry Pi. Every sensor has a unique I2C address, though, so, although they’re all communicating over the same wires, I could still get data from specific sensors using their address. All I had to do was wire each sensor to the breadboard and then connect the breadboard to the Raspberry Pi. To achieve this, I used a bit of leftover wire and connected columns of the breadboard using solder. I then soldered JST connectors directly to the breadboard so that I could easily plug in the sensors.
After connecting the breadboard to the Raspberry Pi, inserting the sensors into four plants, and confirming via test script that I could read data from all of the sensors, I could begin work on producing the data into Kafka.
Real-thyme data
With the Raspberry Pi setup and all of the moisture sensors working as expected, it was time to bring Kafka into the mix to begin streaming some data.
As you might expect, I needed a Kafka cluster before I could write any data into Kafka. Wanting to make the software component of this project as lightweight and easy to set up as possible, I opted to use Confluent Cloud as my Kafka provider. Doing so meant that I didn’t need to set up or manage any infrastructure and that my Kafka cluster was ready within minutes of setting it up.
It’s also worth noting why I chose to use Kafka for this project, especially considering that MQTT is more or less the de facto standard for streaming IoT data from sensors. Both Kafka and MQTT are built for pub/sub style of messaging, so they are similar in that regard. But if you plan to build out a data streaming project such as this one, MQTT will fall short. You need another technology like Kafka to handle stream processing, data persistence, and any downstream integrations. The bottom line is that MQTT and Kafka work really well together. In addition to Kafka, I definitely could have used MQTT for the IoT component of my project. Instead, I decided to work directly with the Python producer on the Raspberry Pi. That said, if you want to use MQTT and Kafka for any IoT-inspired project, rest assured that you can still get your MQTT data into Kafka using the MQTT Kafka Source Connector.
Weeding through data
Before I put any data into motion, I took a step back to decide how I wanted to structure the messages on my Kafka topic. Especially for hack projects like this, it’s easy to start firing data off into a Kafka topic without a worry in the world—but it’s important to know how you’ll structure your data across topics, what key you’ll use, and the data types in fields.
So let’s start with the topics. How will those look? The sensors had the ability to capture moisture and temperature—should these readings be written to a single topic or multiple? Since both the moisture and temperature readings were being captured from a plant’s sensor at the same time, I stored them together in the same Kafka message. Together, those two pieces of information comprised a plant reading for the purposes of this project. It would all go in the same readings topic.
In addition to sensor data, I needed a topic to store the houseplant metadata including the type of plant that the sensor is monitoring and its temperature and moisture boundaries. This information would be used during the data processing stage to determine when a reading ought to trigger an alert.
I created two topics: houseplants-readings and houseplants-metadata. How many partitions should I use? For both topics, I decided to use the default number of partitions in Confluent Cloud which, at the time of writing, is six. Was that the right number? Well, yes and no. In this case, due to the low volume of data that I’m dealing with, six partitions per topic could be overkill, but in the event that I expand this project to more plants later on, it’ll be good to have six partitions.
Besides partitions, another important configuration parameter to make note of is the log compaction that I enabled on the houseplants topic. Unlike the `readings` stream of events, the `metadata` topic holds reference data—or indeed, metadata. By holding it in a compacted topic you ensure that the data will never age out, and you’ll always have access to the last known value for a given key (the key, if you remember, being a unique identifier for each houseplant).
Based on the above, I wrote up two Avro schemas for both the readings and the houseplant metadata (shortened here for readability).
Readings schema
{
  "doc": "Houseplant reading taken from sensors.",
  "fields": [
    {"name": "plant_id", "type": "int"},
  {"name": "timestamp", "logicalType": "timestamp-millis", "type": "long"},
    {"name": "moisture", "type": "float"},
    {"name": "temperature", "type": "float"}
  ],
  "name": "reading",
  "namespace": "com.houseplants",
  "type": "record"
}
Houseplant metadata schema
{
  "doc": "Houseplant metadata.",
  "fields": [
    {"name": "plant_id", "type": "int"},
    {"name": "scientific_name", "type": "string"},
    {"name": "common_name", "type": "string"},
    {"name": "given_name", "type": "string"},
    {"name": "temperature_threshold_low", "type": "float"},
    {"name": "temperature_threshold_high", "type": "float"},
    {"name": "moisture_threshold_low", "type": "float"},
    {"name": "moisture_threshold_high", "type": "float"}
  ],
  "name": "houseplant",
  "namespace": "com.houseplants",
  "type": "record"
}
If you’ve used Kafka before, you know that having topics and knowing what your message values look like is just the first step. It’s just as important to know what the key will be for each message. For both the readings and the metadata, I asked myself what an instance of each of these datasets would be, as it’s the entity instance that should form the basis of a key in Kafka. Since readings are being taken per plant and metadata is assigned per plant, an entity instance of both datasets was an individual plant. I decided that the logical key of both topics would be based on the plant. I would assign a numerical ID to each plant and have that number be the key of both the readings messages and the metadata messages.
So with the slightly smug sense of satisfaction that comes from knowing I was going about this the right way, I could turn my attention to streaming the data from my sensors into the Kafka topics.
Cultivating messages
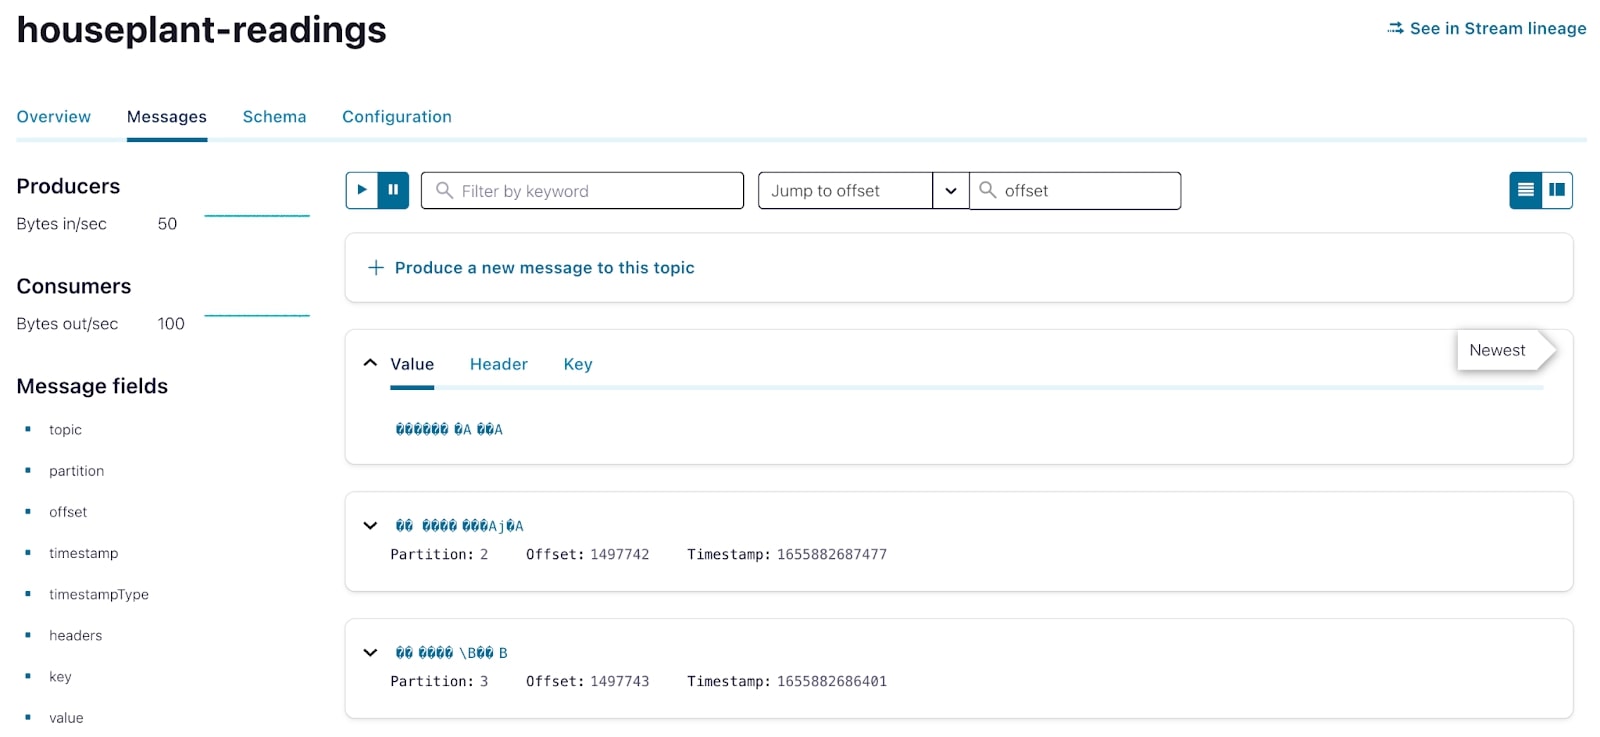
I wanted to start sending the data from my sensors to Kafka. Step one was to install the confluent-kafka Python library on the Raspberry Pi. From there, I wrote a Python script to capture the readings from my sensors and produce the data into Kafka.
Would you believe it if I told you it was that easy? With just a couple lines of code, my sensor data was being written to and persisted in a Kafka topic for use in downstream analytics. I still get a little giddy just thinking about it.
With sensor readings in Kafka, I now needed the houseplant metadata in order to conduct any sort of downstream analysis. In typical data pipelines, this sort of data would reside in a relational database or some other data store and would be ingested using Kafka Connect and the many connectors available for it.
Rather than spin up an external database of my own, I decided to use Kafka as the persistent storage layer for my metadata. With metadata for just a handful of plants, I manually wrote the data straight to Kafka using another Python script.
The root of the problem
My data is in Kafka; now it’s time to really get my hands dirty. But first, let’s revisit what I wanted to achieve with this project. The overall goal is to send an alert when my plants have low moisture readings that indicate that they need to be watered. I can use stream processing to enrich the readings data with the metadata and then compute a new stream of data to drive my alerts.
I opted to use ksqlDB for the data processing stage of this pipeline so that I could process the data with minimal coding. In conjunction with Confluent Cloud, ksqlDB is easy to set up and use—you simply provision an application context and write some simple SQL to start loading and processing your data.
Defining the input data
Before I could start processing the data, I needed to declare my datasets within the ksqlDB application so that it would be available to work with. To do so, I first needed to decide which of two first class ksqlDB objects my data should be represented as—TABLE or STREAM—and then use a CREATE statement to point to the existing Kafka topics.
The houseplant readings data is represented in ksqlDB as a STREAM—basically exactly the same as a Kafka topic (an append-only series of immutable events) but also with a schema. Rather conveniently I had already designed and declared the schema previously, and ksqlDB can fetch it directly from the Schema Registry:
CREATE STREAM houseplant_readings (
    id STRING KEY
) WITH (
    kafka_topic='houseplant-readings',
    format='AVRO',
    partitions=4
);
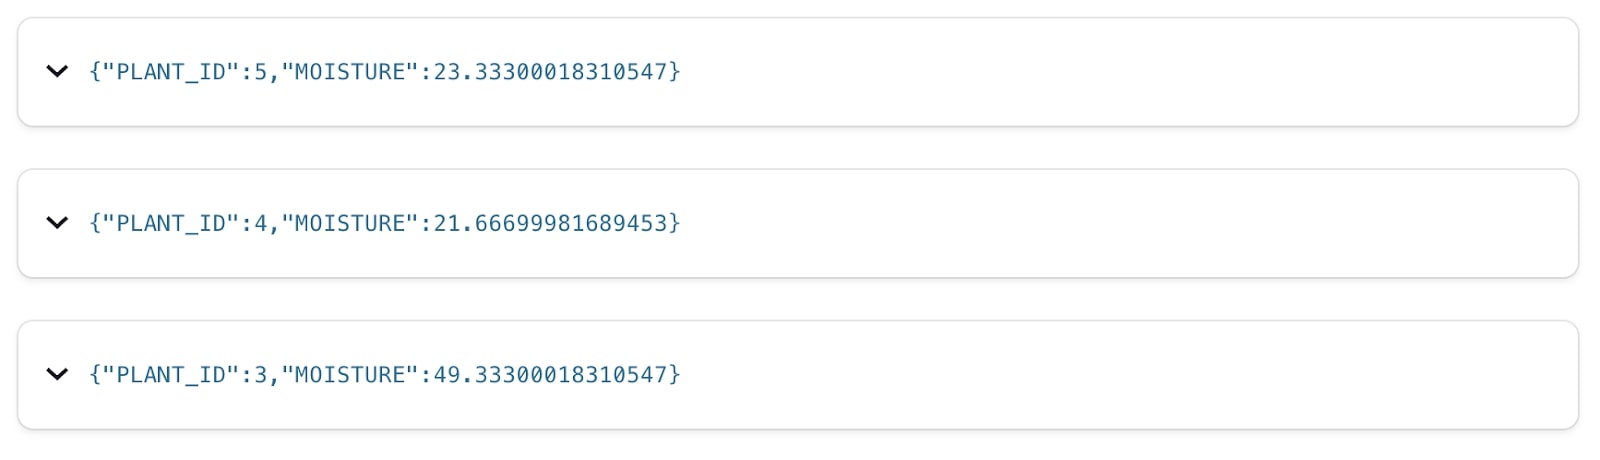
With the stream created over the Kafka topic, we can use standard SQL to query and filter it to explore the data using a simple statement like this:
SELECT
    plant_id,
    moisture
FROM HOUSEPLANT_READINGS
EMIT CHANGES;
The houseplant metadata needs just a little bit more consideration. While it is stored as a Kafka topic (just like the readings data), it’s logically a different type of data—its state. For each plant, it has a name, it has a location, and so on. We store it in a compacted Kafka topic, and represent it in ksqlDB as a TABLE. A table—just like in a regular RDBMS—tells us the current state for a given key. Note that while ksqlDB picks up the schema itself here from the Schema Registry we do need to explicitly declare which field represents the primary key of the table.
CREATE TABLE houseplant_metadata (
    id INTEGER PRIMARY KEY
) WITH (
    kafka_topic='houseplant-metadata',
    format='AVRO',
    partitions=4
);
Enrich the data
With both datasets registered with my ksqlDB application, the next step is to enrich the houseplant_readings with the metadata contained in the houseplants table. This creates a new stream (underpinned by a Kafka topic) with both the reading and the metadata for the associated plant:
The enrichment query would look something like the following:
CREATE STREAM houseplant_readings_enriched WITH (
    kafka_topic='houseplant-readings-enriched',
    format='AVRO',
    partitions=4
) AS
SELECT
    r.id               AS plant_id,
    r.timestamp        AS ts,
    r.moisture         AS moisture,
    r.temperature      AS temperature,
    H.scientific_name  AS scientific_name,
    h.common_name      AS common_name,
    h.given_name       AS given_name,
    h.temperature_low  AS temperature_low,
    h.temperature_high AS temperature_high,
    h.moisture_low     AS moisture_low,
    h.moisture_high    AS moisture_high
FROM houseplant_readings AS r
LEFT OUTER JOIN houseplants AS h
ON houseplant_readings.id = houseplants.id
PARTITION BY r.id
EMIT CHANGES;
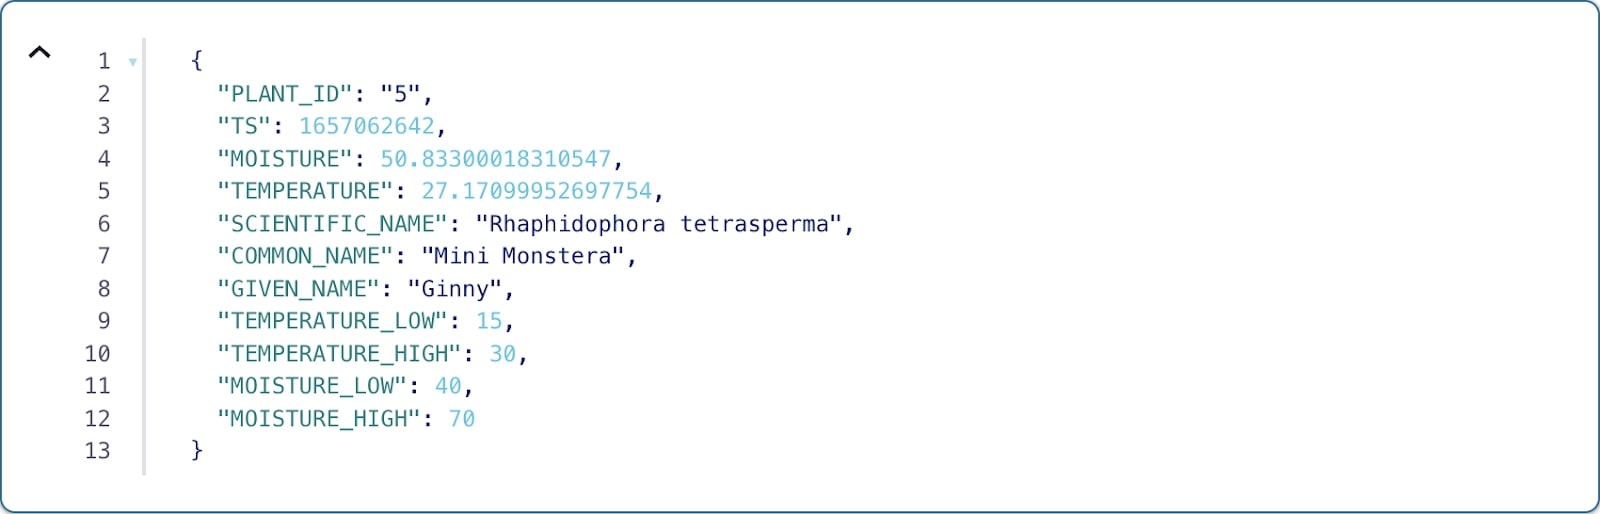
And the output of that query would be something like this:
Creating alerts on a stream of events
Thinking back to the beginning of this article, you’ll remember that the whole point of all this was to tell me when a plant might need to be watered. We’ve got a stream of moisture (and temperature) readings, and we’ve got a table that tells us the threshold at which each plant’s moisture level may indicate that it needs watering. But how do I determine when to send a low moisture alert? And how often do I send them?
In trying to answer those questions, I noticed a few things about my sensors and the data they were generating. First of all, I’m capturing data at five second intervals. If I were to send an alert for every low moisture reading, I’d flood my phone with alerts—that’s no good. I’d prefer to receive an alert at most once every hour. The second thing I realized in looking at my data was that the sensors weren’t perfect—I was regularly seeing false low or false high readings, although the general trend over time was that a plant’s moisture level would decrease.
Combining those two observations, I decided that within a given 1-hour period, it would probably be good enough to send an alert if I saw 20 minutes’ worth of low moisture readings. At one reading every 5 seconds, that’s 720 readings an hour and… doing a bit of math here, that means I’d need to see 240 low readings in a 1-hour period before sending an alert.
So what we’ll do now is create a new stream that will contain at most one event per plant per 1-hour period. I achieved this by writing the following query:
CREATE TABLE houseplant_low_readings WITH (
    kafka_topic='houseplant-low-readings',
    format='AVRO',
    partitions=4
) AS SELECT
    plant_id,
    given_name,
    common_name,
    scientific_name,
    CONCAT(given_name, ' the ', common_name, ' (', scientific_name, ') is looking pretty dry...') AS message,
    COUNT(*) AS low_reading_count
FROM houseplant_readings_enriched
WINDOW TUMBLING (SIZE 1 HOURS, GRACE PERIOD 30 MINUTES)
WHERE moisture < moisture_low GROUP BY plant_id, given_name, common_name, scientific_name HAVING COUNT(*) > 240
EMIT FINAL;
First thing’s first, you’ll notice the windowed aggregation. This query operates over non-overlapping 1-hour windows, allowing me to aggregate data per plant ID within a given window. Pretty straightforward.
I’m specifically filtering for and counting the rows in the enriched readings stream where the moisture reading value is less than the low moisture threshold for that plant. If that count is at least 240, I’ll output a result that will form the basis of an alert.
But you may be wondering why the result of this query is in a table. Well, as we know, streams represent a more or less complete history of a data entity, whereas tables reflect the most up-to-date value for a given key. It’s important to remember that this query is actually a stateful streaming application under the covers. As messages flow through on the underlying enriched data stream, if that particular message meets the filter requirement, we increment the count of low readings for that plant ID within the 1-hour window and keep track of it within a state. What I really care about in this query, however, is the final result of the aggregation—whether the count of low readings is above 240 for a given key. I want a table.
You’ll notice that the last line of that statement is `EMIT FINAL`. This phrase means that, rather than potentially outputting a result every time a new row flows through the streaming application, I’ll wait until the window has closed before a result is emitted.
At the time of writing, `EMIT FINAL` is not available in Confluent Cloud, but it will be available in the coming months.
The result of this query is that, for a given plant ID in a specific one-hour window, I’ll output at most one alerting message, just as I wanted.
Branching out
At this point, I had a Kafka topic populated by ksqlDB containing a message when a plant has an appropriately and consistently low moisture level. But how do I actually get this data out of Kafka? The most convenient thing for me would be to receive this information directly on my phone.
I wasn’t about to reinvent the wheel here, so I took advantage of this blog post that describes using a Telegram bot to read messages from a Kafka topic and send alerts to a phone. Following the process outlined by the blog, I created a Telegram bot and started a conversation with that bot on my phone, making note of that conversation’s unique ID along with the API key for my bot. With that information, I could use the Telegram chat API to send messages from my bot to my phone.
That’s well and good, but how do I get my alerts from Kafka to my Telegram bot? I could invoke message sending by writing a bespoke consumer that would consume the alerts from the Kafka topic and manually sending each message via the Telegram chat API. But that sounds like extra work. Instead, I decided to use the fully managed HTTP Sink Connector to do this same thing, but without writing any additional code of my own.
Within a few minutes, my Telegram Bot was ready for action, and I had a private chat open between myself and the bot. Using the chat ID, I could now use the fully managed HTTP Sink Connector on Confluent Cloud to send messages straight to my phone.
The full configuration looked like this:
{
  "name": "HttpSinkConnector_Houseplants_Telegram_Bot",
  "config": {
    "topics": "houseplant-low-readings",
    "input.data.format": "AVRO",
    "connector.class": "HttpSink",
    "name": "HttpSinkConnector_Houseplants_Telegram_Bot",
    "kafka.auth.mode": "KAFKA_API_KEY",
    "http.api.url": "https://api.telegram.org/**********/sendMessage",
    "request.method": "POST",
    "headers": "Content-Type: application/json",
    "request.body.format": "string",
    "batch.max.size": "1",
    "batch.prefix": "{\"chat_id\":\"********\",",
    "batch.suffix": "}",
    "regex.patterns": ".*MESSAGE=(.*),LOW_READING_COUNT=(.*)}.*",
    "regex.replacements": "\"text\":\"$1\"",
    "regex.separator": "~",
    "tasks.max": "1"
  }
}

A few days after launching the connector, I received a very useful message letting me know that my plant needed to be watered. Success!

Turning over a new leaf
It’s been quite a few months since I completed the initial phase of this project. In that time, I’m happy to report that all of the plants that I’m monitoring are happy and healthy! I no longer have to spend any additional time checking on them, and I can rely exclusively on the alerts generated by my streaming data pipeline. How cool is that?
If the process of building out this project intrigued you, I encourage you to get started on your own streaming data pipeline. Whether you’re a seasoned Kafka user who wants to challenge yourself to build and incorporate real-time pipelines in your own life, or someone who’s entirely new to Kafka, I’m here to tell you that these sorts of projects are for you.
- New to stream processing and Kafka? Check out Kafka Tutorials for quick and easy guides on how to get started or Confluent Developer for more resources on cloud-based Kafka.
- Looking to build something with your hands? Poke around Raspberry Pi resources to see what projects interest you.
- Intrigued by the thought of running Kafka entirely in the cloud? Hit the ground running on your next streaming data pipeline by using Confluent Cloud. As an added bonus, if you use promo code CL60BLOG, you’ll get $60; of additional free usage on your trial—more than enough to kick off your own plant monitoring system!
- Want to hear more about absurd yet practical streaming data pipelines? Follow me on Twitter where you’re sure to hear more!
Avez-vous aimé cet article de blog ? Partagez-le !
Abonnez-vous au blog Confluent


