Nouveau dans Confluent Cloud : rendre les données et les pipelines accessibles pour un streaming prêt pour l’IA | En savoir plus
Streaming Data from Apache Kafka into Azure Data Explorer with Kafka Connect
Near-real-time insights have become a de facto requirement for Azure use cases involving scalable log analytics, time series analytics, and IoT/telemetry analytics. Azure Data Explorer (also called Kusto) is the Azure service purpose built for exactly such use cases. It is a big data analytical database PaaS offering that can ingest event streams from Apache Kafka®, Azure Event Hubs, Azure IoT Hub, and more, allowing you to explore data and gather insights in near real time.
This blog post shows, by example, how to stream events from Apache Kafka on Confluent Cloud on Azure, into Azure Data Explorer, using the Kafka Connect Kusto Sink Connector.
Before we begin, a recap of Kafka Connect
Kafka Connect is an open source, distributed, scalable, and fault-tolerant integration service. It is plugin based to stream data from supported sources into Kafka and from Kafka into supported sinks with zero code and light configuration. If you were planning to write code to integrate with Kafka, it’s a great idea to first check if a Kafka Connect connector is available to do the work for you.
There are numerous reasons why you should use Kafka Connect instead of writing your own integration. The Kafka Connect framework handles interactions with Kafka for producing/consuming, scaling, pausing, resuming, restarting the service, dead letter queues for invalid messages, schemas, serialization/deserialization, overriding configuration, and more.
Connector plugins support reading from source systems in their native and most performant API, into Kafka (source connector), and writing from Kafka to sink systems (sink connector). Kafka Connect also supports per-record transformation through Single Message Transformations (SMTs), which are also plugin based. It is straightforward for anyone to develop a connector, and Confluent has a great guide to walk you through the process.
Kafka Connect is deployed separately from Kafka brokers and can be run over multiple nodes for fault tolerance and throughput. Confluent Cloud on Azure offers managed connectors as a service for select connectors. For the rest, you can use self-managed Kafka Connect clusters. Kafka Connect is just a JVM process and can be run on bare metal, Docker, Kubernetes, virtual machines, etc.
About the Kafka Connect Kusto Sink Connector
The Kafka Connect Kusto Sink Connector is a production-ready, open source (contributions welcome), and Confluent Gold verified integration used by multiple Azure customers in production. You can find full details of the features and roadmap in the GitHub repo, but of particular note from a recent release are:
- Configurable behavior on error, retries, dead letter queues, and upfront validation
- Full support for the Confluent Schema Registry for Avro and JSON, with Protobuf on the roadmap
- At-least-once delivery guarantees
Now, let’s try it out!
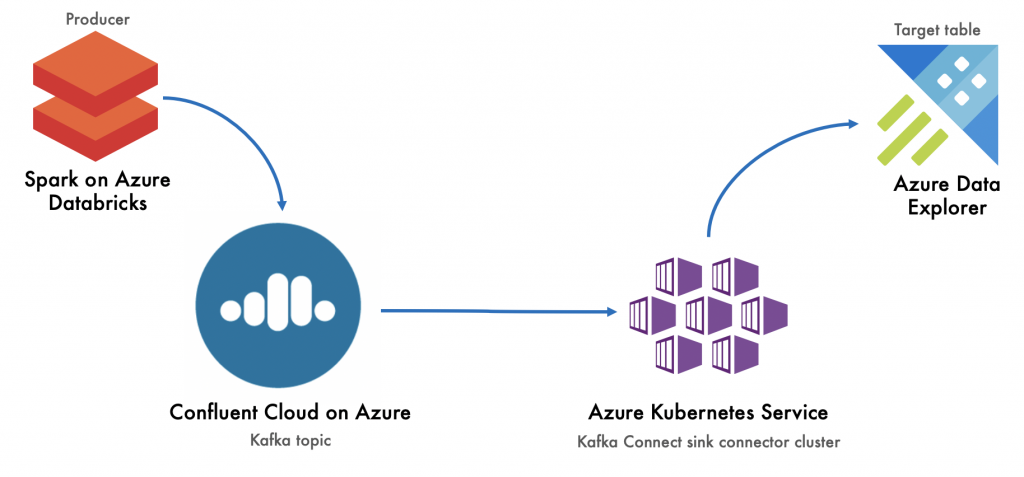
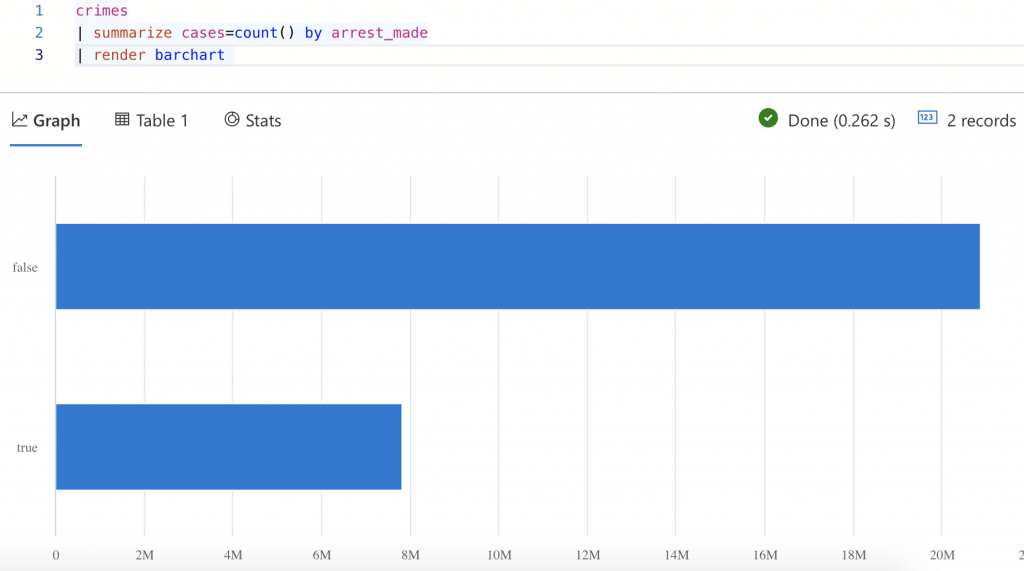
Here is an end-to-end, hands-on lab showcasing the connector in action. You can see an overview of the lab below. In our lab example, we’re going to stream the Chicago crimes public dataset to Kafka on Confluent Cloud on Azure using Spark on Azure Databricks. Then, we will use the Kusto connector to stream the data from Kafka to Azure Data Explorer.
Set up Confluent Cloud
Confluent Cloud on Azure is the fully managed, simplest, and easiest Kafka-based environment for provisioning, securing, and scaling on Azure. You will need a Confluent Cloud instance in your Azure subscription, a Kafka cluster, a Kafka topic, and Confluent Cloud API key and secret for client access/Connect/task access.
You can use the promo code CL60BLOG for an additional $60 of free Confluent Cloud usage.*
Once you’ve provisioned Confluent Cloud, you should install the Confluent CLI:
curl -L --http1.1 https://cnfl.io/ccloud-cli | sh -s -- -b /usr/local/bin
And then log in to Confluent Cloud:
ccloud login
To use the CLI later on, we’ll need the ID of our Kafka cluster:
ccloud kafka cluster list
Here is a sample cluster ID listing from the command above:
ccloud kafka cluster list
      Id      |         Name         | Type  | Provider | Region  | Availability | Status
+-------------+----------------------+-------+----------+---------+--------------+--------+
    lkc-g9zrn | crimes-kafka-cluster | BASIC | azure    | eastus2 | LOW          | UP
Use this cluster ID to set the context for the CLI:
ccloud kafka cluster use <yourClusterID>
Now, let’s create a topic into which we can stream the crimes dataset:
ccloud kafka topic create crimes --cluster <yourClusterID> --partitions
Finally, to get the data out of Confluent Cloud with Kafka Connect, we’ll need an API key, so let’s generate that:
ccloud api-key create --resource <yourClusterID>
Note the API key and secret, as we will use them in the Connect worker configuration and in the connector properties.
We now have what we need from Kafka!
Set up Azure Data Explorer
We need an Azure Data Explorer cluster, a database, a table, and an application ID/service principal with permissions to write to the table up front. We also need something called a mapping reference. The mapping reference maps the contents of the Kafka payload for a message to table columns. The hands-on lab module has the full command listing. For brevity, some commands below have been clipped.
We will first provision an Azure Data Explorer cluster from the Azure portal as detailed in the instructions. Next, we will create a database from the Azure portal. We will then launch the Azure Data Explorer web UI to create database objects.
We first need to create a table with this command:
.create table ['crimes'] (['case_id']:int, ['case_nbr']:string, ['case_dt_tm']:datetime...)
We then need to create an object called a mapping reference that maps the Kafka payload JSON to table columns in the database:
// Create mapping
.create table ['crimes'] ingestion json mapping 'crimes_mapping' '[{"column":"case_id","path":"$.case_id","datatype":"int"}, {"column":"case_nbr","path":"$.case_nbr","datatype":"string"}, {"column":"case_dt_tm","path":"$.case_dt_tm","datatype":"datetime"}...]'
We need to create an application ID/service principal and grant it access to the database:
.add database crimes_db admins ('aadapp=YourSPNAppID;YourTenantID') 'AAD App'
This concludes the setup in Azure Data Explorer.
Create a connector cluster
Since Confluent Cloud does not yet include the Kusto sink connector as a managed connector offering, we need infrastructure to host the Connect cluster. We will use Azure Kubernetes Service (AKS).
We will first create a Docker image and then provision Kafka Connect on our Kubernetes cluster. When the Kubernetes cluster is created (see instructions), it is just a bunch of nodes. To provision Kafka Connect pods, we need to create a Docker image. Here is how you build the Docker image.
First, download the Kusto sink connector JAR to your local machine:
mkdir ~/kafka-confluentcloud-hol
cd ~/kafka-confluentcloud-hol

wget https://github.com/Azure/kafka-sink-azure-kusto/releases/download/v1.0.1/kafka-sink-azure-kusto-1.0.1-jar-with-dependencies.jar
Create a Dockerfile and paste the code below into it. Be sure to edit the bootstrap server list, Kafka API key, and Kafka API secret to reflect yours.
FROM confluentinc/cp-kafka-connect:5.5.0
COPY kafka-sink-azure-kusto-1.0.1-jar-with-dependencies.jar /usr/share/java
ENV CONNECT_CONNECTOR_CLIENT_CONFIG_OVERRIDE_POLICY=All

ENV CONNECT_SASL_MECHANISM=PLAIN
ENV CONNECT_SECURITY_PROTOCOL=SASL_SSL
ENV CONNECT_SSL_ENDPOINT_IDENTIFICATION_ALGORITHM=https
ENV CONNECT_SASL_JAAS_CONFIG="org.apache.kafka.common.security.plain.PlainLoginModule required username=\"YOUR-KAFKA-API-KEY\" password=\YOUR-KAFKA-API-SECRET"\";"
The first line essentially takes a base image for Connect in Docker Hub. In the second line, we copy the Kusto JAR to /usr/share/java. In the next few lines, we configure some environment variables. The property “CONNECT_CONNECTOR_CLIENT_CONFIG_OVERRIDE_POLICY” allows consumer overrides from sink properties. We need this in order to pass security information as part of the connector sink properties. The remainder of the environment variables are security-related worker configurations specific to Confluent Cloud.
Now that we have a Dockerfile defined, let’s build a Docker image:-
sudo docker build -t /kafka-connect-kusto-sink:1.0.1v1 -f <yourDockerFile> .
Let’s publish the Docker image to Docker Hub. We’ll reference the repository and tag (version), in the Helm Chart:
docker push <yourDockerUserID>/kafka-connect-kusto-sink:1.0.1v1
Next, we will clone a Helm Chart locally from Confluent in GitHub. We will use this to provision Kafka Connect on Kubernetes:
cd ~
git clone https://github.com/confluentinc/cp-helm-charts.git

cd ~/kafka-confluentcloud-hol
cp -R ~/cp-helm-charts/charts/cp-kafka-connect .
Here is a quick peek in to what’s inside:
tree cp-kafka-connect/

cp-kafka-connect/
├── Chart.yaml
├── README.md
├── templates
│   ├── NOTES.txt
│   ├── _helpers.tpl
│   ├── deployment.yaml
│   ├── jmx-configmap.yaml
│   ├── secrets.yaml
│   └── service.yaml
└── values.yaml
The values.yaml is the only configuration file we will edit, as shown below. Essentially, the number of Kafka Connect workers (replicaCount), Docker image coordinates, and the Kafka bootstrap server endpoint. We will leave the rest as is.
replicaCount:
...
image: /kafka-connect-kusto-sink
imageTag: 1.0.1v1
...
Kafka:
    bootstrapServers: "PLAINTEXT://yourBootStrapServerList"
Finally, we will provision Kafka Connect. Prerequisites include installation of the Azure CLI, Helm CLI, and Azure AKS CLI on your terminal. Once all the utilities are installed, we need to get AKS cluster admin credentials:
az aks get-credentials --resource-group kafka-confluentcloud-lab-rg --name connector-k8s-cluster --admin
Install the Helm Chart for Kafka Connect, which we already downloaded and edited, on AKS:
helm install ./cp-kafka-connect --generate-name
Now, we have a Kafka Connect worker running on each AKS node.
Launch the sink connector copy tasks
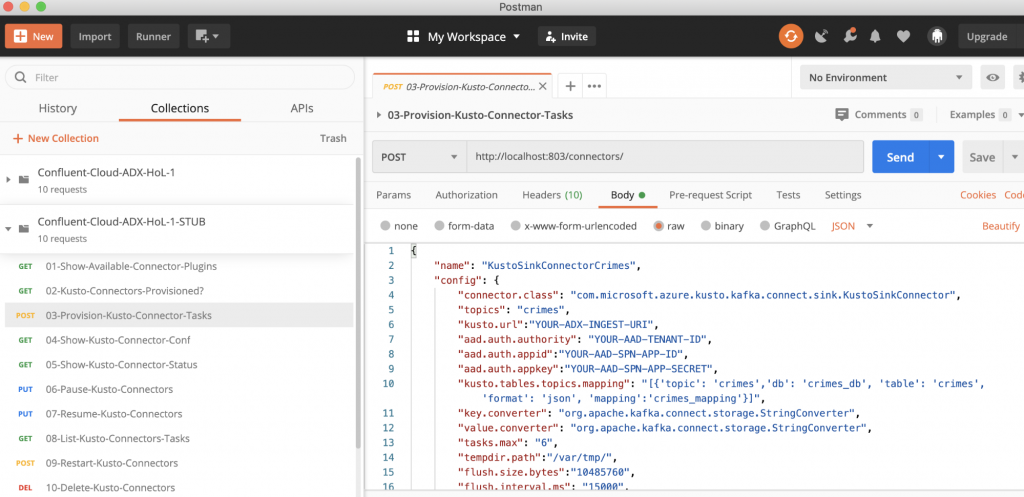
We will use Postman to manage the connectors in this example. First, let’s install Postman. Then, download the Kafka Connect Kusto Sink Connector Postman collection and import it into Postman. We’ll start port forwarding so that we can make REST calls via Postman on our machine to the Kafka Connect service running on the remote AKS cluster:
# Get the service name
kubectl get svc

# Start port-forwarding and leave terminal intact while managing connectors
sudo kubectl port-forward svc/YOUR_SERVICE_ID 803:8083
Let’s update the config (body) in the third request, in the Postman collection, called “03-Provision-Kusto-Connector-Tasks.” Click on Send. This will launch the connector tasks.
Awesome! Here is the pipeline we stood up from Kafka onwards:
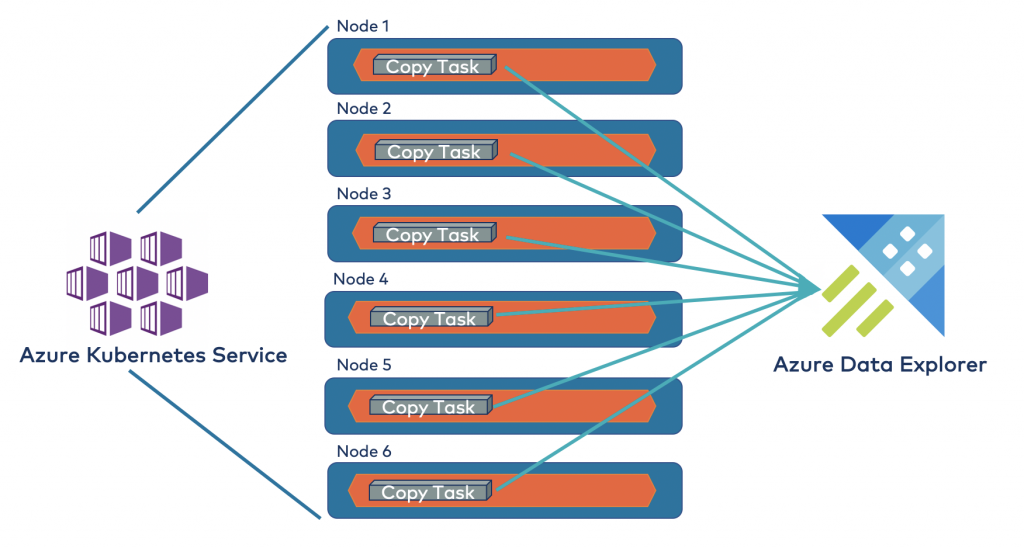
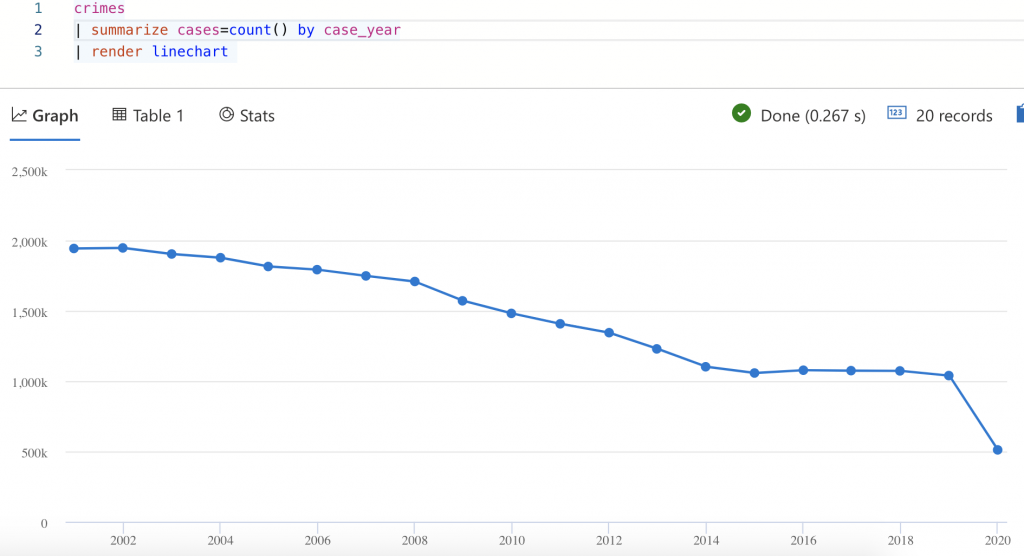
Once the connector copy tasks are launched, any messages written to the Kafka topic are automatically streamed to Azure Data Explorer. You can run all manners of analytics on the same, including predictive analytics with “bring your own model,” anomaly detection, forecasting, and more.
Conclusion
With Confluent Cloud and Azure Kubernetes Service as your Connect cluster infrastructure, you can rapidly and easily provision integration pipelines to the Azure Data Explorer analytical database for fast insights. For the complete hands-on lab, visit the Git repo. We welcome your contributions and feedback to the lab, as well as contributions to the open source connector.
In addition, try Confluent Cloud on Azure Marketplace and use the promo code CL60BLOG to get an additional $60 of free Confluent Cloud usage.* You can also join us for a live demo of Confluent Cloud to learn how to create your own Kafka cluster and use out-of-the-box components like ksqlDB to develop event streaming applications.
Avez-vous aimé cet article de blog ? Partagez-le !
Abonnez-vous au blog Confluent


Customer Intelligence Hub: A Single Pane of Glass for Customer Insight and Action
Customer Intelligence Hub unifies customer signals into a real-time, AI-powered view that helps GTM teams prioritize risk, identify opportunity, and act faster with contextual insights.