Nouveau dans Confluent Cloud : rendre les données et les pipelines accessibles pour un streaming prêt pour l’IA | En savoir plus
Integrating Azure and Confluent: Ingesting Data to Azure Cosmos DB through Apache Kafka
Building cross-platform solutions enables organizations to leverage technology driven by real-time data and enabled with both highly available services and low-latency databases hosted on Microsoft Azure.
Azure Cosmos DB is a fully managed NoSQL database offering with financially backed latency and availability SLAs, enabling apps to run at scale. Confluent is extensively used in data pipelines, serving as a distributed platform for data in motion and providing a seamless solution that connects large-scale applications and microservices running on Azure Cosmos DB.
Confluent provides a platform for data in motion that enables organizations to enrich and transform data as it flows from legacy and/or on-prem systems into new systems on Azure. Confluent on Azure allows for more seamless integration into Azure’s broader ecosystem.
Confluent and Microsoft’s Commercial Software Engineering group have worked together to build a self-managed connector. The Azure Cosmos DB Connector provides a new integration capability between Azure Cosmos DB and Confluent Platform. Microsoft provides enterprise support for the Azure Cosmos DB Connector.
As companies adopt the cloud, they may discover that migrating to the cloud is not a simple, one-time project—it’s a much harder task than building new cloud-native applications. Keeping the old legacy stack and the new cloud applications in sync, with a single cohesive global information system is critical.
Confluent enables large scale, big data pipelines that automate real-time data movement across any systems, applications, and architectures at massive scale. Aggregate, transform, and move data from on-premises legacy services, private clouds, or public clouds and into your apps from a central data pipeline for powerful insights and analytics.
Architecture
This demo shows how to populate test data from the Datagen Source Connector to Azure Cosmos DB using Confluent and the newly available self-managed Azure Cosmos DB connector.
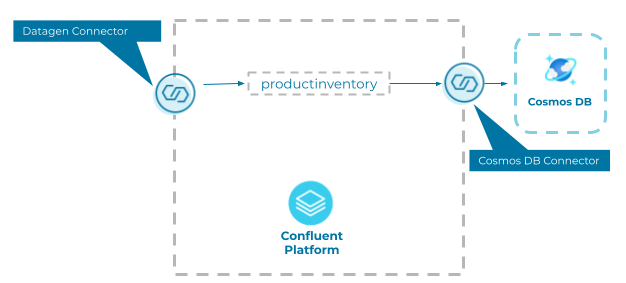
Azure Cosmos DB demo
Prerequisite
- An Azure account to create an Azure Cosmos DB service or obtain the API key from an existing instance
Environment setup
- A Docker instance with a minimum 8 GB of RAM to run Confluent
Overview
- Prepare the Confluent environment
- Understand your schema
- Configure the connectors on the Confluent Connect instance
- Validate data in Azure Cosmos DB
Prepare the Confluent environment
There are a number of ways to get started with Confluent Platform. For this tutorial, we are going to use the cp-all-in-one Docker image, which installs all components of the Confluent Platform. You can walk through the Docker quick start by following the documentation. You can also install it on an Azure virtual machine (VM).
Step 1: Install the Docker Image
Let’s copy down the docker-compose.yml script:
curl --silent --output docker-compose.yml
For more information, see GitHub.
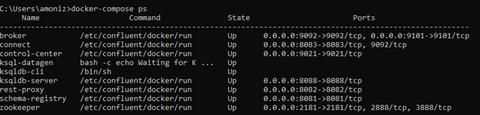
We can start the Docker containers with this:
docker-compose up -d
And very quickly check the status of our containers with this:
docker-compose ps
If you can see that the state for all of your containers is “up”, we are good to go!
Step 2: Install the Azure Cosmos DB Connector
While we are here, we can go ahead and install the files needed for the Azure Cosmos DB connector. On the Connect instance, we can run this:
confluent-hub install microsoftcorporation/kafka-connect-cosmos:1.0.4-beta
After installation, the connector will need to be restarted. You can run Docker Compose to restart the connector.
Confluent Control Center – Monitoring and Set-up
Now that all of our services are up, we can go back into Docker and open our containers. Open your terminal > Go to your Docker folder > Open up your set of containers. We will be interacting with the following components: Control Center, ksql-datagen, Kafka Connect, the broker, and ZooKeeper. We can hover over the “control-center” container and open up the Control Center UI in the browser.

The browser will open up to the url http://localhost:9021/clusters/, which will show the Control Center UI. Control Center delivers a UI for Apache Kafka®, allowing developers to manage messages, topics, schemas, and Kafka Connect connectors. We haven’t created any topics yet or sent any messages yet, so the UI will show zero clusters, brokers, and topics.
Confluent Control Center will now show that the Azure Cosmos DB connector is available.
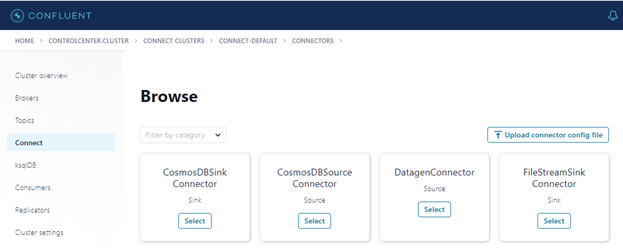
Now we can set up our source and sinks. But first, let’s set up our topic and make sure that the schema is in line with our Azure Cosmos DB database.
Understand your schema
Step 3: Identify connection details for Azure Cosmos DB
- Follow these steps to create a new database
- Configure the database endpoint, master key, database name, topic key, and IP whitelist, and copy the database endpoint
Step 4: Create your Kafka topic
We will go over topic mapping a little later, but for now, it is important that you review the schema of your database and match the data types in your schema to your database.
If we make a mistake with the schema, we need to delete the topic. We can delete a topic by running kafka-topics –delete –zookeeper localhost:2181 –topic <topicname>. You will receive back a prompt saying that the topic <topicname> is marked for deletion. Note: This will have no impact if delete.topic.enable is not set to true. Of course, use this command at your own risk!
Step 5: Why is topic mapping so important?
To define the mapping between Kafka topics and the Azure Cosmos DB containers, the sink and source connectors that work with the topic-container map configuration will be used. This config is provided as a string of the topic-container pairs (joined with “#”) that are comma separated. For instance, to map the topic mytopic1 to the Cosmos container myctr1 and the topic test-topic with the container test-ctr, you would specify it as shown here:
mytopic1#myctr1,test-topic#test-ctr
There are a few things to note about the topic mapping. Each topic and container name can be used only once in the overall mapping. Since the Azure Cosmos DB sink and source connectors both monitor a single Cosmos database at once, the specified Cosmos containers must be present in this database.
A single Cosmos sink connector task can work with multiple topic-container pairs. On the other hand, you will need to specify the same number of Cosmos source connector tasks with as many topic-container pairs. For the example above, since there are two pairs, you will need to create a source connector with tasks.max set to two.
Configure the connectors on the Confluent Connect instance
Now that we have successfully standardized our data elements flowing from the Datagen Source Connector to Confluent, then from Confluent to the Azure Cosmos DB. Let’s go ahead and create our connectors from within Confluent Control Center.
Step 6: Configure the Confluent Datagen Source connector
Log in to Confluent. Click on the Connectors link on the left menu. Select the Datagen Source Connector (you can also use the search box). Fill in the details as follows:
- Name: Datagen_ProductInventory
- Topic name: productinventory
- Output message format: 500
- Iterations: 6000
- Max interval between messages: 500
- Tasks: 1
- Schema.String: <fill in the schema string from your DataGen>
Hit Continue.
Check out the Kafka Connect Datagen repo on GitHub for additional code samples.
Step 7: Configure the Azure Cosmos DB connector
Select the CosmosDB Sink Connector (you can also use the search box). Fill in the details as follows:
Configurations:
- Name: CosmosDBDemo
- Topic name: productinventory
- Output message format: JSON
- Key converter class: io.confluent.connect.avro.AvroConverter
- Value converter class: io.confluent.connect.avro.AvroConverter
- Cosmos endpoint: <insert your Azure Cosmos DB Endpoint here>
- Cosmos connection key: <insert your Azure Cosmos DB Endpoint here>
- Cosmos database name: product
- Topic-container map: productinventory#product
- Use Cosmos upsert: False
Additional properties:
- value.converter.schema.registry.url:http://schema-registry:8081
- key.converter.schema.registry.url:http://schema-registry:8081
- Tasks: 1
Then hit Continue. Check out the Microsoft CosmosDB repo on Github for additional code samples.
Validate data in Azure Cosmos DB
Once the connector is running, we can observe the corresponding topics created for tables in the broker through Confluent Control Center by logging to it http://localhost:9021/clusters > Cluster > Topics. Now you can log in to your Azure Portal account and query the data with Data Explorer.
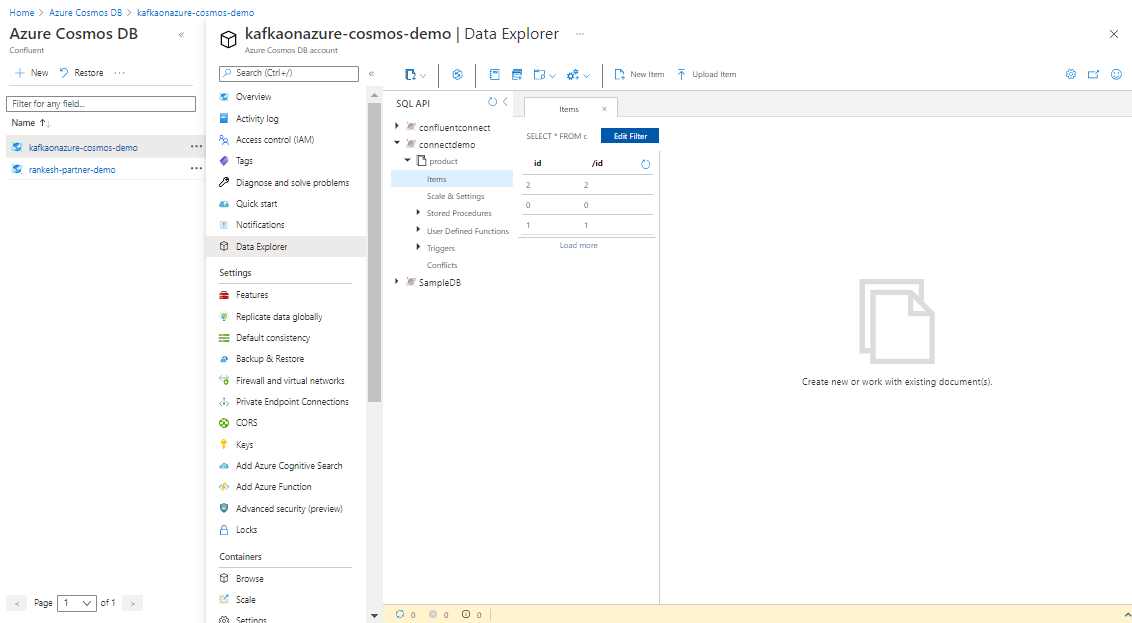
Watch the new data getting ingested into the target in real time by selecting Refresh and check out the Microsoft docs for more information on Data Explorer, Azure Cosmos DB, and Confluent Cloud on Azure.
Next steps
Want to know more?
- Download the Azure Cosmos DB Source and Sink Connectors from the Confluent Hub
- Join Confluent and Microsoft experts for an online talk to see a demo of the Azure Cosmos DB Connector and how it can safely deliver data and events in real time
- Listen to the Streaming Audio podcast featuring Ryan CrawCour, who helped build the Azure Cosmos DB Connector
- Try for free on Azure Marketplace and use the promo code CL60BLOG for an additional $60 of free Confluent Cloud usage*
Avez-vous aimé cet article de blog ? Partagez-le !
Abonnez-vous au blog Confluent


Customer Intelligence Hub: A Single Pane of Glass for Customer Insight and Action
Customer Intelligence Hub unifies customer signals into a real-time, AI-powered view that helps GTM teams prioritize risk, identify opportunity, and act faster with contextual insights.