OSS Kafka couldn’t save them. See how data streaming came to the rescue! | Watch now
How to Connect KSQL to Confluent Cloud Using Kubernetes with Helm
Confluent Cloud, a fully managed event cloud-native streaming service that extends the value of Apache Kafka®, is simple, resilient, secure, and performant, allowing you to focus on what is important—building contextual event-driven applications, not infrastructure.
If you are using Confluent Cloud as your managed Apache Kafka cluster, you probably also want to start using other Confluent Platform components like the Confluent Schema Registry, Kafka Connect, KSQL, and Confluent REST Proxy. You could just deploy all those services on your own cloud servers, but it is becoming more and more common to solve infrastructure problems like this using Kubernetes. This blog post focuses on the specific Helm Chart configuration needed to connect the Confluent Platform components to your Kafka cluster running in Confluent Cloud.
The requirements to begin using the Helm Charts are access to a Kubernetes cluster with version 1.9.2+ and Helm/Tiller 2.8.2+ installed.
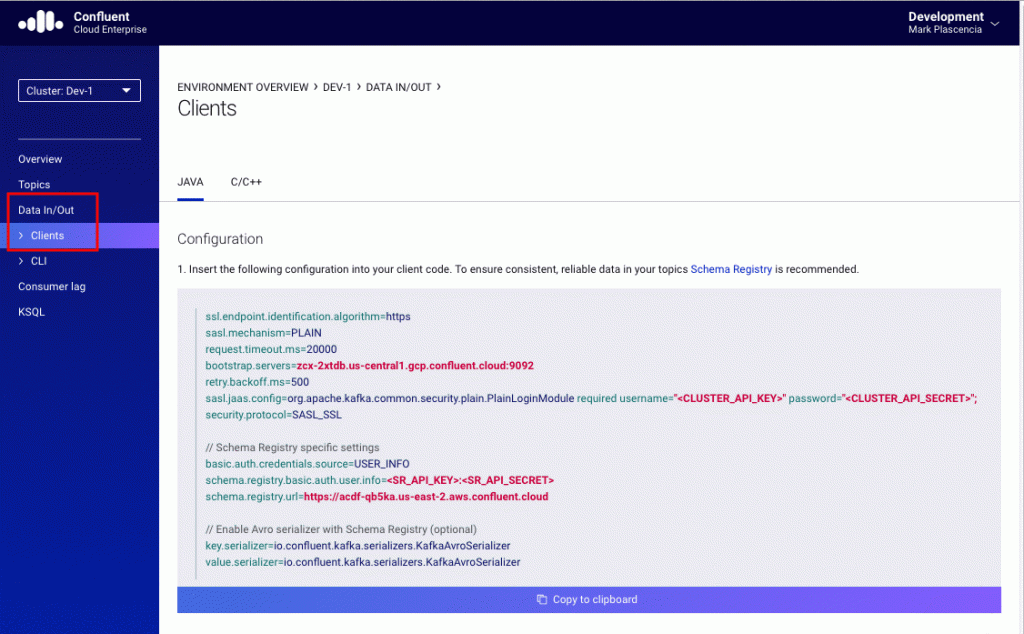
First things first: You will need to gather your Confluent Cloud client configuration, which includes the security.protocol, sasl.mechanism, sasl.jaas.config, bootstrap.servers, retry.backoff, and request.timeout parameters.
You can find this information in your Confluent Cloud dashboard or from your Confluent Cloud CLI configuration (see the CLI documentation).
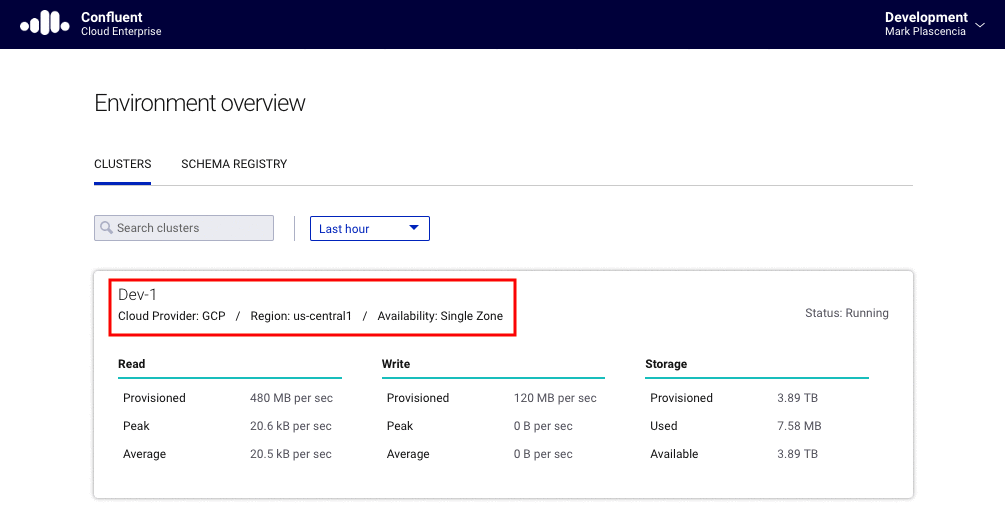
To get the client configuration from your Confluent Cloud dashboard, first log into Confluent Cloud see your available clusters. Next, click on the cluster name whose configuration you want.

You will be brought to the “Cluster overview” page. Now click on the “Data In/Out” option available in the upper left side of the UI. That will show a submenu containing two options: clients and CLI. Click on the “Clients” option. This will take you to the “Clients” page. From here, you can get your specific client configuration. The figure below gives an example of what you should see after completing these steps:

The blog post Using Apache Kafka Command Line Tools with Confluent Cloud goes into great detail about how to find and use the Confluent-Cloud-related configuration parameters.
Helm Chart configuration for Confluent Cloud
To get started, see this example repo which provides updated Helm Charts for Kafka Connect, KSQL and Schema Registry. You can find the specific Helm Chart for each of these components in the sample charts directory.
Each Confluent Platform Helm Chart includes a file named values.yaml. The values.yaml file is populated with default values for many of the configuration parameters needed to deploy and run a Confluent Platform component (e.g., KSQL, Schema Registry). Not all of the possible settings for a component are included in this file.
To help with configuring additional settings for a Helm deployment, values.yaml includes a catch-all map for key/value pairs named configurationOverrides. The configurationOverrides map allows you to specify additional configuration settings that are not included in the default values.yaml file. We will update the configurationOverrides map with the needed settings to connect our Confluent Platform components to Confluent Cloud.
Let’s take a look at a specific example of updating the KSQL values.yaml file to enable a connection to Confluent Cloud.
Note: Each Confluent component has different requirements for connecting to Confluent Cloud. Please refer to the reference documentation for specifics.
After cloning the Helm Chart repo to your local machine, modify the KSQL values.yaml file so that your Confluent Cloud settings are included in the configurationOverrides map.
Here is an example of the updated values for KSQL:
configurationOverrides:
  "ksql.streams.producer.retries": "2147483647"
  "ksql.sink.replicas": "3"
  "ksql.streams.replication.factor": "3"
  "listeners": "http://0.0.0.0:8088"
  "security.protocol": "SASL_SSL"
  "sasl.mechanism": "PLAIN"
  "sasl.jaas.config": "org.apache.kafka.common.security.plain.PlainLoginModule required username=\"api-key\" password=\"secret\";"
Now that you have updated the KSQL values.yaml file, you can install the KSQL component into your Kubernetes cluster using Helm:
helm install --name my-ksql cp-helm-charts/charts/cp-ksql-server
By updating the configurationOverrides map for each of the Confluent Platform Helm Charts, it is possible to deploy and connect Schema Registry, Kafka Connect, KSQL, and REST Proxy to your managed Confluent Cloud cluster.
KSQL and Kafka Connect example
We have shown above how to update the values.yaml file for a Helm Chart, but to bring it all together, let’s work through a concrete example.
The Confluent documentation has a tutorial titled Writing Streaming Queries Using the KSQL CLI. The tutorial provides two paths with either Local or Docker as the environment for the tutorial. We’ll take a new path and install the needed components for the tutorial into Kubernetes using modified Helm Charts.
To follow the tutorial, we’ll need a KSQL server, the Kafka Connect Datagen Connector, and the KSQL CLI. The Datagen connector will be used to generate test data for the tutorial. More information on the Datagen plugin is provided in the blog post Easy Ways to Generate Test Data in Kafka.
To get started, see this GitHub repository, which contains the modified Helm Charts and supporting files to run the components for the tutorial.
This example using Helm has been tested with Google Kubernetes Engine (GKE) and Kubernetes on Docker for Mac.
The diagram below shows which components will be running in Kubernetes and the interaction with Kafka running in Confluent Cloud.
The order we will follow to setup the tutorial’s environment is:

- Create the topics users and pageviews in Kafka
- Deploy Schema Registry to Kubernetes
- Deploy KSQL to Kubernetes
- Deploy Kafka Connect to Kubernetes
- Upload the datagen-users.config and datagen-pageviews.config to Kafka Connect
- Run the KSQL CLI with a shell from Kubernetes
Prerequisites
- A Confluent Cloud account with an available Kafka cluster.
- Access to a healthy Kubernetes cluster with Helm/Tiller installed. The Helm Quickstart Guide provides a walkthrough of how to install and initialize Helm/Tiller on a Kubernetes cluster.
- Kubernetes 1.9.2+
- Helm 2.8.2+
- The topics users and pageviews should be available in your Kafka cluster.
- Use the Confluent Cloud CLI, to create the topics if auto-topic creation is disabled:
- ccloud topic create users
- ccloud topic create pageviews
- Use the Confluent Cloud CLI, to create the topics if auto-topic creation is disabled:
- Docker installed on your local machine to run the KSQL CLI.
- curl installed on your local machine.
- Clone the example Helm Charts and configuration from the helm-chart-examples repo to your local machine.
git clone https://github.com/mplascencia/helm-chart-examples.git
cd helm-chart-examples
Deploy Schema Registry into Kubernetes
Note: Schema Registry is generally available as a managed service on Confluent Cloud. This provides an alternative to managing your own instance of Schema Registry.
Edit the Schema Registry Helm Chart file charts/cp-schema-registry/values.yaml:
- Set the bootstrapServers key to your Confluent Cloud Kafka bootstrap.servers URL
- Set the sasl.jaas.config username and password to your Confluent Cloud Kafka key and secret
Install Schema Registry into Kubernetes with the updated Helm Chart:
helm install --name my-schema charts/cp-schema-registry
You can view the status of your Schema Registry deployment with the command:
helm status my-schema
The sample output should look similar to:
$ helm status my-schema LAST DEPLOYED: Wed Mar 13 14:57:26 2019 NAMESPACE: default STATUS: DEPLOYEDRESOURCES: ==> v1/Pod(related) NAME READY STATUS RESTARTS AGE my-schema-cp-schema-registry-7447778ddf-s4vh9 2/2 Running 0 5m
==> v1/ConfigMap
NAME AGE my-schema-cp-schema-registry-jmx-configmap 5m
==> v1/Service my-schema-cp-schema-registry 5m
==> v1beta2/Deployment my-schema-cp-schema-registry 5m
NOTES: This chart installs a Confluent Kafka Schema Registry.
Deploy KSQL into Kubernetes
Edit the KSQL Helm Chart file charts/cp-ksql-server/values.yaml:
- Set the bootstrapServers key to your Confluent Cloud Kafka bootstrap.servers URL.
- Set the sasl.jaas.config username and password to your Confluent Cloud Kafka key and secret.
- Set the cp-schema-registry key to the Schema Registry’s URL. For our example, the value will be http://my-schema-cp-schema-registry:8081.
Install KSQL in Kubernetes with the updated Helm Chart:
helm install --name my-ksql charts/cp-ksql-server
You can view the status of your deployment with the command:
helm status my-ksql
The sample output should look similar to:
$ helm status my-ksql LAST DEPLOYED: Tue Mar 12 13:15:58 2019 NAMESPACE: default STATUS: DEPLOYEDRESOURCES: ==> v1/ConfigMap NAME AGE my-ksql-cp-ksql-server-jmx-configmap 4m my-ksql-cp-ksql-server-ksql-queries-configmap 4m
==> v1/Service my-ksql-cp-ksql-server 4m
==> v1beta2/Deployment my-ksql-cp-ksql-server 4m
==> v1/Pod(related)
NAME READY STATUS RESTARTS AGE my-ksql-cp-ksql-server-b44bd6d4b-8j2xb 2/2 Running 0 4m
NOTES: This chart installs Confluent KSQL server.
Deploy Kafka Connect into Kubernetes using Helm
For Kafka Connect, we will create a new Docker image that uses the official Confluent Base Docker Image for Kafka Connect but add a new stage with the Kafka Connect Datagen Connector installed as part of the Docker image.
The file to create the Docker image with the Datagen connector is included as part of the sample repo at docker/Dockerfile. You will notice that the image key within the charts/cp-kafka-connect/values.yaml file references a Docker image that includes the Datagen connector.
As an aside, you can follow the pattern of extending the base Kafka Connect Docker image to create your own custom Kafka Connect images with the connectors you need installed. Make sure to update the plugin.path in values.yaml file to include the path of the installed connectors. See the Confluent Hub for a list of connectors.
Edit the charts/cp-kafka-connect/values.yaml file with your Confluent Cloud client configuration:
- Set the bootstrapServers key to your Confluent Cloud bootstrap.servers URL.
- There are five different JAAS config keys in the values.yaml file. Update the username and password to your Confluent Cloud key and secret.The config keys to update are:
-
- sasl.jaas.config
- producer.sasl.jaas.config
- producer.confluent.monitoring.interceptor.sasl.jaas.config
- consumer.sasl.jaas.config
- consumer.confluent.monitoring.interceptor.sasl.jaas.config
Install Kafka Connect into Kubernetes with the Helm command:
helm install --name my-connect charts/cp-kafka-connect
You can view the status of your deployment with the command:
helm status my-connect
The sample output should look similar to:
$ helm status my-connect LAST DEPLOYED: Tue Mar 12 14:09:19 2019 NAMESPACE: default STATUS: DEPLOYEDRESOURCES: ==> v1/Service NAME AGE my-connect-cp-kafka-connect 9m
==> v1beta2/Deployment my-connect-cp-kafka-connect 9m
==> v1/Pod(related)
NAME READY STATUS RESTARTS AGE my-connect-cp-kafka-connect-7998c55588-mjr2c 2/2 Running 0 9m
==> v1/ConfigMap
NAME AGE my-connect-cp-kafka-connect-jmx-configmap 9m
NOTES: This chart installs a Confluent Kafka Connect.
Configure the Datagen plugin
Port forwarding note: To access services running in Kubernetes from your local machine, you will need to enable port forwarding between the Kubernetes cluster and your local machine.
KSQL and Kafka Connect should now be up and running in your Kubernetes cluster. To configure and start the Datagen connector, upload a connector configuration to Kafka Connect. We’ll use the Kafka Connect REST API to interact with the server. Please refer to the Kafka Connect REST API for additional functionality. The connector configuration files for the users and pageviews are available on GitHub.
In a separate terminal, enable port forwarding to Kafka Connect:
kubectl port-forward $(kubectl get pod --selector="app=cp-kafka-connect,release=my-connect" --output jsonpath='{.items[0].metadata.name}') 8083:8083
If using GKE, you may need to enable port forwarding with gcloud also:
gcloud container clusters get-credentials [cluster-name] --zone [zone] --project [project-name] && kubectl port-forward $(kubectl get pod --selector="app=cp-kafka-connect,release=my-connect" --output jsonpath='{.items[0].metadata.name}') 8083:8083
Upload the users and pageviews configuration to Kafka Connect:
curl -H "Content-Type: application/json" --data @kafka-connect-configs/datagen-users.config localhost:8083/connectors
curl -H "Content-Type: application/json" --data @kafka-connect-configs/datagen-pageviews.config localhost:8083/connectors
You can check the status of the connectors to make sure they are installed correctly with these commands:
curl localhost:8083/connectors/datagen-users/status | jqcurl localhost:8083/connectors/datagen-pageviews/status | jq
The expected output should be similar to the following:
{
  "name": "datagen-users",
  "connector": {
    "state": "RUNNING",
    "worker_id": "connect:8083"
  },
  "tasks": [
    {
      "state": "RUNNING",
      "id": 0,
      "worker_id": "connect:8083"
    }
  ],
  "type": "sink"
}
Note about the Datagen connector: Once the configuration is uploaded and the tasks are in a running state, the datagen-users task and datagen-pageviews task are generating and sending data to the Kafka topics. You must delete or pause the connectors to stop the Datagen connector from sending data to the Kafka topics. More details on using the Datagen connector can be found in this blog post about generating test data for Kafka and the Datagen GitHub repo.
KSQL CLI
We’re almost there! We will now start up the KSQL CLI in a container running in your Kubernetes cluster.
Run the KSQL CLI within Kubernetes. This will give you an interactive shell for the KSQL CLI.
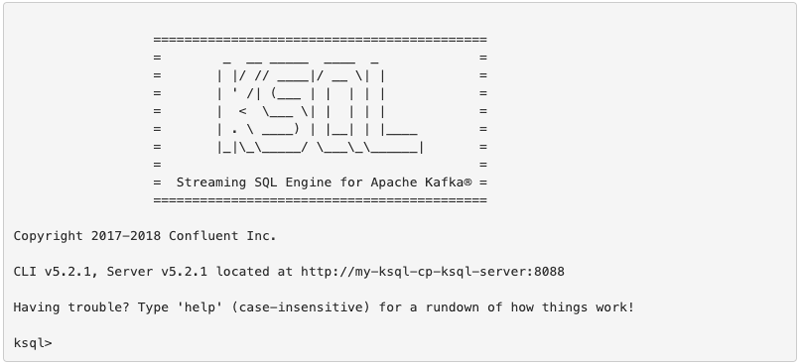
kubectl run tmp-ksql-cli --rm -i --tty --image confluentinc/cp-ksql-cli:5.2.1 http://my-ksql-cp-ksql-server:8088
The output should resemble this:

To inspect a topic, enter the command PRINT 'users'. Use ctrl+c to stop printing messages.
ksql> PRINT 'users';
{"ROWTIME":1552428236621,"ROWKEY":"User_3","registertime":1516846406710,"userid":"User_3","regionid":"Region_3","gender":"FEMALE"}
{"ROWTIME":1552428237148,"ROWKEY":"User_9","registertime":1492508192372,"userid":"User_9","regionid":"Region_8","gender":"OTHER"}
{"ROWTIME":1552428237192,"ROWKEY":"User_3","registertime":1508099073957,"userid":"User_3","regionid":"Region_7","gender":"FEMALE"}
{"ROWTIME":1552428238056,"ROWKEY":"User_6","registertime":1493836651524,"userid":"User_6","regionid":"Region_2","gender":"FEMALE"}
{"ROWTIME":1552428238735,"ROWKEY":"User_7","registertime":1516508840200,"userid":"User_7","regionid":"Region_7","gender":"FEMALE"}
{"ROWTIME":1552428239440,"ROWKEY":"User_5","registertime":1513899539224,"userid":"User_5","regionid":"Region_2","gender":"MALE"}
{"ROWTIME":1552428239737,"ROWKEY":"User_7","registertime":1507804915157,"userid":"User_7","regionid":"Region_9","gender":"OTHER"}
{"ROWTIME":1552428239741,"ROWKEY":"User_5","registertime":1494297081102,"userid":"User_5","regionid":"Region_7","gender":"MALE"}
Follow the tutorial to write event streaming queries using KSQL
You have now installed all of the required Confluent Platform components for the tutorial. Instead of Docker or Local, though, you are running in your Kubernetes cluster! Using the KSQL CLI shell, you can proceed by following the tutorial to learn about writing event streaming queries using KSQL.
Wrapping it up
Using Kubernetes, Helm, and Confluent Cloud together is a powerful combination for quickly getting up and running with Apache Kafka. If your software and infrastructure teams are already using Kubernetes to deploy and run services, it makes sense to use Kubernetes for your Confluent Platform components as well.
If Kubernetes and Helm does not fit into your deployment strategy then you might also be interested in checking out the documentation for an alternate approach, where the Confluent components are installed directly into your cloud infrastructure yet still enable connection to Confluent Cloud.
Also, Schema Registry is now available as a managed service from Confluent. Check out the quick start to begin using Confluent’s managed Schema Registry service.
To learn more:
- Check out Confluent Cloud, a fully managed event streaming service based on Apache Kafka
- Learn about ksqlDB, the successor to KSQL, and see the latest syntax
Avez-vous aimé cet article de blog ? Partagez-le !
Abonnez-vous au blog Confluent
New With Confluent Platform 8.0: Stream Securely, Monitor Easily, and Scale Endlessly
This blog announces the general availability (GA) of Confluent Platform 8.0 and its latest key features: Client-side field level encryption (GA), ZooKeeper-free Kafka, management for Flink with Control Center, and more.
Introducing the Next Generation of Control Center for Confluent Platform: Enhanced UX, Faster Performance, and Unparalleled Scale
This blog announces the general availability of the next generation of Control Center for Confluent Platform
