[Webinar] How to Implement Data Contracts: A Shift Left to First-Class Data Products | Register Now
Building a Scalable Search Architecture
Software projects of all sizes and complexities have a common challenge: building a scalable solution for search. Who has never seen an application use RDBMS SQL statements to run searches? You might be wondering, is this a good solution? As the databases professor at my university used to say, it depends.
Using SQL to run your search might be enough for your use case, but as your project requirements grow and more advanced features are needed—for example, enabling synonyms, multilingual search, or even machine learning—your relational database might not be enough.
Disclaimer: There are nice projects around like PostgreSQL full-text search that might be enough for your use case, and you should certainly consider them.
For this reason and others as well, many projects start using their database for everything, and over time they might move to a search engine like Elasticsearch or Solr.
Building a resilient and scalable solution is not always easy. It involves many moving parts, from data preparation to building indexing and query pipelines. Luckily, this task looks a lot like the way we tackle problems that arise when connecting data.
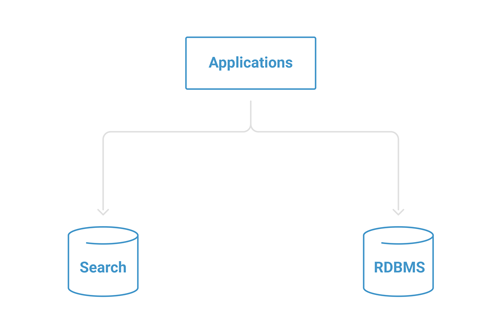
A common first step is using the application persistence layer to save the documents directly to the database as well as to the search engine. For small-scale projects, this technique lets the development team iterate quickly without having to scale the required infrastructure.

Figure 1. Direct indexing
While the intuitive approach, known as a distributed transaction, is popular and seems useful, you might encounter consistency problems if one of your writes fails. It also requires both systems to always be available, so no maintenance windows are possible.
If you are interested in knowing more, there is a great article by Martin Kleppmann et al. that describes the existing problems with heterogeneous, distributed transactions. Distributed transactions are very hard to implement successfully, which is why we’ll introduce a log-inspired system such as Apache Kafka®.
We will introduce three different approaches that use Apache Kafka® to help you build scalable and resilient solutions able to handle an increasing number or documents, integrate different sources of information, introduce ontologies and other machine learning approaches such as learning to rank, etc.
Building an indexing pipeline at scale with Kafka Connect
As soon as the number of data points involved in your search feature increases, typically we’ll introduce a broker in between all the involved components. This architectural pattern provides several benefits:
- Better scalability by allowing multiple data producers and consumers to run in parallel
- Greater flexibility, maintainability, and changeability by decoupling production from data consumption and allowing all systems to run independently
- Increased data diversity by allowing ingestion from multiple and diverse sources and eventually providing organization to each of the indexing pipeline steps, such as data unification, normalization, or more advanced processes like integrating ontologies.
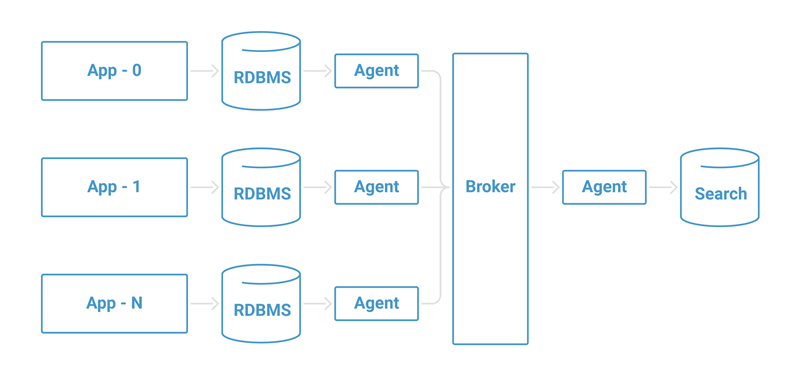
Usually, this would look something like the following:

Figure 2. Scaling indexing
A collection of agents are responsible for collecting data from the data sources (e.g., relational databases) and storing them in an intermediate broker. Later, another agent or group of agents will collect the data from the brokers and store them in our search engine.
This can be achieved using many different tools, but if you are already using Apache Kafka as your middleware/broker, Kafka Connect is a scalable framework well suited for connecting systems across Kafka. Kafka Connect has the great benefit of simplifying your deployment requirements, as it is bundled with Apache Kafka and its ecosystem.
In case Kafka Connect is new to you, before moving forward, I recommend checking out the Kafka Connect blog series where my colleague Robin Moffatt introduces Kafka Connect with a nice example.
If you visit the Confluent Hub, you’ll also find that there are many connectors, such as the Kafka Connect JDBC connector, Kafka Connect Elasticsearch connector, two Apache-2.0-licensed Solr community connectors, and others created by the community.
The JDBC and Elasticsearch connectors are included in the Confluent Platform, but if you’re using a different Apache Kafka distribution, you can install them by downloading the connectors from the Confluent Hub and following the documentation.
Moving data into Apache Kafka with the JDBC connector
Moving data while adapting it to the requirements of your search product is a common integration point when building infrastructure like the one described in this blog post.
This is usually achieved by implementing some variation of the change data capture pattern, in which the JDBC connector comes into play. This connector can be used as a source (streaming changes from a database into Kafka) or as a sink (streaming data from a Kafka topic into a database). For this use case, we are going to use it as a source connector.
Setting up the connector
The JDBC connector has many powerful features, such as supporting a variety of JDBC data types, detecting CREATE and DELETE TABLE commands, varying polling intervals and, perhaps most notably, copying data incrementally.
The process of moving data works by periodically running SQL queries. To accomplish this, the JDBC connector tracks a set of columns that are used to determine which rows are new, which were updated, etc.
The JDBC connector supports several modes of operation:
- Incrementing mode works on columns that are always guaranteed to have an increasing integer ID for each new row, such as an auto increment field. Keep in mind this mode can only detect new rows.
- Timestamp mode works in a similar fashion, but instead of using a monotonically increasing integer column, this mode tracks a timestamp column, capturing any rows in which the timestamp is greater than the time of the last poll. Through this mode, you can capture updates to existing data as well as new data.
- You should select carefully which column to monitor in this mode, as it will affect how updates and new records are tracked.
- Combination mode of timestamp and incrementing is very powerful. This mode can track new records as well as updates to existing ones.
- Custom query: Keep in mind while using this mode that no automatic offset tracking will be performed—custom queries should do that. This mode can become expensive if the query is complex.
- Bulk data import is a valuable mode for bootstrapping your system, for example.
More details on how to use the JDBC connector can be found in this deep dive post by my colleague Robin Moffatt.
JDBC drivers
The connector relies on the database JDBC driver(s) for its core functionality. The JDBC driver for your database of choice should be installed in the same kafka-connect-jdbc directory as the connector. If you are using a Linux package such as DEB or RPM, this is usually in the /usr/share/java/kafka-connect-jdbc directory. If you’re installing from an archive, this will be in the share/java/kafka-connect-jdbc directory in your installation.
The following is an example configuration that sets up the connector to query the products table of a MySQL database, using the “modified” column for timestamps and “ID” column for primary keys, and writing records to the db-products Kafka topics:
name=mysql-source
connector.class=io.confluent.connect.jdbc.JdbcSourceConnector
tasks.max=10
connection.url=jdbc:mysql://mysql.example.com:3306/my_database table.whitelist=products
mode=timestamp+incrementing timestamp.column.name=modified incrementing.column.name=id
topic.prefix=db-
Schema evolution
Schema evolution is inevitable in all data integration situations, and search is no exception. If the Avro converter is used, the connector will detect when a change on the incoming table schemas happened and manage the interaction with Confluent Schema Registry.
In all likelihood, the schema of your data will change over the life of your application, so using Schema Registry will make it easier for you to adjust and ensure data format consistency, as well as enable data production and consumption to evolve with mode independence.
Things to watch out for with the JDBC connector
A frequent question that comes up with the JDBC connector is selecting the right mode of operation. Although the connector allows you to start from operation modes perfectly suited for initial load bulk mode, it is very important to think, table by table, the best way to import each table’s records into Apache Kafka.
The connector allows you write a custom query to import data into Kafka. If you are planning to use this advanced mode, you should be careful and make sure the performance of your query matches your timing expectations.
Last but not least, remember this connector works by issuing regular SQL queries directly into your database. Always keep an eye on their performance and make sure they run in the expected time to allow your pipeline to function properly.
You can read more about options for integrating data from relational sources into Kafka in No More Silos: How to Integrate Your Databases with Apache Kafka and CDC.
Indexing your documents with the Elasticsearch connector
After you getting your events stored into Apache Kafka, the next logical step for building your initial indexing pipeline is to pull the data from Kafka into Elasticsearch. To do that, you can use the Kafka Connect Elasticsearch connector.
The Kafka Connect Elasticsearch connector has a rich set of features, such as mapping inference and schema evolution. You can find the specific configuration details in the documentation.
Setting up the connector
For an easy way to get started with the Elasticsearch connector, use this configuration:
name=search-indexing-sink
connector.class=io.confluent.connect.elasticsearch.ElasticsearchSinkConnector
tasks.max=1
topics=db-products
key.ignore=true
connection.url=http://localhost:9200
type.name=products
The configuration will pull from a topic name called db-products, created earlier with the JDBC connector. Using a maximum of one task (you can configure more tasks if needed), it will pull the data stored in that topic into a db-products index at an Elasticsearch instance located at http://localhost:9200.
Notes about the Kafka Connect Elasticsearch connector
The Elasticsearch connector is generally straightforward, but there are a few considerations to take note of.
As you might already know, Elasticsearch mappings can be challenging to get right. You need to think carefully about how your data looks for each of the use cases involved because even with dynamic fields, the end result of your queries will depend on how you have configured your analyzers and tokenizers.
The Elasticsearch connector allows you, to a certain degree, to use automatic mapping inference. However, if you are building your search infrastructure, an even better way is to define an index template where you can control exactly how your data is going to be processed internally.
Another issue you might encounter is around retries, which could happen for various reasons (e.g., Elasticsearch is busy or down for maintenance). In such a scenario, the connector will continue to run and retry the unsuccessful operations using an exponential backoff, giving Elasticsearch time to recover.
Wrapping it up
As you can see, it’s easy to use Apache Kafka and Kafka Connect to scale your search infrastructure by connecting different source applications, databases, and your search engine.
This solution uses a single technology stack to create one uniform approach that helps your project integrate different sources and build scalable and resilient search. It is a natural evolution from the initial application-centric setup.
Interested in more?
If you’d like to know more, you can download the Confluent Platform, the leading distribution of Apache Kafka.
Avez-vous aimé cet article de blog ? Partagez-le !
Abonnez-vous au blog Confluent
Introducing KIP-848: The Next Generation of the Consumer Rebalance Protocol
Big news! KIP-848, the next-gen Consumer Rebalance Protocol, is now available in Confluent Cloud! This is a major upgrade for your Kafka clusters, offering faster rebalances and improved stability. Our new blog post dives deep into how KIP-848 functions, making it easy to understand the benefits.
How to Query Apache Kafka® Topics With Natural Language
The users who need access to data stored in Apache Kafka® topics aren’t always experts in technologies like Apache Flink® SQL. This blog shows how users can use natural language processing to have their plain-language questions translated into Flink queries with Confluent Cloud.
