Introducing Connector Private Networking: Join The Upcoming Webinar!
Building the Confluent UI with React Hooks – Benefits and Lessons Learned
Get started with Confluent, for free
Watch demo: Kafka streaming in 10 minutes
Updating a fundamental paradigm in your React app can be as easy as search and replace, or at other times, as difficult as convincing your entire frontend engineering to buy into it. Migrating to React Hooks may fall into the latter, but with numerous benefits, an improved user interface, and easier maintainability at scale, it is well worth the effort.
The Confluent Cloud UI is built using React Redux. As the scale of our web application and the number of developers grow, it becomes increasingly imperative to focus on three key issues:
- Code readability
- Code reusability
- Test coverage for both unit tests and integration tests
To address these issues, we migrated our React components to utilize React Hooks. This blog post provides insight into the benefits of React Hooks and presents examples that explain how we refactored traditional React containers and components to React Hooks in the Confluent UI. Along the way, our team learned some lessons, such as how to properly apply memoization when using Hooks. This blog post dives deep into the benefits and lessons learned from using Hooks in our frontend codebase.
Benefits
Using React Hooks provides three benefits: reusability, readability, and testability.
Reusability
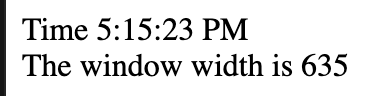
One benefit of React Hooks is that you can decouple unrelated logic code from lifecycle methods. For example, consider a component called “Updating Clock and Resize” that does just two things:
- Updates a clock every second
- Adds a listener to the resize event and displays the updated content
The following is a screenshot of this fictional component:
Below is an implementation of the class component:
import React from "react";

class Component extends React.Component {
 constructor(props) {
   super(props);
   this.tickId = null;
   this.resizeListener = null;
   this.state = {
     time: new Date().toLocaleTimeString(),
     windowWidth: window.innerWidth
   };
 }

 componentDidMount() {
   this.tickId = setInterval(() => {
     this.setState({ time: new Date().toLocaleTimeString() });
   }, 1000);
   this.resizeListener = () => {
     this.setState({ windowWidth: window.innerWidth });
   };
   window.addEventListener("resize", this.resizeListener);
 }

 componentWillUnmount() {
   clearInterval(this.tickId);
   window.removeEventListener("resize", this.resizeListener);
 }

 render() {
   return (
     <div>
       <div>Time {this.state.time}</div>
       <div>The window width is {this.state.windowWidth}</div>
     </div>
   );
 }
}
export default Component;
One downside to this approach is that you mix both setInterval and addEventListener in your componentDidMount. You generally want to avoid building out apps in lifecycle methods (i.e., componentDidMount, componentDidUpdate, and componentWillUnmount) because your code becomes more tightly coupled and less scalable as your logic gets more complex—and not to mention more difficult to understand.
Fortunately, you can separate the setInterval and addEventListener into two useEffect Hooks after refactoring the component. Moreover, if you would like to reuse the setInterval and addEventListener in different components, you can define two custom Hooks, such as useInterval and useEventListener.
Before you put together these custom Hooks, take a look at a Hook called useEventCallback from Formik. useEventCallback utilizes useRef to store the updated callback function into a mutable ref and returns a memoized callback. In other words, you want to ensure that the reference to your savedCallback never changes, as it will be used as a dependency for your useEffect. You can read more about useEffect and dependency array in the article Using the Effect Hook.
// from formik’s useEventCallback
// that stores the callback in a mutable Hook when fn is updating
// and the callback's reference address will not be changed
function useEventCallback(fn) {
 const ref = React.useRef(fn);
 useEffect(() => {
   ref.current = fn;
 }, [fn]);
 return React.useCallback((...args) => ref.current.apply(void 0, args), []);
}
Then, extract the logic for useInterval and useEventListener:
function useInterval (fn, delay){
 const savedCallback = useEventCallback(fn);
 useEffect(() => {
   if (delay != null) {
     const tickId = setInterval(savedCallback, delay);
     return () => {
       clearInterval(tickId);
     };
   }
 }, [delay, savedCallback]);
};

function useEventListener(event, fn) {
 const savedCallback = useEventCallback(fn);
 useEffect(() => {
   window.addEventListener(event, savedCallback);
   return () => {
     window.removeEventListener(event, savedCallback);
   };
 }, [event, savedCallback]);
}
Now, it’s time to directly reuse useInterval and useEventListener in the original implementation (see the source code for reference):
const getCurrentLocalTimeString = () => new Date().toLocaleTimeString();
const getWindowWidth = () => window.innerWidth;

export default function Component(props) {
  const [time, setTime] = useState(getCurrentLocalTimeString);
  const [windowWidth, setWindowSize] = useState(getWindowWidth);

  useInterval(() => {
    setTime(getCurrentLocalTimeString());
  }, 1000);

  useEventListener("resize", () => {
    setWindowSize(getWindowWidth());
  });

  return (
    <div>
      <div>Time (time)</dev>
      <div>The window width is (windowWidth)</div>
    </div>
  );
}
With React Hooks reusing component logic, you can now see the logic behind setInterval and setEventListener from the component, which immediately makes the code cleaner. In addition, two new useful custom Hooks are created that enhance the reusability of the codebase.
Readability
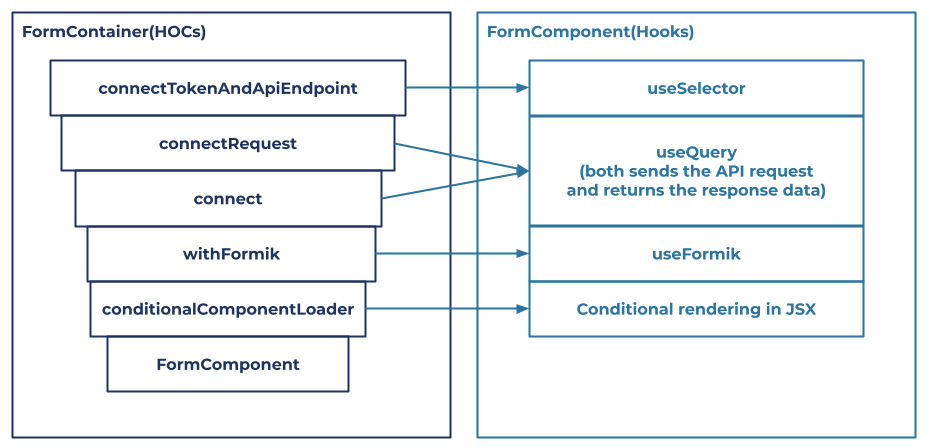
Like most React apps at the time (prior to React 16.7), the Confluent UI was divided into two categories: containers and presentational components, as suggested by Dan Abramov. A container was typically composed with a variety of higher-order components (HOCs) to reuse the logic and inject data. The presentational components received the data and callbacks via props passed from the containers.
Two common issues with using HOCs include the use of render props and the potential to have components surrounded by layers of providers, consumers, higher-order components, render props, and other abstractions—otherwise known as wrapper hell. The following uses the topic edit form in the Confluent UI as an example of wrapper hell.
The form container has the following logic:
- Inject the API endpoint and token from the Redux store
- Send a request using the API endpoint and token from step 1
- Inject the API response from the Redux store
- Inject and initialize a Formik form using the response from API
- Conditionally render the component if the API is fetching or failed
const FormContainer = compose(
  connectTokenAndApiEndpoint,           // get token/endpoint from redux store
  connectRequest(mapPropsToRequestFn1), // send query to api
  connect(mapStateToPropsFn1),          // inject redux’s data to component
  withFormik(formikProps),              // inject formik props
  conditionalComponentLoader,           // render loading component
)(FormComponent);
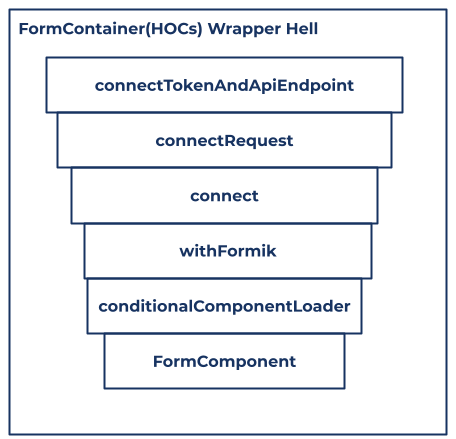
The code produces several nested wrappers in React, as shown in the figure above. Developers new to React may find it difficult to understand the purpose of each nested wrapper. Moreover, it is also difficult to figure out the data relationship between containers and presentational components.
Below is an alternative look at the same component using React Hooks:
import React from "react";
import { useSelector } from "react-redux";
import { useQuery } from "react-query";
import { useFormik } from "formik";

function Form(props) {
 const apiEndpoint= useSelector((state) => state.apiEndpoint);
 const token = useSelector((state) => state.token);
 const { isLoading, error, data } = useQuery(
   "getFormData",
   getFormData({ apiEndpoint, token, ... })  //inject data from props+redux
 );
 const formikProps = useFormik({
   initialValues: { ...data, ... },          //inject data from props
   onSubmit: (values) => {}
 });
 if (isLoading) {
   return "loading";
 }
 if (error != null) {
   return "error";
 }
 return <form onSubmit={formikProps.handleSubmit}>...</form>;
}

export default Form;
The following figure shows the mapping between HOCs and Hooks. Compared to the HOCs solution, the Hooks approach provides cleaner logic and a better way to understand the relationship between the data and component.
Now the data flow and logic is cleaner:
- Get apiEndpoint and token from Redux’s store by useSelector
- Send an API request with apiEndpoint and token from step 1
- Get the response data from the API request and pass the response data as initial values for the form
- Conditionally render the component if the API is fetching or returned a failed response
As a result, you may consider using Hooks to replace old HOCs and render props to improve the readability of your React application.
Testability
A common testing pattern in React is to test container and presentational components separately. This works for unit tests. However, if one container is composed of several HOCs, you will be required to test the container and components together in order to do the integration tests, which is generally more cumbersome.
After applying Hooks in a React app, containers and a component can be combined into one component. Thanks to the react-testing-library, it is easier to test the component with multiple custom Hooks. Furthermore, it makes it easier to write separate unit tests for customized Hooks.
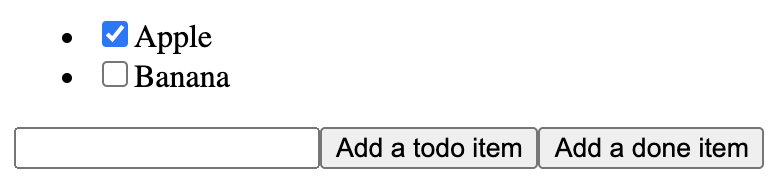
For example, let’s test the following Hook useToggleSelectionSet (see source code for reference) with a component TodoList. The TodoList contains two props:
- items: the whole items of TodoList
- preSelections: the items will be marked as done when added to the list
import { useToggleSelectionSet } from "./useToggleSelectionSet";

export const TodoList = ({ items, preSelections }) => {
  const [selectionSet, toggleSelectionItem] = useToggleSelectionSet(
    preSelections
  );
  return (
    <ul>
      {items.map((item) => {
        return (
          <li key={item}>
            <input
              data-testid={`${item}-checkbox`}
              checked={selectionSet.has(item)}
              onChange={(event) =>
                toggleSelectionItem(item, event.target.checked)
              }
              type="checkbox"
            ></input>
            <span>{item}</span>
          </li>
        );
      })}
    </ul>
  );
};
import { useCallback, useEffect, useState } from "react";

export function useToggleSelectionSet(preSelections) {
  const [selectionSet, setSelectionSet] = useState(
    () => new Set(preSelections)
  );
  // toggle an item between selected and unselected
  const toggleSelectionItem = useCallback((item, isChecked) => {
    setSelectionSet((prevSet) => {
      const newSet = new Set(prevSet);
      if (isChecked) {
        newSet.add(item);
      } else {
        newSet.delete(item);
      }
      return newSet;
    });
  }, []);

  // keep the old selections and appending new preSelections
  useEffect(() => {
    setSelectionSet((prevSelectionSet) => {
      const newSelections = preSelections.filter(
        (item) => !prevSelectionSet.has(item)
      );
      if (newSelections.length > 0) {
        return new Set([...prevSelectionSet, ...newSelections]);
      }
      return prevSelectionSet;
    });
  }, [preSelections]);

  return [selectionSet, toggleSelectionItem];
}
With the react-testing-library’s help, it is easy to test a component during the rerendering process. For example, the TodoList component test first renders with the items “Apple” and “Banana,” with “Apple” selected.
Here is the corresponding code:
    const { getByTestId, rerender } = render(
      <TodoList items={["Apple", "Banana"]} preSelections={["Apple"]} />
    );
You can also check whether “Apple” is selected and whether “Banana” is not selected:
    // Apple is pre selected
    expect(getByTestId("Apple-checkbox")).toHaveProperty("checked", true);
    expect(getByTestId("Banana-checkbox")).toHaveProperty("checked", false);
Now imagine you’ve added “Cat” to the list, so the items are now “Apple,” “Banana,” and “Cat.” And you would like to select the newly added item “Cat.”
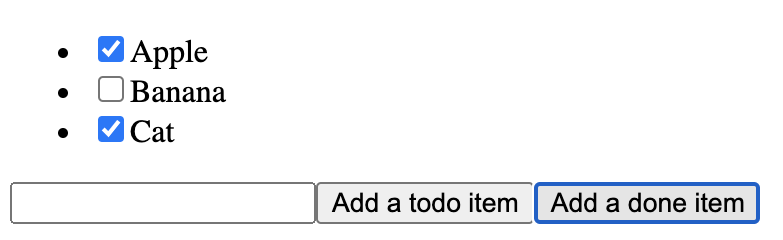
You can simulate this using rerender with your updated props and check whether “Apple” is still selected.
    rerender(
      <TodoList items={["Apple", "Banana", "Cat"]} preSelections={["Cat"]} />
    );

    // Apple's selection is still there
    expect(getByTestId("Apple-checkbox")).toHaveProperty("checked", true);
In addition, you can use fireEvent to test the checkbox’s functionality:
    // check toggle click
    fireEvent.click(getByTestId("Banana-checkbox"));
    expect(getByTestId("Banana-checkbox")).toHaveProperty("checked", true);
    fireEvent.click(getByTestId("Banana-checkbox"));
    expect(getByTestId("Banana-checkbox")).toHaveProperty("checked", false);
The resulting unit test would look like this:
import { render, fireEvent } from "@testing-library/react";
import { TodoList } from "../TodoList";

describe("TodoList", () => {
  it("TodoList keep the old list selections when there are new items", () => {
    const { getByTestId, rerender } = render(
      <TodoList items={["Apple", "Banana"]} preSelections={["Apple"]} />
    );
    // Apple is pre selected
    expect(getByTestId("Apple-checkbox")).toHaveProperty("checked", true);
    expect(getByTestId("Banana-checkbox")).toHaveProperty("checked", false);

    rerender(
      <TodoList items={["Apple", "Banana", "Cat"]} preSelections={["Cat"]} />
    );

    // Apple's selection is still there
    expect(getByTestId("Apple-checkbox")).toHaveProperty("checked", true);
    expect(getByTestId("Cat-checkbox")).toHaveProperty("checked", true);

    // check toggle click
    fireEvent.click(getByTestId("Banana-checkbox"));
    expect(getByTestId("Banana-checkbox")).toHaveProperty("checked", true);
    fireEvent.click(getByTestId("Banana-checkbox"));
    expect(getByTestId("Banana-checkbox")).toHaveProperty("checked", false);
  });
});
Lastly, it is cleaner and more intuitive to test the useToggleSelectionSet Hook by itself with the React Hooks Testing Library than to create a full integration test with TodoList.
import { renderHook, act } from "@testing-library/react-hooks/dom/pure";
import { useToggleSelectionSet } from "../useToggleSelectionSet";

describe("useToggleSelectionSet", () => {
  it("useToggleSelectionSet keep the old selections when there are new preSelections", () => {
    const hook = renderHook(
      (preSelections) => useToggleSelectionSet(preSelections),
      { initialProps: ["Apple"] }
    );
    let [selectionSet, handleToggleItem] = hook.result.current;
    // Apple is pre selected
    expect(selectionSet).toMatchObject(new Set(["Apple"]));

    // check toggle
    act(() => {
      handleToggleItem("Banana", true);
    });
    [selectionSet] = hook.result.current;
    expect(selectionSet).toMatchObject(new Set(["Apple", "Banana"]));

    // rerender with new props
    hook.rerender(["Cat"]);
    [selectionSet] = hook.result.current;
    // Apple's selection is still there
    expect(selectionSet).toMatchObject(new Set(["Apple", "Banana", "Cat"]));
  });
});
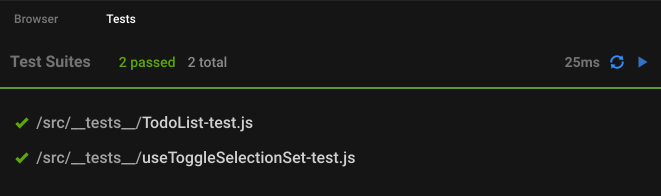
Everything looks good! Both the component and Hook tests have passed.
Another vital part of React Hook testing is the capability of mocking out modules. Mocking Hooks is easier than mocking HOCs because the former is similar to mocking a function.
More lessons learned
While React Hooks solve wrapper hell well and improve the readability and reusability significantly in the codebase, it’s not a silver bullet. This section shares a couple of pitfalls that we encountered while migrating to React Hooks due to unmemoized code.
Pitfall 1: Unnecessary rerendering
It’s a challenge to figure out the unnecessary rerendering when migrating to Hooks. For example, you may migrate React Redux’s connect HOC to the useSelector Hook. With the connect HOC, all fields are combined into an object by the mapStateToProps function. The connected component will not rerender if all fields in the object are the same as the previous one. For example, the ConnectedComponent will not be rendered if the age and name are not changed.
function mapStateToProps(state, props) {
 return {
   age: state.age,
   name: state.name
 };
}
const ConnectedComponent = connect(mapStateToProps)(MyComponent);
However, if you replace connect with useSelector, there will be unnecessary rerendering.
function MyComponent(state, props) {
 const mappedProps = useSelector((state) => ({
   age: state.age,
   name: state.name
 }));
 ...
}
In this example, the mappedProps object is recreated whenever an action is dispatched to the Redux store, so the mappedProps is not the same as the previous one, which leads to unnecessary rerendering. Passing shallowEqual to useSelector, or calling useSelector multiple times separately, with each returning an individual value, may solve this problem.
Additionally, useSelector is a Hook, not an HOC, so it cannot wrap a component with React.PureComponent as connect() did. Therefore, even if a component’s props and all returned data from useSelector are not changed, the component may still be rerendered unnecessarily.
To solve this problem, you may consider using React.memo to optimize the performance. Moreover, useMemo and useCallback are also handful Hooks for memoization.
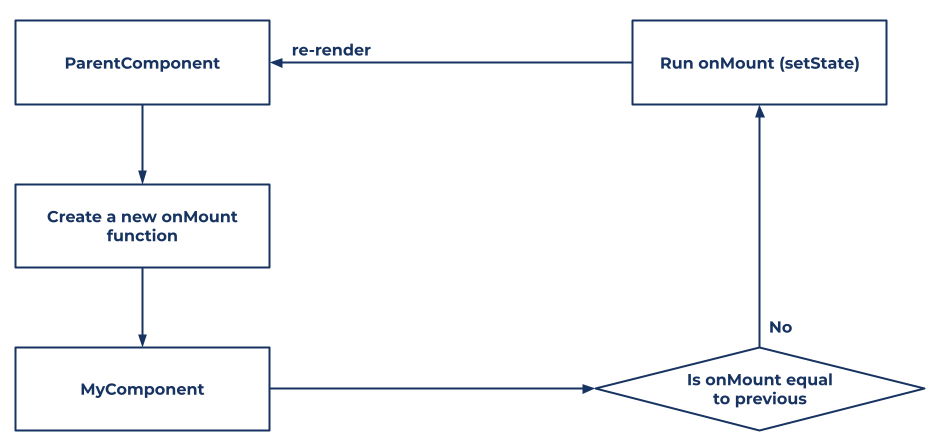
Pitfall 2: Infinite rerendering
When migrating from class components to Hooks, it is common practice to replace the componentDidMount method with a useEffect. However, if a developer includes a callback as a dependency of useEffect, and the callback contains setState from its parent’s component, you may encounter an infinite rerendering issue.
Consider the following class component with a prop onMount. The onMount method will only be invoked once when the component mounts.
class MyComponent extends Component {
  componentDidMount() {
    const onMount = this.props.onMount;
    onMount && onMount();
  }
  ...
}
In its parent component, the onMount method is created with an inline function that includes a setState method.
<MyComponent
onMount={()=>{
setState(state => {...})
}}
...
/>
When refactoring to React Hooks, the code looks like this:
function MyComponent (props) {
  const {onMount} = props;
  useEffect(()=> {
    onMount();
  }, []);
 ...
}
If the onMount prop changes, you want to fire the new event, so we added onMount to the dependency array of useEffect.
useEffect(()=> {
   onMount();
// added a depen
}, [onMount]);
However, the onMount is created by an inline function, which is never the same as the previous onMount during rerendering. Unfortunately, we forget to memoize this function properly. Moreover, onMount includes setState from the parent component, which will trigger a rerender from a parent component. Thus, it leads to an infinite rerendering process displayed in the figure below. Eventually, the page will crash.
There are two ways to solve this bug:
- Wrap onMount with useCallback from the parent component.
const onMount = useCallback(()=>{setState(state=>{...})} ,[]);Now onMount is memoized since the dependency array of useCallback is empty. Therefore, the onMount will only be invoked once, which will not lead to additional rerendering. However, the useCallback approach requires all parent components to wrap the onMount with useCallback. To solve this problem, there is a second option.
- Wrap onMount with useEventCallback.If MyComponent is shared with multiple components and you forget to wrap one of the components’s onMount with useCallback, the bug still exists. In that case, you should solve the problem in your child component.As mentioned earlier in the “Updating Clock” example, the output of useEventCallback will be memoized. You may wrap the onMount with useEventCallback. Since memodOnMount is memoized, the memodOnMount in useEffect will not execute infinitely.
function MyComponent (props) {
  const {onMount} = props;
  const memodOnMount = useEventCallback(onMount);
  useEffect(()=> {
    memodOnMount();
  }, [memodOnMount]);
  ...
}
Hooks without memoization will result in these issues. Thus, when using React Hooks, attention must be paid to memoizing and especially to the variable that is part of the dependency array.
Pitfall 3: Side effects in other components during rendering
Sometimes it is possible to forget to wrap useEffect when calling setState or dispatch from Redux, for example:
function MyForm(props) {
 const { setOpenModal } = props;
 const [{ success }, submit] = useFormSubmit();
 const dispatch = useDispatch();
// We should not call dispatch or setState during render
 if (success) {
   dispatch(push("/fakepath"));
   setOpenModal(false);
 }
 return <form onSubmit={(values) => submit(getFakeQuery(values))}>...</form>;
}
React throws warnings for some updates while rendering:
Warning: Cannot update a component from inside the function body of a different component.
Wrapping dispatch/setState with useEffect solves the problem:
useEffect(() => {
  if (success) {
    dispatch(push("/fakepath"));
    setOpenModal(false);
  }
}, [...]);
Conclusion
React Hooks significantly improves code reusability, readability, and ease of integration testing. At Confluent, we’ve learned to address rendering issues by properly applying memoization when using React Hooks. To help you apply React Hook best practices, be sure to familiarize yourself with React Hooks’ rules and FAQ.
And if you haven’t already, get started with fully managed Apache Kafka® as a service. When you sign up, you’ll receive $400 to spend within Confluent Cloud during your first 60 days. You can also use the promo code CL60BLOG to receive $60 of additional free usage.*
Get started with Confluent, for free
Watch demo: Kafka streaming in 10 minutes
Did you like this blog post? Share it now
Subscribe to the Confluent blog


Schema Registry Clients in Action
Learn about the bits and bytes of what happens behind the scenes in the Apache Kafka producer and consumer clients when communicating with the Schema Registry and serializing and deserializing messages.

How to Securely Connect Confluent Cloud with Services on Amazon Web Services (AWS), Azure, and Google Cloud Platform (GCP)
The rise of fully managed cloud services fundamentally changed the technology landscape and introduced benefits like increased flexibility, accelerated deployment, and reduced downtime. Confluent offers a portfolio of fully managed...