[Webinar] Harnessing the Power of Data Streaming Platforms | Register Now
How to Build a Scalable ETL Pipeline with Kafka Connect
Get started with Confluent, for free
Watch demo: Kafka streaming in 10 minutes
Apache Kafka is a high-throughput distributed message system that is being adopted by hundreds of companies to manage their real-time data. Companies use Kafka for many applications (real time stream processing, data synchronization, messaging, and more), but one of the most popular applications is ETL pipelines. Kafka is a perfect tool for building data pipelines: it’s reliable, scalable, and efficient.
Until recently, building pipelines with Kafka has required significant effort: each system you wanted to connect to Kafka required either custom code or a different tool, each new tool used a different set of configurations, might assume different data formats, and used different approaches to management and monitoring. Data pipelines built from this hodgepodge of tools are brittle and difficult to manage.
Kafka Connect is designed to make it easier to build large scale, real-time data pipelines by standardizing how you move data into and out of Kafka. You can use Kafka connectors to read from or write to external systems, manage data flow, and scale the system—all without writing new code. Kafka Connect manages all the common problems in connecting with other systems (scalability, fault tolerance, configuration, and management), allowing each connector to focus only on how to best copy data between its target system and Kafka. Kafka Connect can ingest entire databases or collect metrics from all your application servers into Kafka topics, making the data available for stream processing with low latency. An export connector can deliver data from Kafka topics into secondary indexes like Elasticsearch or into batch systems such as Hadoop for offline analysis.
Confluent Platform now ships with Kafka Connect and includes three connectors: one for moving files, a JDBC connector for SQL databases, and an HDFS connector for Hadoop (including Hive). Both the JDBC and HDFS connector offer useful features for you to easily build ETL pipelines.
The JDBC connector allows you to import data from any relational database with a JDBC driver (such as MySQL, Oracle, or SQL Server) into Kafka. By using JDBC, this connector can support a wide variety of databases without requiring custom code for each one.
Data is loaded by periodically executing a SQL query and creating an output record for each row in the result set. By default, all tables in a database are copied, each to its own output topic, making it easy to ingest entire databases into Kafka. The database is monitored for new or deleted tables and adapts automatically. When copying data from a table, the connector can load only new or modified rows by specifying which columns should be used to detect changes.
The HDFS connector allows you to export data from Kafka topics to HDFS files in a variety of formats and integrates with Hive to make data immediately available for querying with HiveQL.
The HDFS connector consumes data continuously from Kafka and writes it to HDFS. The data from each Kafka topic can be partitioned in a variety of ways and is divided into chunks. Each chunk of data is represented as an HDFS file with topic, Kafka partition, and the chunk’s start and end offsets in the filename. If no partitioning is specified, the default partitioner simply organizes data by the Kafka topic and partition. The size of each data chunk can be controlled by the number of records, the amount of time spent writing the file, and schema compatibility.
The HDFS connector can optionally integrate with Hive. When enabled, the connector automatically creates an external Hive partitioned table for each Kafka topic and updates the table according to the available data in HDFS.
In this blog, we’ll demonstrate how to use Kafka Connect, together with the JDBC and HDFS connectors, to build a scalable data pipeline. We will also demonstrate some useful features of the JDBC and HDFS connectors, such as database change capture, schema migration, and custom partitioning.
Building a Scalable ETL Pipeline in 30 Minutes
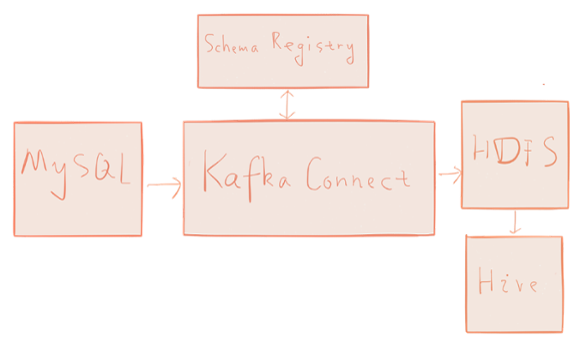
To demonstrate Kafka Connect, we’ll build a simple data pipeline tying together a few common systems: MySQL → Kafka → HDFS → Hive. The pipeline captures changes from the database and loads the change history into the data warehouse, in this case Hive.
In the MySQL database, we have a users table which stores the current state of user profiles. In addition to common user profile information, the users table has a unique id column and a modified column which stores the timestamp of the most recent user profile change.
We simulate user profile changes by updating the corresponding entry in the users table. The JDBC Kafka connector will automatically capture those user profile changes and write each as an event to Kafka. Then, the HDFS Kafka connector will write those events to files in HDFS. The data that ultimately ends up in Hadoop will be the edit history of user profiles, ready for analysis using Hive or Spark.
To help bootstrap the environment required to try this example for yourself, we’ve created a virtual machine you can use to follow along with the example in this post and a repository with the source code and Vagrant scripts. Both include Confluent Platform 2.0, Apache Hadoop and Apache Hive.
Getting Started
You can either use the prebuilt virtual machine or Vagrant to run the demo. We provide instructions on how to get started with both.
Prebuilt Virtual Machine
To use the prebuilt virtual machine, you need to have Virtualbox or VMware installed. In Virtualbox, use File->Import Appliance to import the pre-built virtual machine. Once the virtual machine is started, login to the virtual machine with username vagrant and password vagrant.
Vagrant
To use Vagrant, make sure you have vagrant installed. You can download and install Vagrant at https://www.vagrantup.com.
$ git clone https://github.com/confluentinc/kafka-connect-blog
$ cd kafka-connect-blog
$ vagrant up
Once Vagrant finishes starting up the virtual machine, you can login into the virtual machine using:
$ vagrant ssh
In what follows, all the commands are running in the virtual machine. If you’re comfortable with tools such as screen or tmux, you may find them helpful to have multiple terminals open for different steps.
Environment Setup
In the virtual machine, first run
$ ./setup.sh
The setup.sh script accomplishes the following things:
- Download and install MySQL server. The install script also starts the MySQL server.
- Download the MySQL JDBC driver. The MySQL JDBC driver will be used by the Hive metastore and the Kafka Connect JDBC connector.
- Configure the Hive Metastore using the MySQL database.
Then start necessary services:
$ ./start.sh
The start.sh script accomplishes the following things:
- Start necessary services for Kafka Connect. As Kafka Connect uses Kafka to transfer data, we need to start Kafka. Also, the data written in HDFS is in Avro format, so we need the Schema Registry running to store the Avro schemas for the data.
- Start Hadoop. We have a single node HDFS cluster running at hdfs://localhost:9000
- Start the Hive metastore. We use the MySQL database as the storage for the Hive metastore. The URI of the Hive metastore is thrift://localhost:9083
Data Preparation
Now we need to create some data in the MySQL database. We will create a users table to represent the user profiles. The autoincrement id column is the primary key and the modified column saves the timestamp of the most recent update of each user profile. The modified column will be filled with the current timestamp if we omit the value during insert.
$ mysql -u root --password="mypassword"
mysql> CREATE DATABASE demo;
mysql> USE demo;
mysql> CREATE TABLE users (
    ->   id serial NOT NULL PRIMARY KEY,
    ->   name varchar(100),
    ->   email varchar(200),
    ->   department varchar(200),
    ->   modified timestamp default CURRENT_TIMESTAMP NOT NULL,
    ->   INDEX `modified_index` (`modified`)
    -> );
mysql> INSERT INTO users (name, email, department) VALUES ('alice', 'alice@abc.com', 'engineering');
mysql> INSERT INTO users (name, email, department) VALUES ('bob', 'bob@abc.com', 'sales');
mysql> exit;
Using Kafka Connect to Ingest Data
Now we start Kafka Connect to ingest data from the MySQL database to Kafka then to HDFS. Note that data of the MySQL database will remain in Kafka after ingesting to HDFS and thus can be exported to other systems such as Cassandra, ElasticSearch, etc.
$ connect-standalone /mnt/etc/connect-avro-standalone.properties \
    /mnt/etc/mysql.properties /mnt/etc/hdfs.properties &
We’ll discuss the details of these properties files in more detail below, but the above command starts Kafka Connect with two connectors, one JDBC connector to import data from MySQL and one HDFS connector to export data from Kafka. You should see that the process starts up, logs some messages, and then exports data from Kafka to HDFS. The JDBC connector creates a Kafka topic with the name test_jdbc_users. The HDFS connector reads data from test_jdbc_users and writes data to HDFS under /topics/test_jdbc_users and creates a Hive external table with name test_jdbc_users.
Once the connector finishes ingesting data to HDFS, check that the data is available in HDFS using Hive:
$ hive
hive> SHOW TABLES;
OK
test_jdbc_users
hive> SELECT * FROM test_jdbc_users;
OK
1 alice alice@abc.com engineering 1450305345000
2 bob   bob@abc.com   sales       1450305346000
Not surprisingly, we have two records in test_jdbc_users which match the content in the users table in the MySQL database.
One notable thing is that in the demo, we configured the HDFS connector to use the FieldPartitioner. The related configurations for field partitioning in the HDFS connector are listed in the following table:
| partitioner.class | Specifies the partitioner to use when writing data to HDFS. In the demo, FieldPartitioner is used, which partitions the data to different directories according to the value of the partitioning field specified in partition.field.name. |
| partition.field.name | Specifies the partition field. |
In the demo, we used department as the partition field. To check the data in HDFS are actually partitioned by department:
$ hadoop fs -ls /topics/test_jdbc_users
Found 2 items
drwxr-xr-x   - vagrant supergroup          0 2015-12-16 22:45 /topics/test_jdbc_users/department=engineering
drwxr-xr-x   - vagrant supergroup          0 2015-12-16 22:45 /topics/test_jdbc_users/department=sales
We see that under /topics/test_jdbc_users/, we have two directories and each directory name has the form of department=value. The value part is determined by the department column in the MySQL users table.
The mysql.properties and hdfs.properties control the behavior of the JDBC and HDFS connectors respectively. You can find the detailed documentation for the configuration of these connectors at
- http://docs.confluent.io/current/connect/connect-jdbc/docs/index.html#configuration and
- http://docs.confluent.io/current/connect/connect-hdfs/docs/index.html#configuration.
Database Change Capture
Next, we demonstrate how the JDBC connector can perform database change capture. The configurations in the JDBC connector to capture changes are as follows:
| mode | Specifies how to capture database changes. In the demo, we combine an incrementing column with a timestamp column and incrementing to capture changes. This is the most robust and accurate mode. By combining the two, as long as the timestamp is sufficiently granular, each (id, timestamp) tuple will uniquely identify an update to a row. Even if an update fails after partially completing, unprocessed updates will are still correctly detected and delivered when the system recovers. |
| incrementing.column.name | Specifies the incrementing column. In the demo, we use the id column. |
| timestamp.column.name | Specifies the timestamp column to be used by the JDBC connector to capture changes of existing rows in tables. |
In the MySQL users table, the modified column stores the timestamp for last modification of a row. We change the user profiles by modifying the email column and set modified to current timestamp:
mysql>UPDATE users SET email = 'alice@def.com', modified = CURRENT_TIMESTAMP WHERE name='alice';
mysql>UPDATE users SET email = 'bob@ghi.com', modified = CURRENT_TIMESTAMP WHERE name='bob';
The JDBC connector detects that data in the users table have been changed as the modified column have updated values and will fetch modified data from database and copied to Kafka and eventually to HDFS. To verify that the modified data is in HDFS:
<hive> SELECT * FROM test_jdbc_users;
OK
1 alice alice@abc.com engineering 1450305345000
1 alice alice@def.com engineering 1450306396000
2 bob   bob@abc.com   sales       1450305346000
2 bob   bob@ghi.com   sales       1450306397000
Note that there are two more records for the Hive external table test_jdbc_users. The two new records matches the new content of the users table in the mysql database.
Here we simulate a simple ETL data pipeline from database to data warehouse, in this case, Hive. The data in Hive will be the full history of user profile updates and is available for future analysis with Hive and Spark.
Schema Migration
Finally, we’ll demonstrate how the HDFS connector can handle schema migration. The connector supports schema evolution and reacts to schema changes of data according to the schema.compatibility configuration. The schema.compatibility can be set to NONE, BACKWARD, FORWARD and FULL. We’ll only cover the most common mode, BACKWARD compatibility, but you can read more about schema evolution at http://docs.confluent.io/current/avro.html.
If a schema is evolved in a backward compatible way, we can always use the latest schema to query all the data uniformly. For example, removing fields is backward compatible change to a schema because when we encounter records written with the old schema that contain these fields we can just ignore them. Adding a field with a default value is another very common backward compatible schema change.
If BACKWARD is specified in the schema.compatibility setting, the connector keeps track of the latest schema used in writing data to HDFS, and if a data record with a schema version larger than current latest schema arrives the connector commits the current set of files and writes the data record with new schema to new files. For data records arriving at a later time with schema of an earlier version, the connector projects the data record to the latest schema before writing to the same set of files in HDFS.
If Hive integration is enabled, we need to specify the schema.compatibility to be BACKWARD, FORWARD or FULL. This ensures that the Hive table schema is able to query all the data under a topic written with different schemas. If the schema.compatibility is set to BACKWARD, the Hive table schema for a topic will be equivalent to the latest schema in the HDFS files under that topic that can query the whole data of that topic.
To make a backward compatible change in our source JDBC system, we drop a column in the users table in the database, effectively removing a field from the data.
mysql> ALTER TABLE users DROP COLUMN name;
mysql> INSERT INTO users (email, department) VALUES ('charlie@abc.com', 'sales');
mysql> INSERT INTO users (email, department) VALUES ('daniel@abc.com', 'engineering');
The Avro converter used by Kafka Connect will register a new schema with a higher version in Schema Registry. The HDFS connector detects the schema change and will react according to the schema.compatibility configuration. In the demo, we set schema.compatibility to be BACKWARD, which means that the table schema for test_jdbc_users will be equivalent to the latest Avro schema in the HDFS files under /topics/test_jdbc_users. As the data in HDFS are written with backward compatible schemas, the Hive table schema can be used to query whole data under /topics/test_jdbc_users, To verify:
hive> SELECT * FROM test_jdbc_users;
OK
1 alice@abc.com   engineering 1450305345000
1 alice@def.com   engineering 1450306396000
4 daniel@abc.com  engineering 1450306767000
2 bob@abc.com     sales       1450305346000
2 bob@ghi.com     sales       1450306397000
3 charlie@abc.com sales       1450306766000
We see that all the six records are in test_jdbc_users and the name column no longer appears. While it still exists in the old data files, it is ignored by the Hive query because the field is not included in the latest schema.
Summary
In this blog, we built an ETL pipeline with Kafka Connect combining the JDBC and HDFS connectors. This pipeline captures changes in the database and loads the change history to a data warehouse, in this case Hive.
We have also demonstrated some useful features offered by the JDBC Kafka connector and HDFS Kafka connector such as change capture, schema migration and custom partitioning. To learn more about Kafka Connect, including the design, architecture and usage, please visit http://docs.confluent.io/current/connect/index.html.
If you want to develop new connectors, please visit the developer guide at http://docs.confluent.io/current/connect/devguide.html.
Thanks to the team members who provided valuable feedback: Ewen Cheslack-Postava, Gwen Shapira, Jeff Hartley, Joe Adler, and Neha Narkhede.
Get started with Confluent, for free
Watch demo: Kafka streaming in 10 minutes
Did you like this blog post? Share it now
Subscribe to the Confluent blog


How to Process GitHub Data with Kafka Streams
Learn how to track events in a large codebase, GitHub in this example, using Apache Kafka and Kafka Streams.


Introducing Apache Kafka 3.7
Apache Kafka 3.7 introduces updates to the Consumer rebalance protocol, an official Apache Kafka Docker image, JBOD support in Kraft-based clusters, and more!